
I spend a whole lot of time cooking outdoors, so I decided to build and design an outdoor kitchen with help from BBQGuys.com.
Disclosure BBQGuys.com and Aspire by Hestan compensated me for this review. Opinions are my own.
Save this BBQ Tip
Enter your email, and I’ll send this link directly to your inbox. Plus, you’ll get new BBQ recipes and tips weekly.
Table of Contents
Where to start when designing an outdoor kitchen
Step 1 – Decide What Features You Want Your Kitchen to Have
When planning your outdoor kitchen, you first need to decide what functionality you’d like it to have. In addition to the grill, you can go with simple counters and cabinets, or you can add all sorts of features, ranging from cooktops to refrigerators and drawers to trash receptacles.
As you dream up the design, be mindful that some features may require utilities. For instance, a fridge will need electricity and a sink will require plumbing.
Personally, I wanted some drawers where I could store BBQ utensils, lighters and gloves. I also needed storage for charcoal and cast iron.
I go through paper towels like nobody’s business, so I wanted a sleek design for that. And I wanted a trash receptacle that could be tucked away from the critters.
Step 2 – Pick out Your Accessories
Browse through the BBQGuys.com website to select the style and brand of accessories you’d like to help you design your outdoor kitchen.
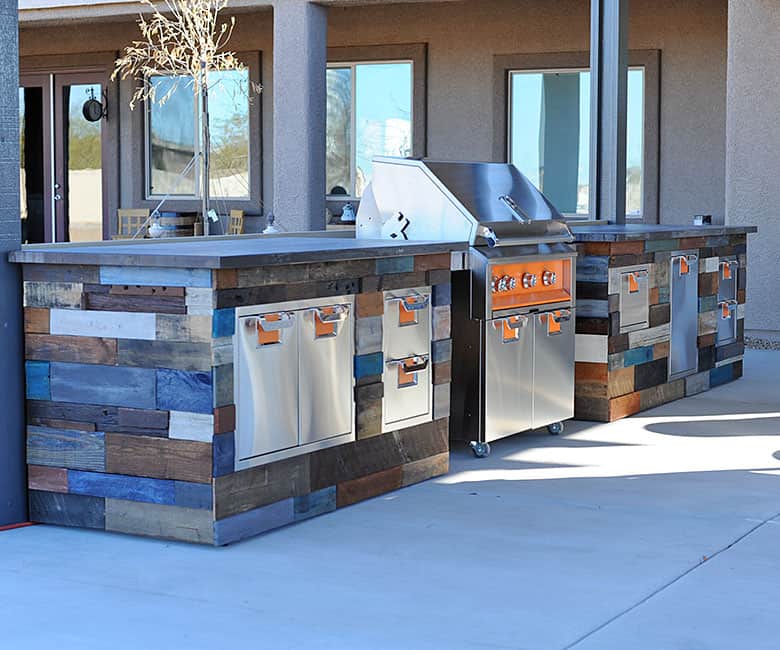
I have worked with Aspire by Hestan for over a year and love the quality of their gas grill, so I went with their accessory line, which is available at BBQGuys.com.
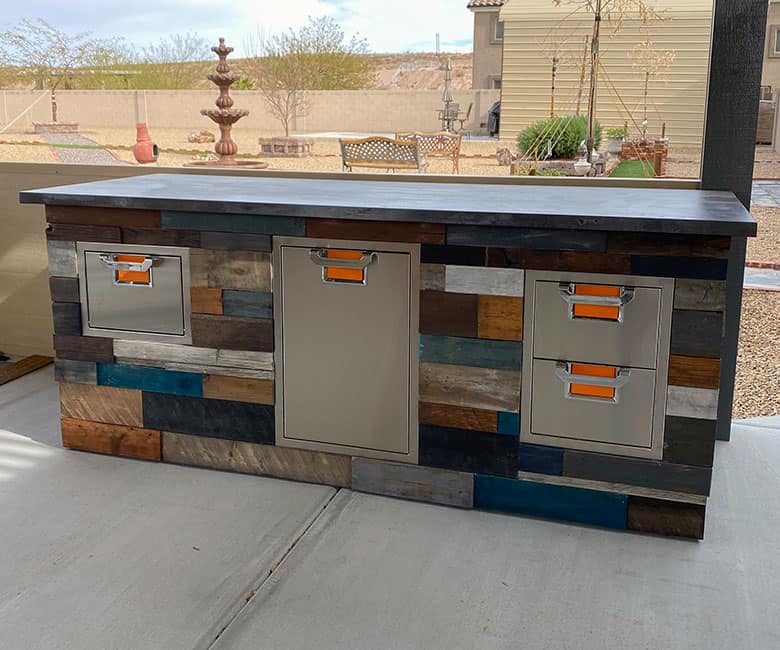
Each Aspire by Hestan accessory can be accented with a color inlay. I chose citra – which is gives my outdoor kitchen a pop of orange.

Each of the accessories you choose will ultimately be mounted into a cabinet frame that will be finished with decorative siding and counters.
Step 3 – Select Your Frame Kits
Once you know the dimensions of the accessories you want, work with BBQ Guys to figure out what size frame kits you’ll need. When I called, they were so awesome and patient with me, and they double-triple checked everything, to make sure my order was correct.
I decided to go with the Grillnetics Frame Kit. It uses wide, sturdy, yet lightweight, aluminum framing that won’t rust, and the sides are constructed of PermaBase cement board.
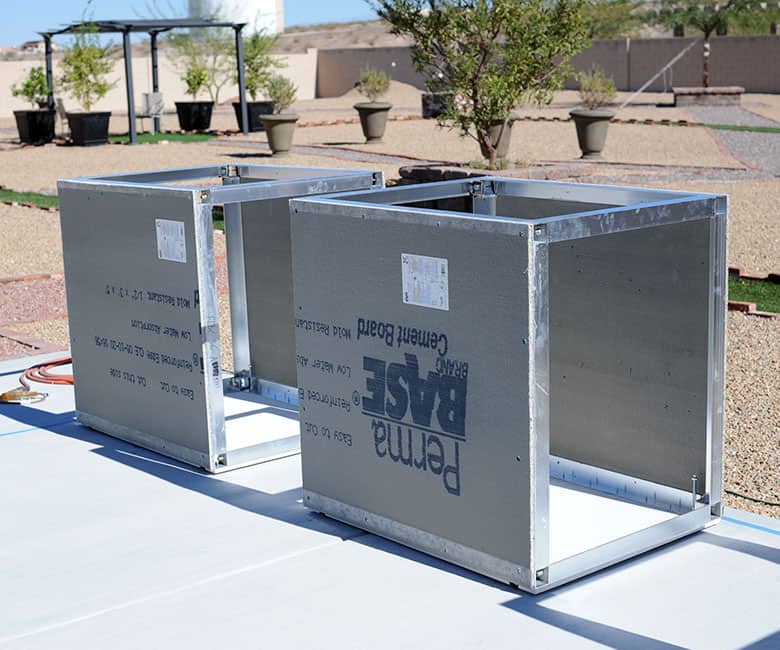
For accessories that are 30” wide, you’ll need the 36” cabinets, and for accessories that are 19” wide, you’ll need the 24” cabinets. Or you can get longer frame kits, if you’re just looking for longer counters without added accessories.
Each of the base cabinets get connected together to form the solid structure. For me, I ended up with two 3-foot bases and three 2-foot bases. When combined, I had one 5-foot base and one 7-foot base that flank both sides of my standalone Aspire by Hestan gas grill.
I originally was going to space them evenly to where I had two 6-foot counters, but I adjusted the layout during construction, because I liked the functionality of the design better. That’s one of the great advantages you have when you build your own outdoor kitchen. You can adapt as needed.
Step 4 – Make Sure Your Patio Space Is Large Enough
Some might argue that this should be step one, but I prefer to figure out my outdoor kitchen needs first and space later.
If you dreamed too big, you might have to scale back on accessories before placing your order. Or you can do what I did and just pour a bigger patio.
Be sure to plan out space for your cabinets and grill, plus space to walk around and hang out and room for patio cover columns, if you choose to cover your outdoor kitchen, which I do recommend.
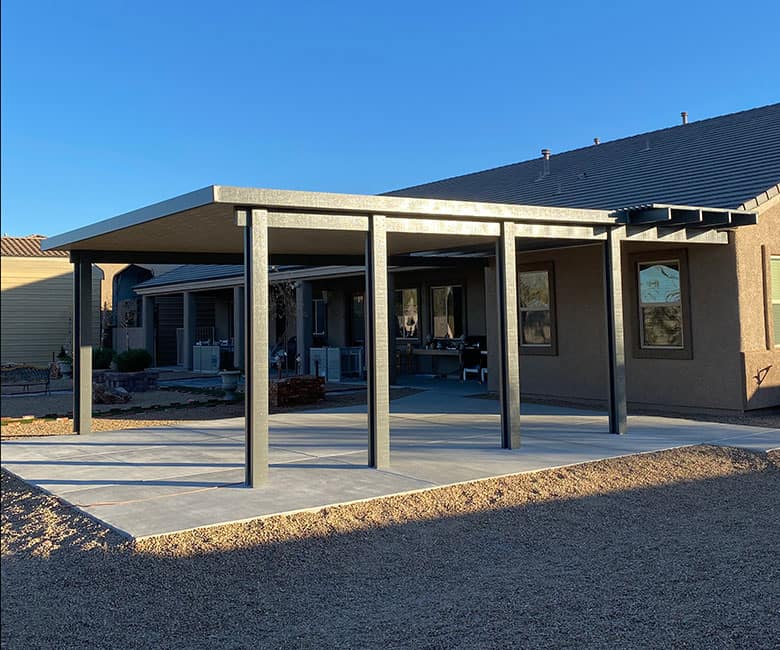
My main covered kitchen area is 20’ by 20’. I added some extra concrete around the sides and a covered walkway for even more functionality.
Step 5 – Order Your Outdoor Kitchen Components
Once you have everything planned out, go ahead and place your order for your grill, accessories and frame kit. With BBQGuys.com, shipping is free, and products usually leave the warehouse in 5-7 days.
Before assembling your cabinets, be sure to have everything else in place, including the concrete, utilities and patio cover. If you’re handy, you can do some of these things on your own, but I preferred to hire contractors to support local small businesses and ensure everything was built to code.
Once your slab is down and your patio cover is installed, you can build your outdoor kitchen.
View my step-by-step instructions for building an outdoor kitchen.
What’s the Best Outdoor Kitchen Countertop Material
There are many beautiful ways to finish your BBQ island. Personally, I chose the counter material first. Because I do a lot of food photography, I wanted a counter that looked great in food videos.
We went to several granite yards to look for different counters. From our research, we found that natural stone finishes like granite and quartzite were best for the elements, but even they had some cons.
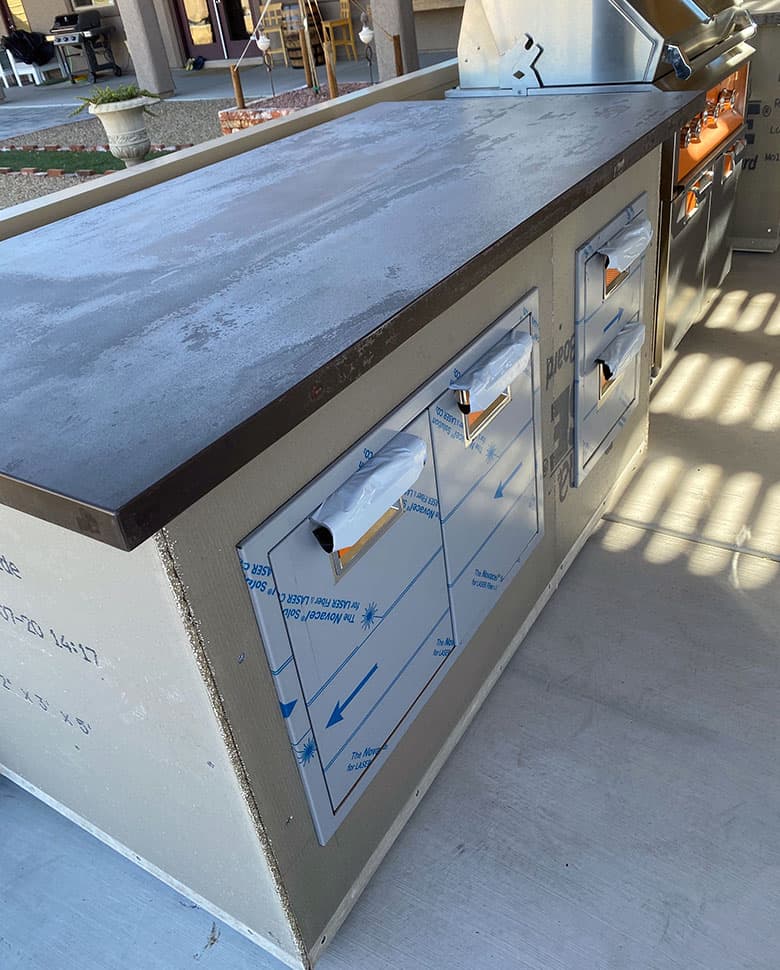
In the end, we found that a manufactured material called Dekton that was ideal for outdoor environments. And I fell in love with the Trilium color.
If we bought it at the yard, we were going to have to purchase the whole slab, even if we only needed a portion of the slab, and we were going to have to hire a fabricator. Instead, we went to Home Depot. Not only was it on sale, but they only charge you for the actual square feet you need, not the whole slab, and installation is included in the cost.
Pros and Cons of Different Outdoor Countertops
Granite is one of the most popular choices for outdoor kitchens, because it’s durable, withstands weather, won’t etch and comes in a variety of colors. It can have a tendency to stain, unless you occasionally coat it with a sealer.
Quartzite and quartz are not the same thing, and unfortunately, some of the assistants at the yards didn’t actually realize that, so be mindful about which you choose. Quartzite is natural stone. Quartz is engineered. Quartzite is a great choice for an outdoor counter. While quartz on the other hand will turn yellow after prolonged exposure to the sun.
Dekton is a manufactured material made of porcelain, glass and quartz. It doesn’t scratch, fade, stain or change colors. It’s more expensive than granite and quartzite, mainly because it’s more difficult to fabricate, but it will last the life of your kitchen.
Concrete is a less expensive alternative, but just like your outdoor patio slab, it may scratch, chip and change colors.
Marble is beautiful in indoor kitchens, but not so great outdoors. It tends to scratch easily and dull with exposure to weather. Like granite, it will also stain, unless sealed.
What Finishes Are Best for the Sides of the Cabinets
One of the most creative parts about designing an outdoor kitchen is deciding what finish to use on the sides. You have a lot of options. At BBQGuys.com, you can see the pros and cons of different finishes like stacked stone, brick, concrete, stucco and wood.
With that knowledge in hand, we took our counter sample with us to the tile and hardware stores and looked at so many varieties.
Since our outdoor kitchen has a standalone grill, and there are no live fire components built into our base, we decided to go with wood. If your grill is built into your cabinet, you should probably choose another material, because wood is combustible.
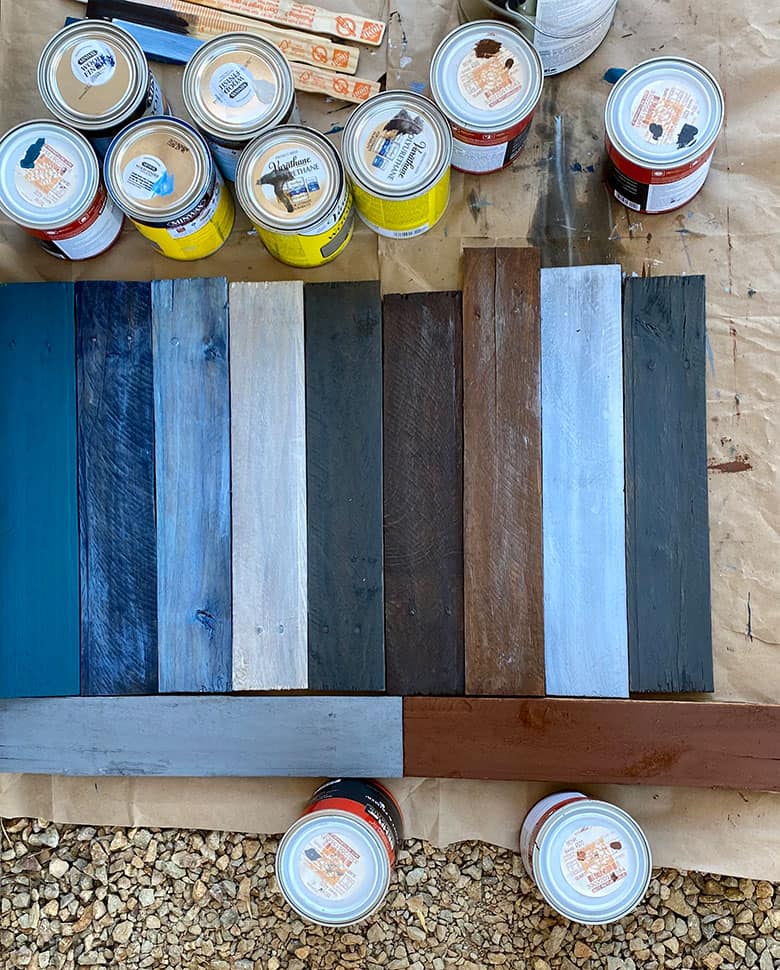
As we started calculating how many square feet of wood we were going to need, we realized that we had several wood pallets in the backyard. So, to save money, we cut the pallets, painted them in a variety of colors and installed that wood on the side with liquid nails and finishing nails.
Our cabinet rests against the wall, so I called Grillnetics to get their advice on how to finish the back. They agreed, there was no need to add fancy finishes. Instead, they said a coat of paint would be good to just give it a little extra protection.
Calculate the Size of Your Counters
Once your cabinets are built and connected and you’ve figured out what material you’re going to finish the sides with, you’ll know how wide the base cabinets will be. This will help you calculate your counter dimensions.
Measure the width of the base, plus the width of the side finishing. Then, I recommend having a 1.5-2” overhang along the front and side edges. This makes wiping away crumbs much easier, because you have room to slide your hand under the lip.
Calculations for the length of my left cabinet
Cabinet width = 60”
Wood finishing width left side = 1
Wood finishing width right side = 1”
Overhang on left side = 2”
Overhang on right side = 2”
Final counter width = 66”
Calculations for the length of my right cabinet
Cabinet width = 84”
Wood finishing width left side = 1″
Wood finishing width right side = 1”
Overhang on left side = 2”
Overhang on right side = 2”
Final counter width = 90”
Calculations for the depth of both cabinets
Cabinet depth = 29”
Wood finishing width front side = 1”
Overhang on front side = 2”
Overhang on back side = 2”
Final counter width = 34”
The Materials to Build This Exact Outdoor Kitchen
Here is a breakdown of all of the materials I used to build my outdoor kitchen.
Grillnetics Base Cabinets
Aspire by Hestan Accessories
30” Double Door (Citra finish)
2 Double Drawers (Citra finish)
Paper Towel Holder (Citra finish)
Trash Receptacle (Citra finish)
Finishes
3 pallets of wood broken down
5 quarts Behr Premium Plus flat exterior paint
Colors: Legendary Gray, Shadow Mountain, Tsunami, Brown Velvet, Baronial Brown
Varathane English Chestnut and Smoke Gray; Minwax Tinsmith Gray, Navy and Vintage Blue
While choosing to design an outdoor kitchen is an investment, if you spend a lot of time outdoors, you’ll be so satisfied, and not only will it improve your lifestyle, but if you ever end up selling your home, experts say that you can gain those expenses back when you go to sell.
But who am I kidding? With an outdoor kitchen like this, you’re not going anywhere…except outdoors.
View my step-by-step instructions for building an outdoor kitchen.


That turned out amazing! Dream outdoor kitchen!
Hubby and I have read and will reread your advice on building an outdoor kitchen. Your outdoor kitchen is dreamy ~ thanks for the detailed information it will help us to build a durable area to grill and entertain in for many years to come.
Thanks. I can’t wait to see the dream kitchen you build for your kids’ grilling classes.
You have covered every aspect in detail which really simplifies the process for someone designing their own kitchen, from deciding on features to choosing a countertop material. My personal experience is that while building an outdoor kitchen, it is also important to choose durable materials. Things like stone, wood, and concrete are great options as they can withstand different weather conditions. Plus, they provide additional insulation for the kitchen. Additionally, if one is opting for wood or concrete, try to opt for water and heat-resistant sealants to protect them from damage. All in all, an excellent article.
Creating an outdoor kitchen has been a dream of mine, and this article provides fantastic insights into the design process. I particularly love the emphasis on functionality while maintaining a stylish look. Incorporating weather-resistant materials like stainless steel not only ensures durability but also adds a sleek and modern touch. Personalizing the space with adequate seating and lighting truly makes it an extension of the indoor living area, perfect for hosting gatherings and enjoying the outdoors.