
I’ve just amplified my outdoor cooking game by adding a Nexgrill 2-Burner Propane Griddle from Home Depot to my arsenal. This product review includes assembly instructions and 3 meal suggestions to get you started.
Save this BBQ Tip
Enter your email, and I’ll send this link directly to your inbox. Plus, you’ll get new BBQ recipes and tips weekly.
Table of Contents
When you think of cooking outside, you probably think about firing up the grill or smoker, but every back patio should also include a griddle. It will add versatility to the types of meals you can create outdoors.
I partnered with the Home Depot to try out their exclusive Nexgrill 2-Burner Propane Gas Grill with Griddle Top, and I love cooking on it.
It’s basically like a huge cast iron pan in my backyard. I can breathe in the fresh air, listen to the birds chirping and sizzle up a feast without worrying about grease splatters on my kitchen floor.
I’m talking full-on pancake breakfasts and fajita fiestas. You can even transform yourself into a backyard Japanese hibachi chef.
Assembly is optional
As with most grills, the Nexgrill requires some assembly. While it’s easy enough to do yourself, The Home Depot will assemble it for you for free. That’s a service they offer for all grills you purchase in the store.
If you’d still prefer to assemble it yourself, here are the step-by-step instructions.
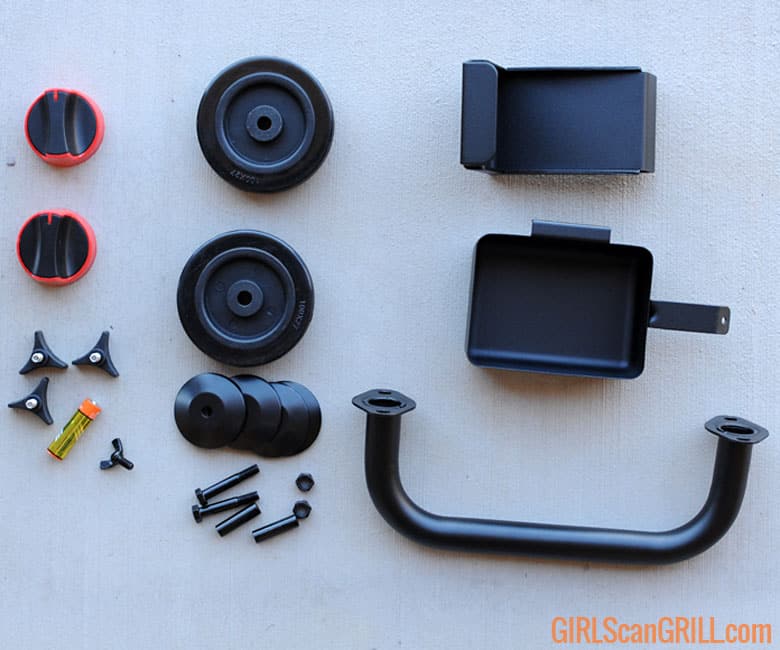
To start, unfold the legs. They tuck under the burners and clip into place, which is great when you want to collapse them back and transport the griddle to a tailgate.
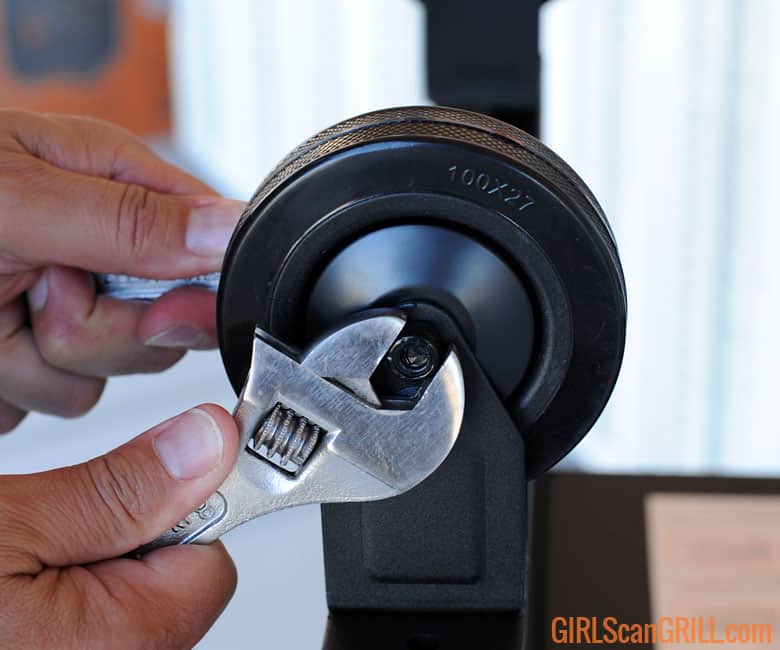
To add the wheels, you’ll need a couple of wrenches to tighten the nuts.
Then, you add the bottom shelf with wingnut screws. I appreciate that they used this type of screw, because it makes removal easy. When you want to collapse the grill, you don’t need to find your tools.
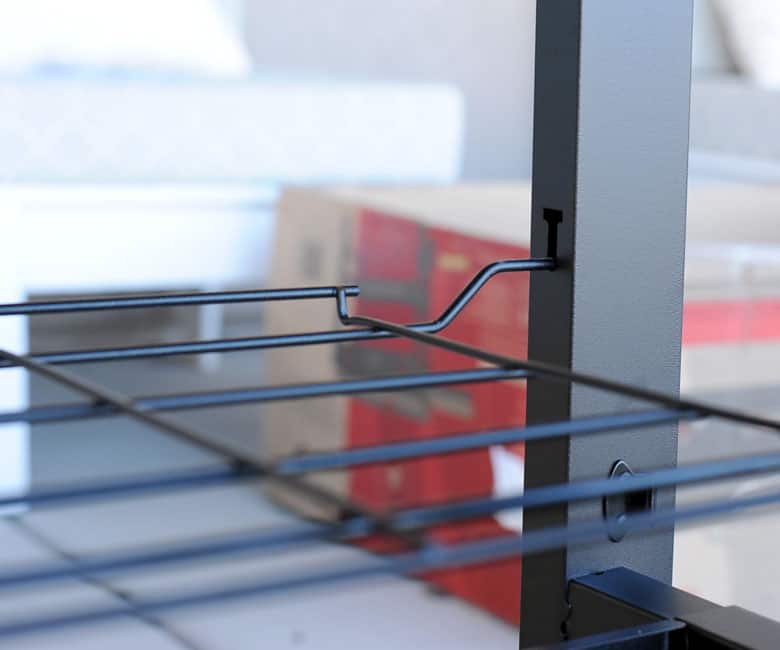
One shelf would be enough, but the Nexgrill also has a wire rack that rests above the bottom shelf. No tools are required. It just slides into mounting holes.
But wait, there’s also a side shelf. It slides into a couple slots on the left side of the griddle and gets secured with another wingnut screw.
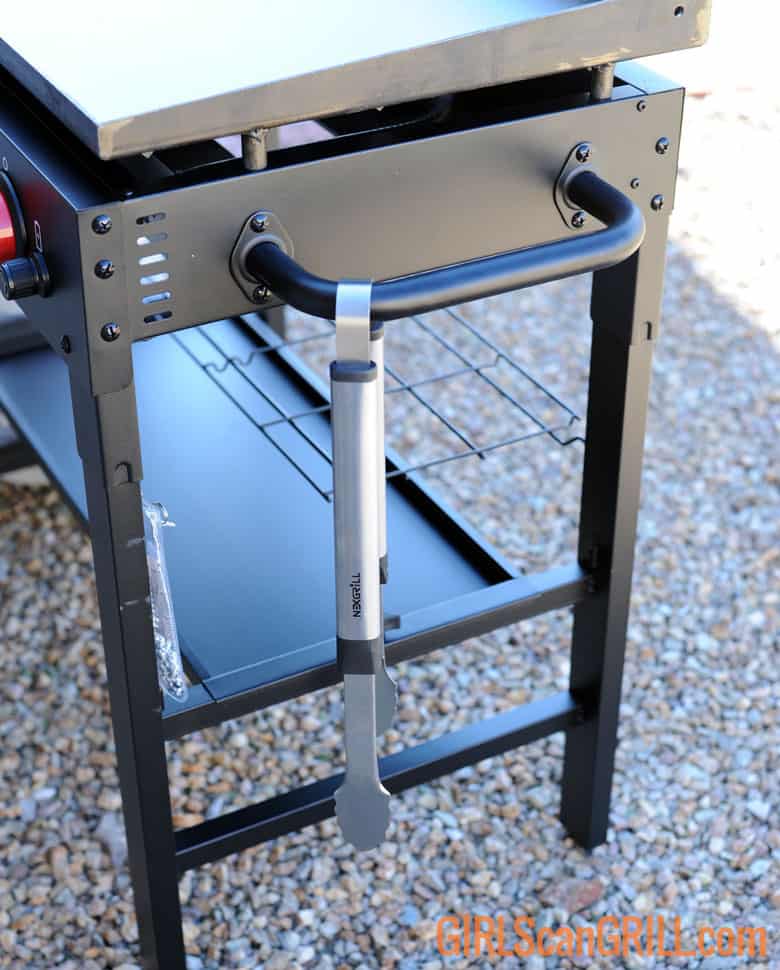
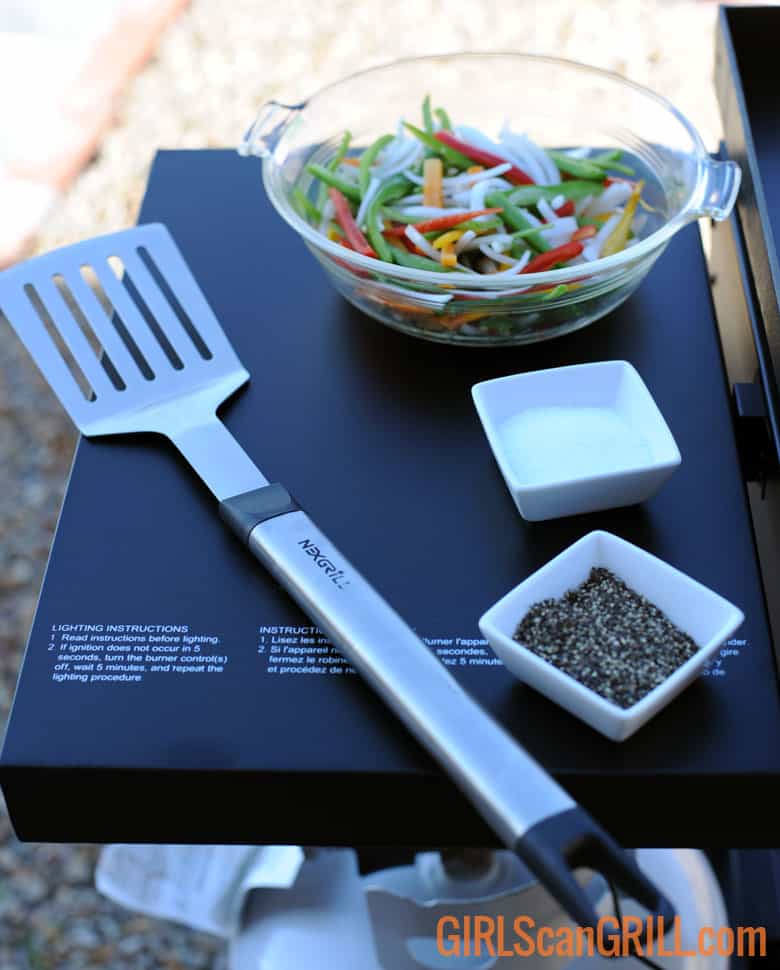
The last tool you’ll need is a Phillip’s head screwdriver to install the side handle. It’s also a great place to hang your tongs.

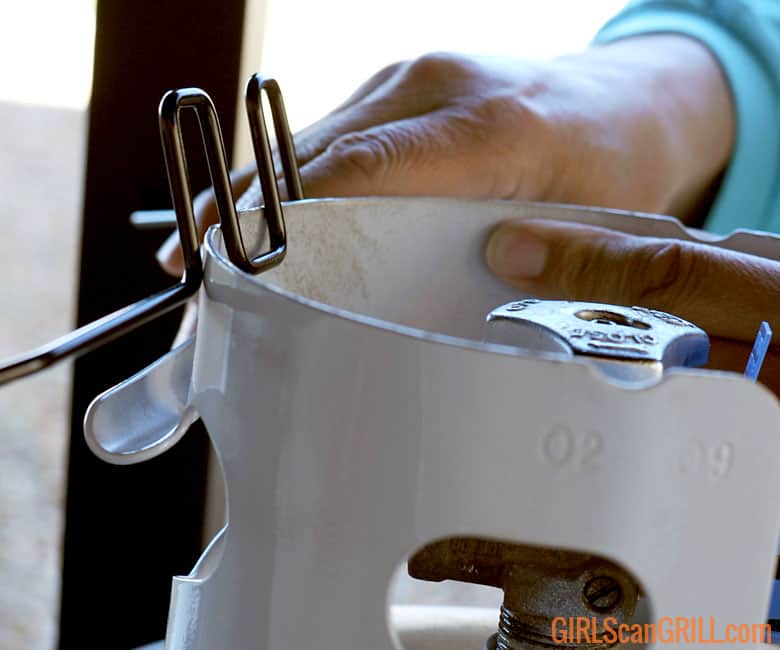
The Nexgrill runs on a propane tank (sold separately), so the final two assembly parts are the propane stand and a clip that attaches onto the tank handle.
With the propane tank secured, you can now grab the griddle handle and wheel it around the patio or deck.
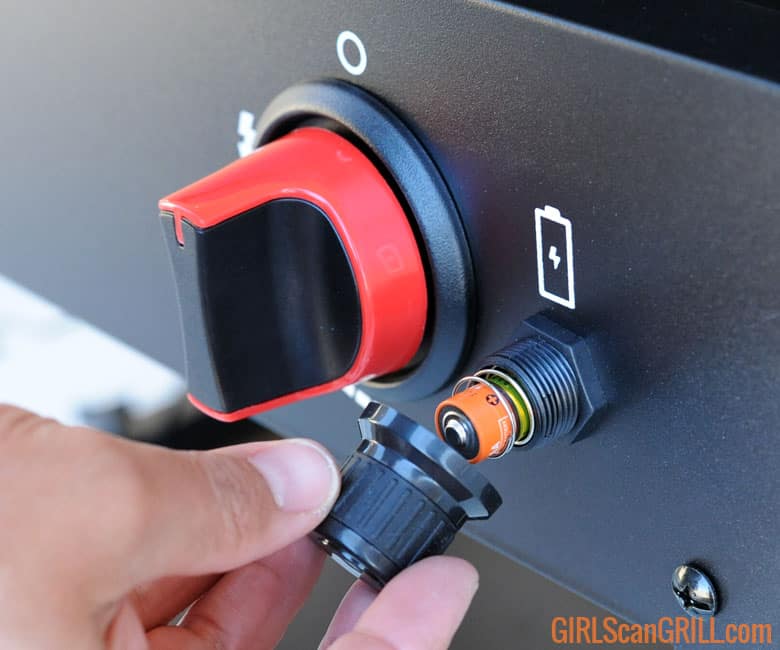
You’re almost good to go. Add the temp dials and included battery for the quick start ignition.
Prepping your Nexgrill 2-Burner Griddle for your first cook
There are a couple more steps before you get cooking for the first time. The griddle top is hot rolled steel, so it’s important to treat it well. If you nurture your griddle, she’ll pay you back in delicious meals time and time again.
This is the only time you’ll use soap. Grab the hose and a bucket of soapy water and rinse off the griddle. Towel dry it, and set it on top of the burners.
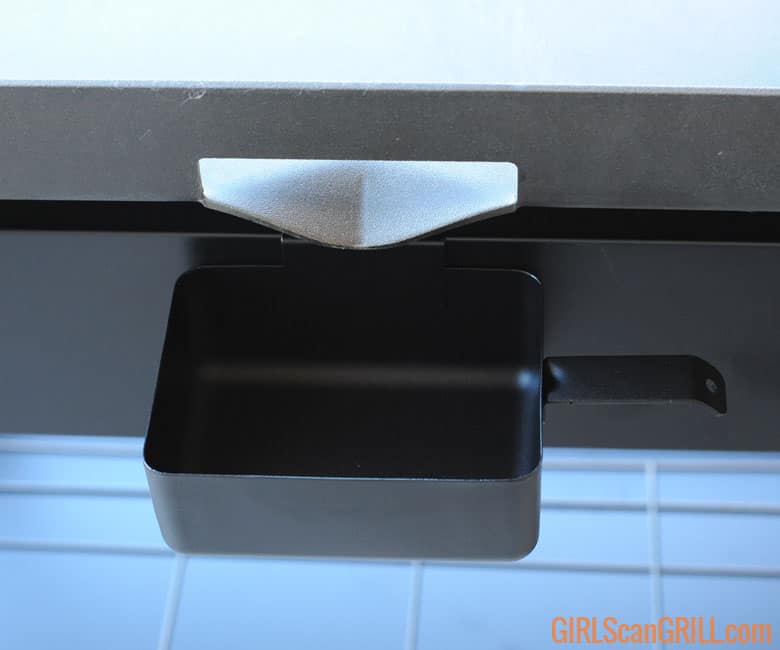
This probably goes without saying, but be sure to attach the drip pan to the little slot under the spout. Don’t hang it over the griddle top…unless you want all your drippings all over your patio.
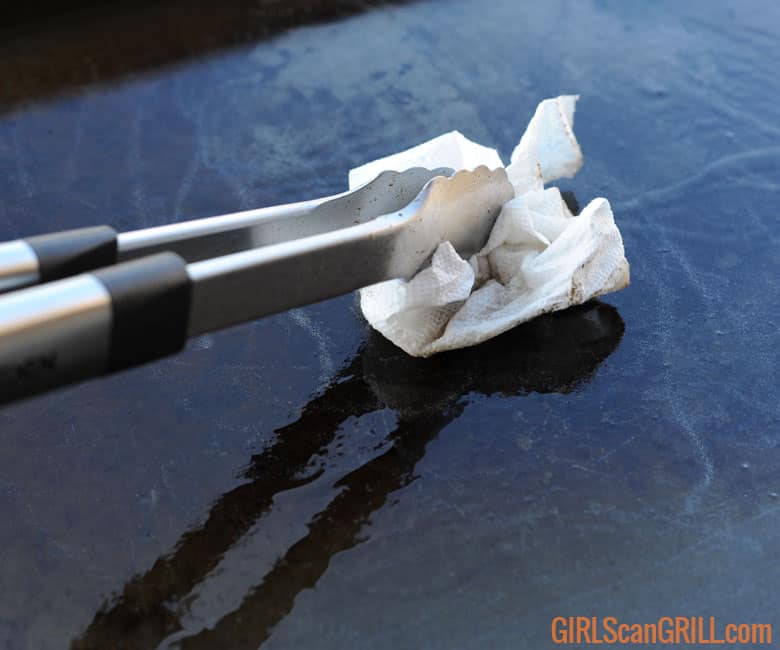
The griddle comes pre-seasoned, but you’re going to want to put an extra coat of oil on it, since you just soaped it up. Just rub it down with a paper towel and long-handled tongs.
How the Nexgrill 2-Burner Griddle works
Before lighting your grill, try to put it on a level surface. It’s designed so that the grease will run toward the back. If its unlevel, your grease may pool in other areas of the griddle.
This happened to me the first time I used the griddle, but it was okay, because it was a pool of bacon grease. Instead of having to add more oil to the griddle when it was time to cook the eggs, I just brushed the bacon grease onto the cook surface, giving them more flavor.
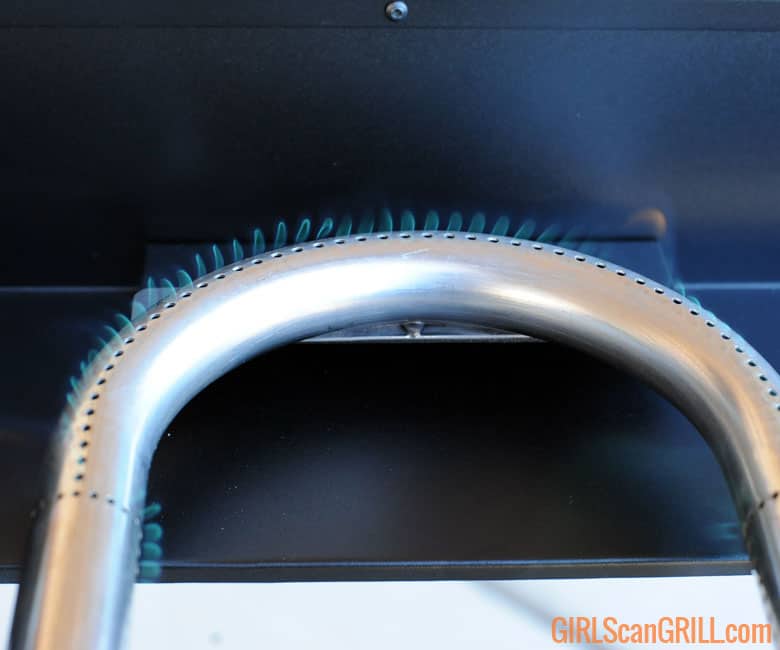
The Nexgrill runs on propane gas that fuels two 19,000 BTU burners. I really appreciate the way they are semi-enclosed, because it protects the flame from wind.
I tested the griddle in 22 mph winds, and the flame never went out, which has been a problem for me with other propane griddles. The Nexgrill engineers made their griddle virtually windproof.
To start the grill, twist the dial on the propane tank to open the gas line. Turn the griddle dials to high, and push the electronic ignition.
In the event that the ignition battery dies, the griddle also comes with a matchstick backup, which extends a tiny match over the burners, so you can light it without burning yourself.
Once the burners are lit, adjust the dials to the heat temp you’re looking for. I was really impressed that the lowest setting actually kept the griddle temp pretty low.
I found that the heat is higher along the middle of the griddle and lower along the corners. This is pretty cool, because it allows you to hot hold your food in the corners while the rest of the meal is cooking.
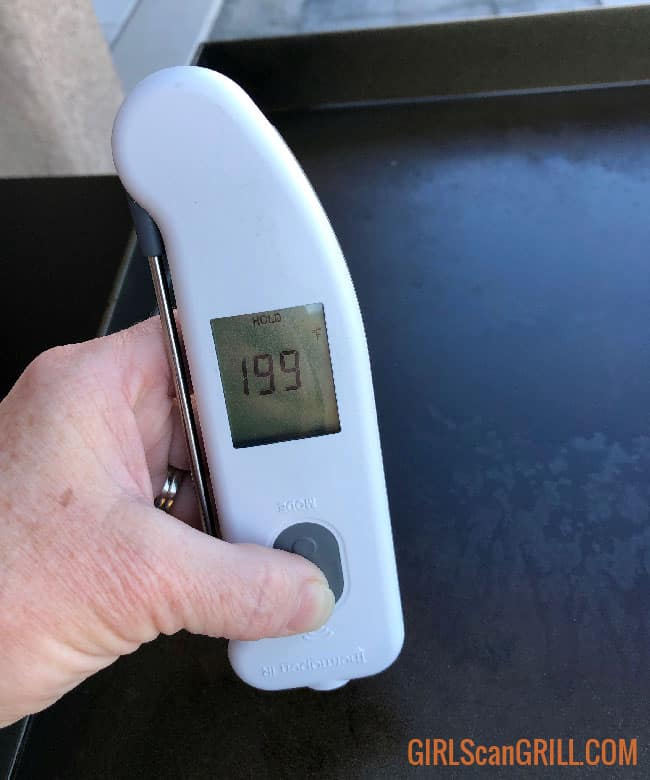
| Temperature | Corners | Center |
| Low | ~180F | ~250F |
| Medium | ~200F | ~300F |
| High | ~250F | ~400F |
As with all rolled steel, the griddle top holds heat really well. I find it’s better to start low and build the heat to your preferred point. If you start with the heat too high, it will take a while for it to cool down.
Breakfast on the Nexgrill
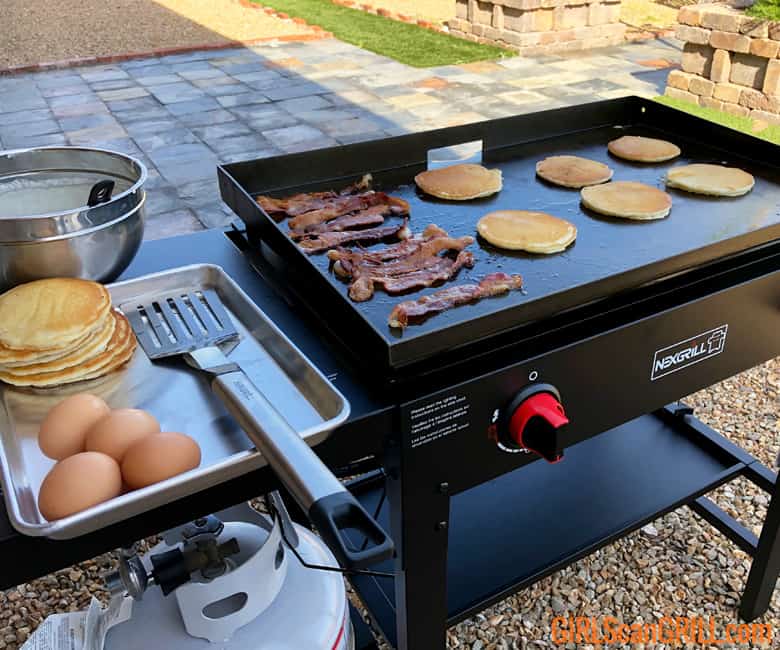
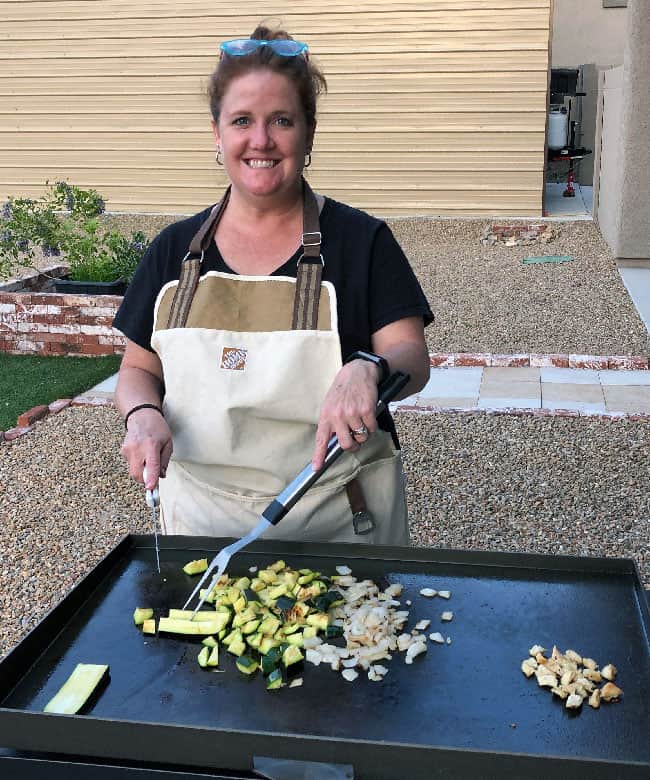
For my first cook, I went with breakfast. I felt like a short-order cook, cooking up crispy bacon, eggs to order and stacks upon stacks of flapjacks.
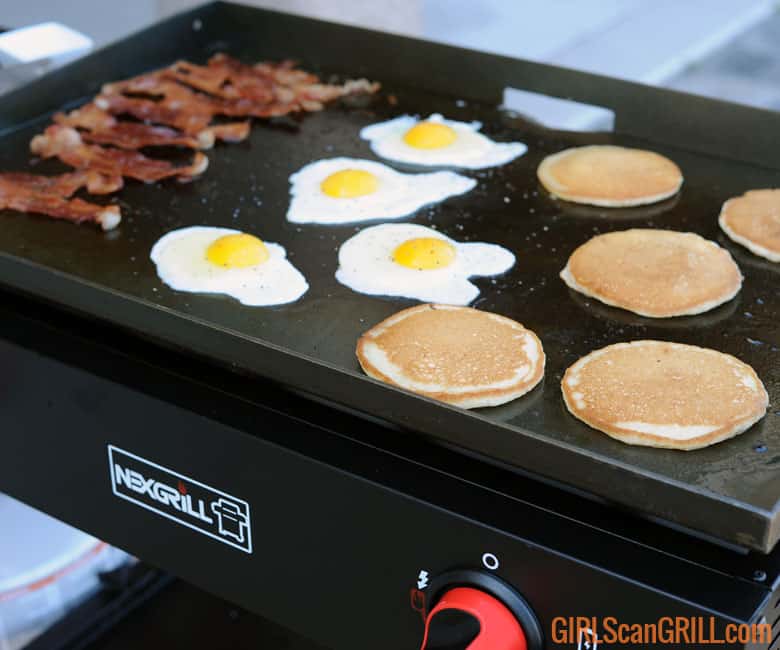
The griddle has 514 square inches, which was enough space for an entire pack of bacon, 4 eggs and 5-6 pancakes.
I started with the bacon and let it get pretty crispy, flipping a couple of times during the cook. As the bacon fat rendered, I spread the fat across the entire surface of the griddle.
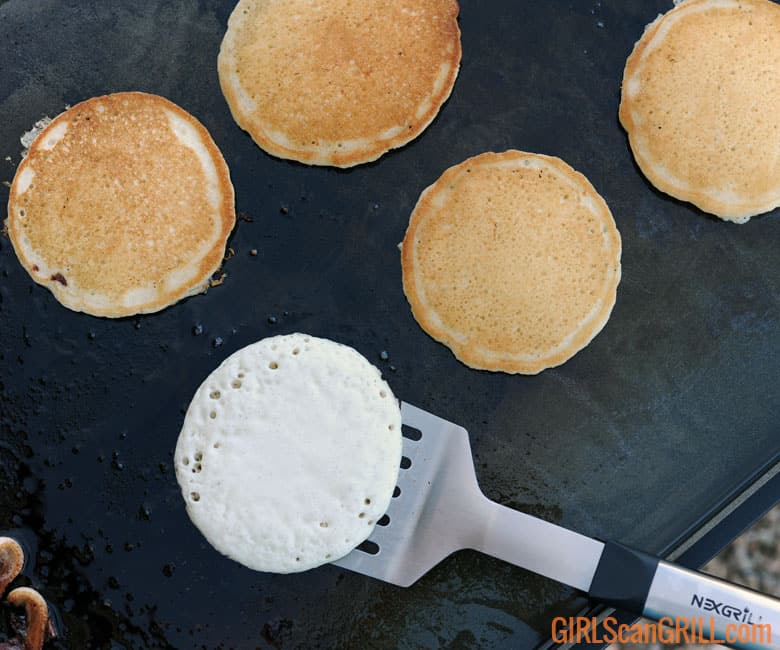
I turned one side of the burners to low, so the bacon stayed warm. Then I cooked up all of the flapjacks. Once they were cooked, I moved them to the low side and corners – again to keep warm.
Then, I fried up the eggs. Breakfast was hot and fast, just like being at a diner.
Lunch on the Nexgrill
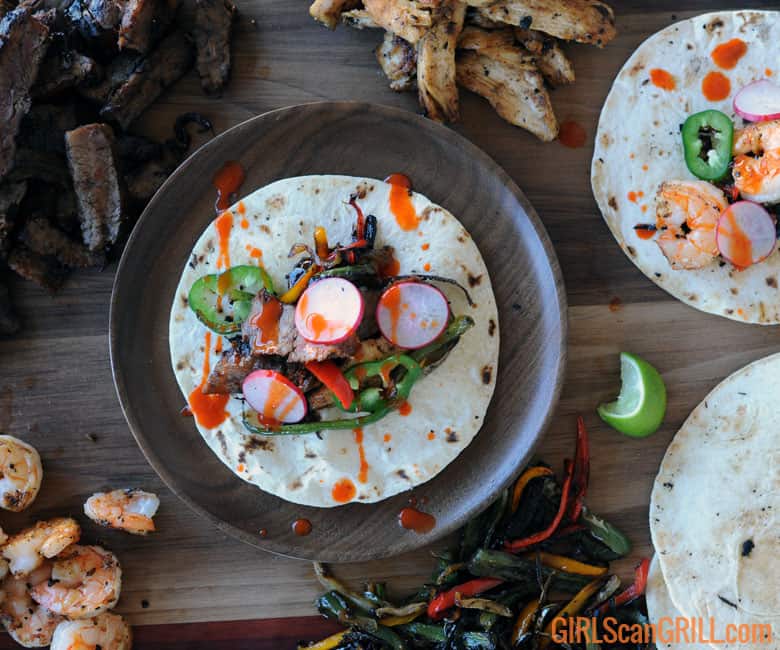
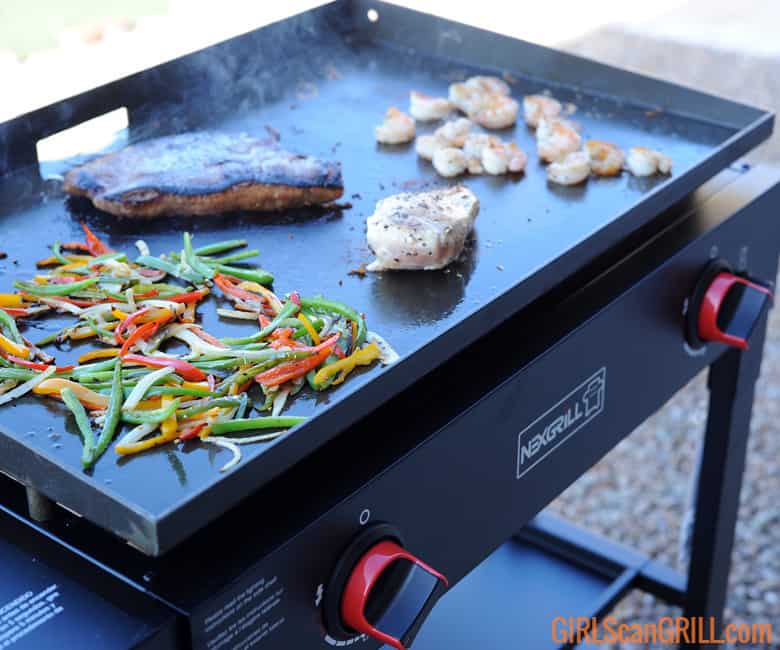
Next on the menu was a fajita fiesta with chicken, steak, shrimp, peppers and onions, and toasted tortillas.
All of the proteins were rubbed with a blend of salt, pepper, granulated garlic, ground cumin and guajillo pepper powder. You can let this rub rest on the meat for a couple of hours.
Before every cook, drizzle a little bit of vegetable oil on the griddle top, which by the way is impressively solid. I’ve cooked on other griddles that were thin and didn’t retain heat well, but the Nexgrill is 1/8-inch thick and is extremely sturdy.
When cooking multiple proteins, start with the ones that take the longest time to cook, like the steak and chicken. You can add the veggies on in the beginning, too.
Once the steak and chicken are nearly cooked through, add the shrimp. They’ll only take a couple minutes per side.
Finish the cook off by toasting the tortillas on the griddle, and let the fiesta begin.
Dinner on the Nexgrill
For my last test run, I tried my hand at a full hibachi dinner. I have a whole new appreciation for chefs at Japanese steakhouses. My onion volcano and egg flipping skills need some practice.
You’re going to want to follow the same protein rules for this meal. Cook the steak and chicken first and finish with the shrimp and scallops. While everything is cooking, stir fry some zucchini and onions and prepare the fried rice.
Everything is seasoned simply with salt, pepper, butter, garlic and teriyaki or soy sauce.
For the fried rice, sauté onions and carrots, and add chilled cooked rice. Scramble an egg, and toss it into the rice with green onions, butter, soy sauce and sesame seeds.
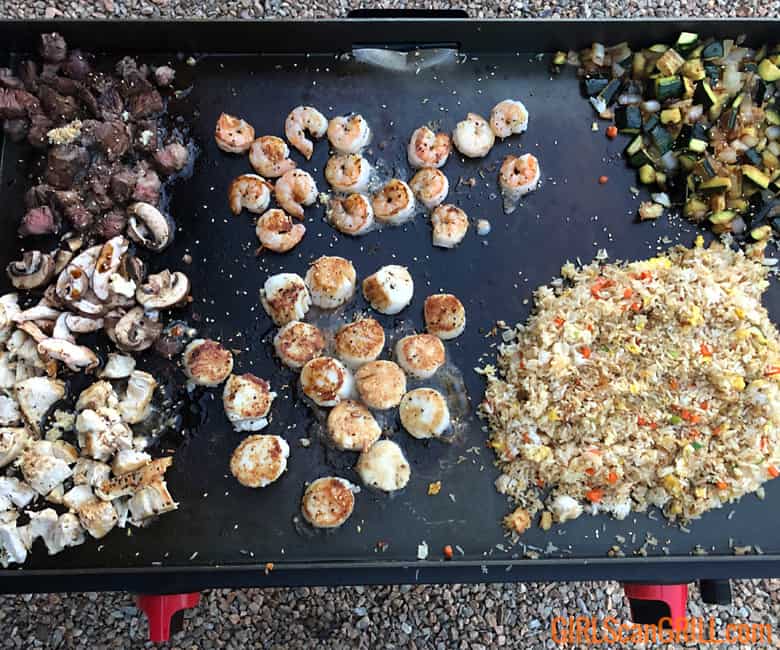
I tried to get my family to pull up their chairs around the griddle so I could flip shrimp at them, but they know my aim isn’t that great.
Clean-up
When you’re done cooking your meal, pour some water over the griddle and scrape any residue toward the drip pan. I find chain mail scrubbers do the best job at cleaning.
Wipe the griddle dry with paper towels or a shop towel. Remember, don’t use soap. It will strip away that great seasoning you created.
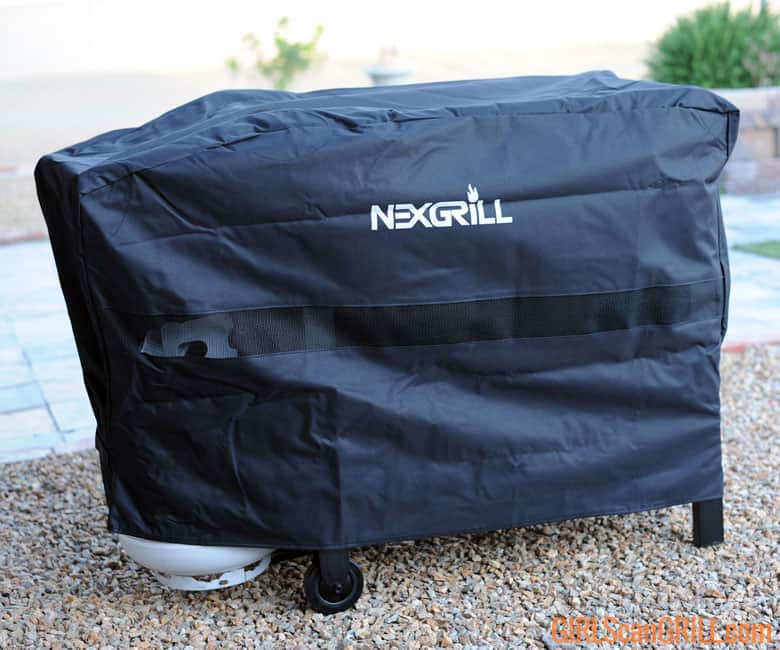
Once it’s cooled off, I highly recommend getting a grill cover, because the seasoned griddle is a magnet for dust. The 42-inch Nexgrill Premium Griddle Cover is made to fit this grill perfectly and will protect it from weather and dust.
As you can see, I truly love this griddle. It’s already become part of my Sunday morning brunch routine.
Overall, I’m super impressed with the quality, portability and large cooking area. The only flaw that I have found is that you need to be careful what you place on the side shelf. It can get pretty hot. I placed a plastic bowl on it, and it started to melt. I also placed my spatula on the shelf with the handle near the griddle, and it was too hot to handle. It’s just something to be mindful of.
I’m going to keep on practicing my hibachi skills, and you can be sure that the Nexgrill is going to see its fair share of burgers this summer.
Nexgrill Griddle Specifications
- Height: 32.5 inches
- Width: 45.7 inches
- Depth: 23.8 inches
- Weight: Around 70 pounds
- Primary Cooking Area: 18 x 29 inches
- Fuel Source: Propane
- Price: $199
- Warranty: 1 year
Price quoted at time of review; subject to change


You mention or imply the griddle being cast iron twice in the article. Is the griddle not hot rolled steel? Cast iron is entirely a different material with different properties which I would prefer.
I’m so sorry for posting the wrong information. You are correct it is hot rolled steel, but honestly it performs like my cast iron pans. I’ve updated the post. Thanks for pointing this out.
Can you tell me where on the temperature knob position I would find the temps you were kind enough to list? I’ve used mine once and when set to the start point was 400+ degrees…that was at the lightning bolt setting. I eventually got it cooled down enough to do my burgers and they were great but there is not much information about the knobs and temps. I do have the quick read surface thermometer and a digital to I won’t burn things.Loved your Japanese dinner demo…looked great.
Low will be when you turn it all the way down to the right. High is the area where the white and red meet on the left. Medium will be facing straight down in the middle of high and low. Enjoy.
What are chain mail scrubbers ?
Here is a link to an example: https://amzn.to/37QGLA5
Can you cut meat with a knife like steak and not mare the gill top like the Blackstone grill I like the look of your the best but want to cut on it
I’ve never had an issue with it. I do make sure it’s seasoned really well, so that layer of season probably helps to protect the surface.
We have had our griddle for approximately four months and we our struggle with a “metal” taste on our food. We cooked pork chops, bacon and some vegetables with the same result. I believe I’ve cleaned it well but would appreciate a method that would eliminate this taste. Thanks for your help.
It sounds like you might be cleaning it too well. You want there to be a nice baked on layer of oil. This will act as a barrier between the metal and your food.
When I heated the grill and cooked on it the metal
Warped it’s like one side was too hot and one side to cook is that normal? If not what should I do?
I have not seen that happen. You’ll need to contact Nexgrill directly. They should be able to help and cover anything that’s under warranty.
Can you order a cast iron flattop for this particular
Model?
Not that I’m aware of
Is there a lid you can buy to better protect?
The grill cover helps, but water can still get through it when it rains. I haven’t seen a griddle lid for the Nexgrill.
My flattop warped while cooking on this. What can I do to fix it?
Try turning on all your burners and let it roll for a while. This should help reshape it.
Are the burners stainless steel.any rustingbissues