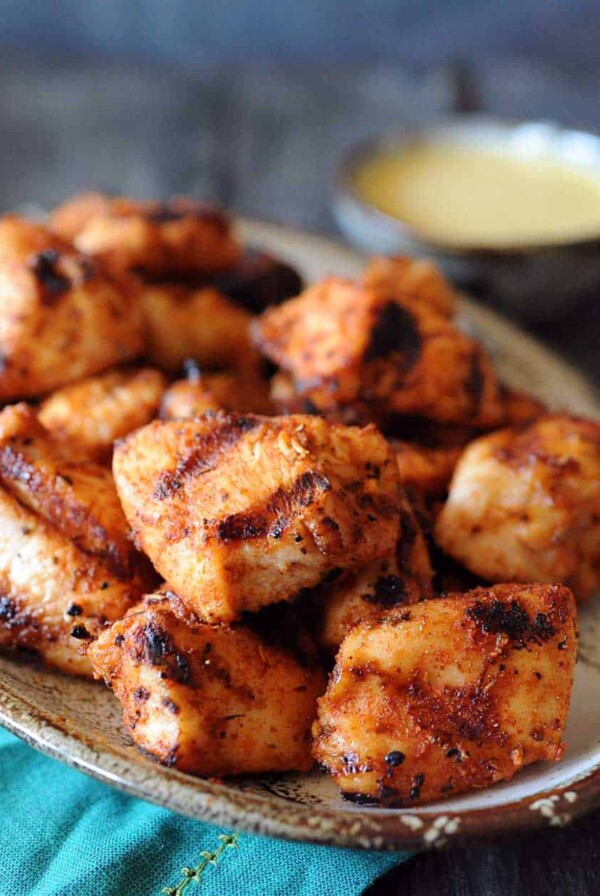
Pork butt is pitmaster Christie Vanover’s number one KCBS meat category. In this week’s BBQ Tips Podcast, she goes over the judging rules and shares her winning secrets for competition pork.
I’ve been running a series about KCBS competition meat categories. We’ve hit on chicken. We’ve hit on ribs. Today, it’s all about competition pork.
Pork is actually my best category in KCBS. I have 16 top ten calls. So today we’re going to touch on what the judges are looking for. Some of the rules and regulations when it comes to pork. And then my whole trimming, injecting and smoking process.
Listen to the BBQ Tips Podcast on
Table of Contents
KCBS Pork Category Rules
Let’s start with the KCBS rules. So pork is obviously a vague category. There are a lot of different muscles in the pig itself. So here are the muscles that you’re allowed to cook in the pork category.
There’s Boston butt, Boston roast, picnic, collar and whole shoulder. I will tell you, in my experience, most teams are cooking that whole shoulder, which is also known as the butt when you buy it at the grocery store.
You can cook it on any grill. As long as your grill is not electric or propane. It does have to have some sort of wood or charcoal source.
Save this BBQ Tip
Enter your email, and I’ll send this link directly to your inbox. Plus, you’ll get new BBQ recipes and tips weekly.
When you turn it in, you’re allowed to turn it in chopped, cubed, sliced, pulled, diced, shredded, you name it, you can turn it in any way that you want to.
You’re allowed to cook it with the bone in or the bone out.
I did review the rules for 2024 before the podcast to make sure there wasn’t any other nuances, and there actually is one thing in there that I had never noticed before.
You’re actually allowed to turn the bone in in the box, so long as you haven’t altered the bone in any state. So you can’t, like, chop up the bone, which would be really hard, or like saw it half or anything. But you can have the actual whole bone from a pork shoulder in there if you wanted to do that for some reason.
Change in rules
One of the rules that has changed over the years is that it used to be that when you cooked your pork, it had to start at a weight of at least 4 pounds. And then from there you could cut it down throughout the cooking process.
When the meat inspectors came by, it had to be at least 4 pounds.
So what a lot of teams would do is they would cook a pork shoulder, but they would trim it down a lot. They would sculpt out that money muscle.
They would shave off a lot of the top, and they would get it as small and as close to 4 pounds as possible. They would weigh it, vacuum seal it and then bring it to the competitions and do the cook from there.
So why did the rule change? Mainly because there are a couple of muscles, which we’ll talk about in a little bit that are the predominant muscles of a pork shoulder or pork butt that teams usually turn in.
So there was really no sense in focusing on cooking the whole pork shoulder when they really wanted to focus on certain cuts and certain parts of that pork shoulder.
It was a waste to cook all that extra meat and prolong the cook time because it was a larger hunk of meat. But now the rules have changed. Now your pork butt doesn’t have to weigh 4 pounds anymore, so now you can actually sculpt out those muscles individually if you want to, and smoke those by themselves.
So you could have just like a 1 or 2 pound money muscle and smoke that.
That has definitely changed the game. And it’s actually changed the way that I cook my pork shoulder.
Rules similar in all categories
A couple other rules, which are similar to pretty much every other meat, is you have to have at least six portions in the box, because there will be six judges that are going to taste it.
So you have to either have enough pulled pork so that there’s six portions, or if you have money, muscle slices, you need to have six money muscle slices.
One thing you may not realize, though, is that if you have a variety of cuts in there, like let’s say you have some pulled and some chunks and some money muscle, you don’t actually have to have six portions of each of those.
You could have three money muscle slices and three slices of chunk, and a small pile of pulled pork.
Then what’s going to happen is as the box gets passed around, each judge will take one portion. They know they have to leave enough in the box for the other judges.
So if there are only three money muscle pieces and three chunks, they know they’re not going to take one of each because they have to leave enough for judge number six. So they’ll take one of those and they’ll judge that piece.
Now it’s a little bit risky to do something like that because your money muscle might be amazing. Your chunk on the other hand, maybe isn’t.
So judge one who gets your money muscle slice may score you higher than judge six who gets the piece of meat that’s not as good.
The only advantage I can see to doing this is perhaps if you cooked your money muscles and you really only had three good slices out of everything that you had and you wanted.
You thought that that was going to up your score because your money was so good that you didn’t want to leave it out, but also you didn’t have enough for everybody. I suppose that’s a tactic that you could do.
My recommendation is just cook at least six good pieces of meat, because a judge eats with their eyes first, and even though they know that they’re not supposed to alter their scores based on what they expect to see in the box again, if they see with their eyes and they see, oh man, I really wanted a slice of that money and I didn’t get it, there’s a risk that they could score you down.
They’re not supposed to, but there’s a risk that that could happen. So just try to make at least six good pieces, is my advice.
Also just like every other category, you’re allowed to use sauce or not completely up to you, but you want to make sure that your sauce isn’t overpowering and that it doesn’t hide the meat itself.
How KCBS judges pork
The judging categories are the same as they are for all other meats: appearance, taste and tenderness.
Appearance
For appearance , they’re looking at that box and they’re determining whether or not it looks like something that they want to eat. Is it appealing? Is it something that looks really delicious?
According to the judges content update program, the sauce should not obscure the meat. You should not cover that pork with so much sauce that they actually can’t see the pork itself. Again, it’s a pork category contest, not a sauce category contest.
Adding a light glaze of sauce at the end is perfect because it gives it that appearance of moistness, and it gives it a little sheen, but you don’t want to dollop on so much sauce that they can’t see the pork.
Taste
When it comes to taste, seasoning and sauce should not overpower the pork. You want there to be that nice, naturally sweet flavor of the pork. You want to enhance that. You want that to shine through.
You don’t want judges to be overpowered by something that’s too salty, too sweet, too spicy. Again, you’re looking for that beautiful balance of savory and sweet.
I have found on the West Coast, at least, that the judges do really like those fruitier flavors when it comes to pork like cherry and apple. So if you incorporate that into your sauces or into your wraps I find that that scores pretty well.
If you do decide to put different cuts in the box, make sure that you personally taste each one before you box them up.
It’s possible that the money might need an extra little pop. It’s a larger, thicker cut of meat. Maybe the bacon doesn’t need as much because it’s got enough glaze and sauce on it.
So taste each thing and adjust accordingly so that you can get a nice, even balanced taste profile in your entire box.
Tenderness
Like ribs, I think tenderness is the area where some teams struggle when it comes to pork, because you either get a seven because it’s overly tender, or you get a seven because it’s tight.
You don’t always know because when you taste it, maybe it’s fantastic, but by the time it gets to the judges’ table, there’s a chance that that tenderness could have changed.
And different cuts are going to have different textures.
The muscle, for example, should be nice and soft and supple when they bite into it, but not too mushy. The bacon, if you have that or pulled, you don’t want that mushy as well.
You want there to be some texture in there. If you do chunks, you need to be mindful of the bark on the chunks. A good bark is amazing, but if your bark got a little bit too crusty, then maybe that texture gave it a little bit of pull.
So your texture can vary depending on the cuts that you put in the box.
So one piece of advice I may have for you is if you’re struggling to figure out where you’re going wrong in texture and tenderness is maybe just focus on one cut of meat.
If you don’t know if it’s your pulled section that’s bringing your pork score down or your money muscle that’s bringing your pork score down, next time, maybe just put money muscle in the box. Maybe just do chunks.
Now I will say I don’t have the courage to just do pulled in the box, because I think now judges, even though again they’re not supposed to, base their scores on expectations. I think they expect to see money.
So if you just tested pulled in the box, that would be a little bit risky. Unless you made that box look absolutely amazing.
There are a couple of rules on tenderness that judges are supposed to follow.
They’re not supposed to use their hands to judge tenderness. They’re just supposed to use their mouths.
What I mean by that is there’s an old test that some judges used to do called the thumbprint test, where they would take a piece of money muscle, press their thumb on it and see how it would give or indent to kind of test the tenderness that way.
Or there’s the pulled test. They’ll take your pulled pork and they’ll try to stretch it and and see how tight it is or how loose or soft it is. They are not supposed to use those methods when it comes to judging tenderness for pork, it’s all supposed to be based on mouthfeel.
And with that mouthfeel, the money muscle, as an example, should be moist and easy to bite through. There shouldn’t be any tug. There shouldn’t be any dryness to it.
But it also shouldn’t be so soft that it just kind of disintegrates in their mouth and maybe, like, becomes mushy. It’s supposed to still have some integrity.
One test that they can also do is where they take a bite, and then they press the meat to the roof of their mouth with their tongue. If it kind of dissolves and becomes paste, then they know that it’s too mushy.
If it still has some character to it when they do that, then it’s probably spot on and they’ll hopefully give you a nine.
All right. Those are all the pork rules and pork judging guidelines. So I’m going to talk to you about how I select my pork, but how I cook it, how I smoke it, how I seasoned it, etc.. So let’s get into that.
Selecting competition pork butts
I always cook pork, but traditionally I buy them from WinCo, which is a local grocery store here in Vegas, and I go with the Hormel brand. But I’ve also cooked Prairie fresh. I’ve cooked Compart and I’ve cooked Smithfield. I’ve cooked whatever they have at Costco or Sam’s Club. I’ve tried lots of different ones.
What to look for when selecting pork butts
I traditionally look for bone-in pork butts, and there are two things that I’m looking for when I see that package in the grocery store case. The first and foremost thing that I’m looking for is the money muscle itself.
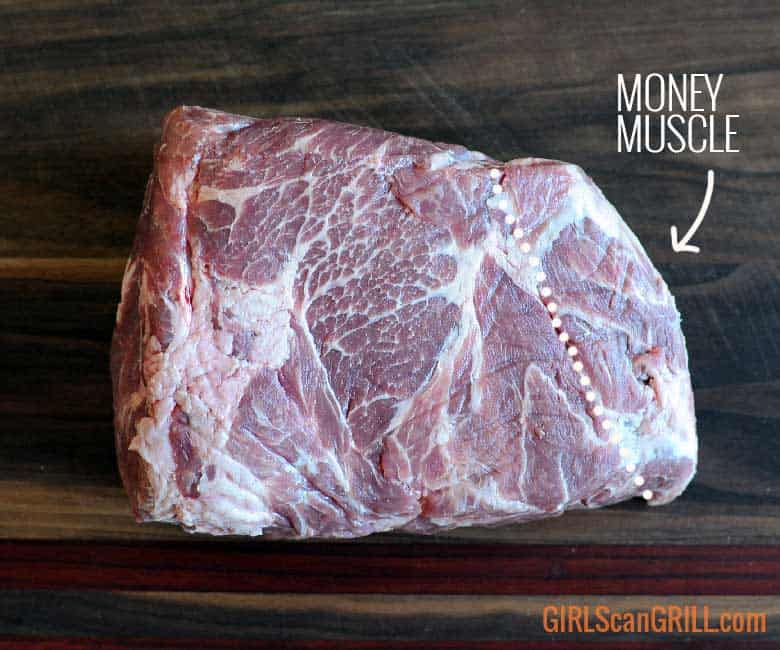
When you pick up a pork butt notice the bone, notice that shoulder blade bone that’s kind of on one of the sides. Sometimes it’s on the right side, sometimes it’s on the left side because it depends which shoulder you’re getting from the pig.
But look for that. And wherever you feel the bone on the side, the opposite side is where the money muscle is located. Its almost looks like a pork loin and that it’s long and cylindrical, but then it kind of tapers off on one end.
What I’m looking for in that part of the pork butt is the amount of marbling, the amount of white flecks or striation that is kind of marbled through there with the pork meat itself.
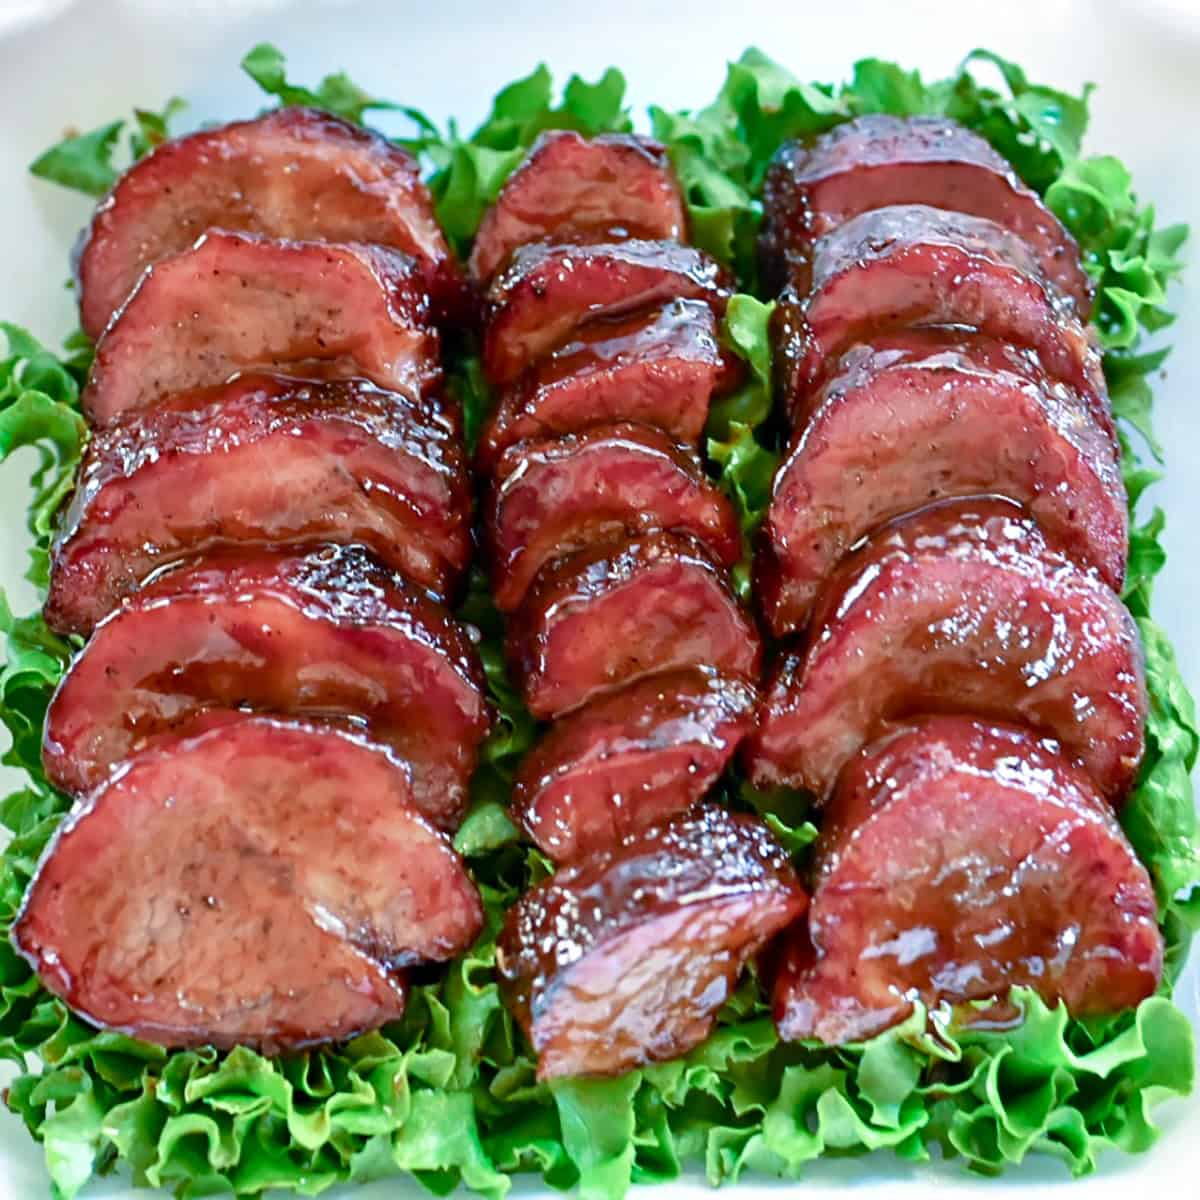
The more marbled it is, the more tender and juicy it’s going to become. So I look for something that has beautiful marbling, a little bit even shape, and I kind of look for the ones that are as big as possible because that’s going to end up being my sliced money muscle as opposed to something that’s kind of little.
You’re going to end up with little like quarter size money muscle pieces. I’d rather go for the half dollars if I can find a good money muscle.
The top of the pork butt doesn’t usually matter to me because I’m actually going to not even cook that part. I used to. I don’t anymore.
If you want to cook that part, cool, go for it. Again, I recommend the same advice. Just look for something that’s got some nice marbling in the meat.
The second thing that I look for that’s most important to me is the bottom side.
So the bottom side is going to have a fat cap over it. Right beneath that fat cap when you flip it over is what we call the bacon. It’s not actually the bacon. It’s not the belly of the pig, but we call it the bacon of the pork butt.
There’s a very thin layer of meat right under that fat cap that is delectable. When you shred it or pull it, it is just a perfect mouthfeel, a beautiful bite, wonderful pork flavor.
So what I’m looking for when I flip that pork butt over is that the full fat cap is covering all of that bacon meat. Sometimes you’ll see when it gets butchered that there will be like a part of the fat cap and then the part of the meat exposed.
Well, I need that fat cap to protect the bacon. If it’s not there, then that bacon meat is going to char and maybe cook too quickly or just get the wrong texture.
So again, I look for a marbled money muscle and I look for a full fat cat bottom. Those are the two things I love the most.
Now, if I find a money muscle that I love but the fat cap is not full, I may still buy that pork butt. And what I’ll do is I’ll take a piece of fat cap, maybe from another pork or from some of my trimmings, and I’ll patchwork it and cover up that bacon to help protect it.
There’s always little workarounds that you can do.
I usually buy three pork butts. Sometimes I go with four, depending on the competition. But I’ll get those three pork butts. I’ll take them home, throw them in the refrigerator.
Trimming competition pork butts
When it comes to trimming them up, there are two different methods that I’ve had a lot of success with.
My old trim method
Let me talk about the first one. With the first one, I remove the bone entirely from the meat, and then I kind of carve down by the money muscle, and I take off a big chunk of the top of that pork.
But I’m talking about like two, three inches worth of meat that all just goes aside, gets frozen. Then I use that to make sausage.
Then I use my filet knife to really sculpt out the money muscle. I want to trim down. There’s some veins in there. There’s some fat seams in there. I just really want to sculpt it, so it has that beautiful kind of rounded, even cylindrical shape.
Then again, I trim away some of the stuff on the top. I take out the horn, which is that part of meat that’s by the bone. Get rid of any of that excess.
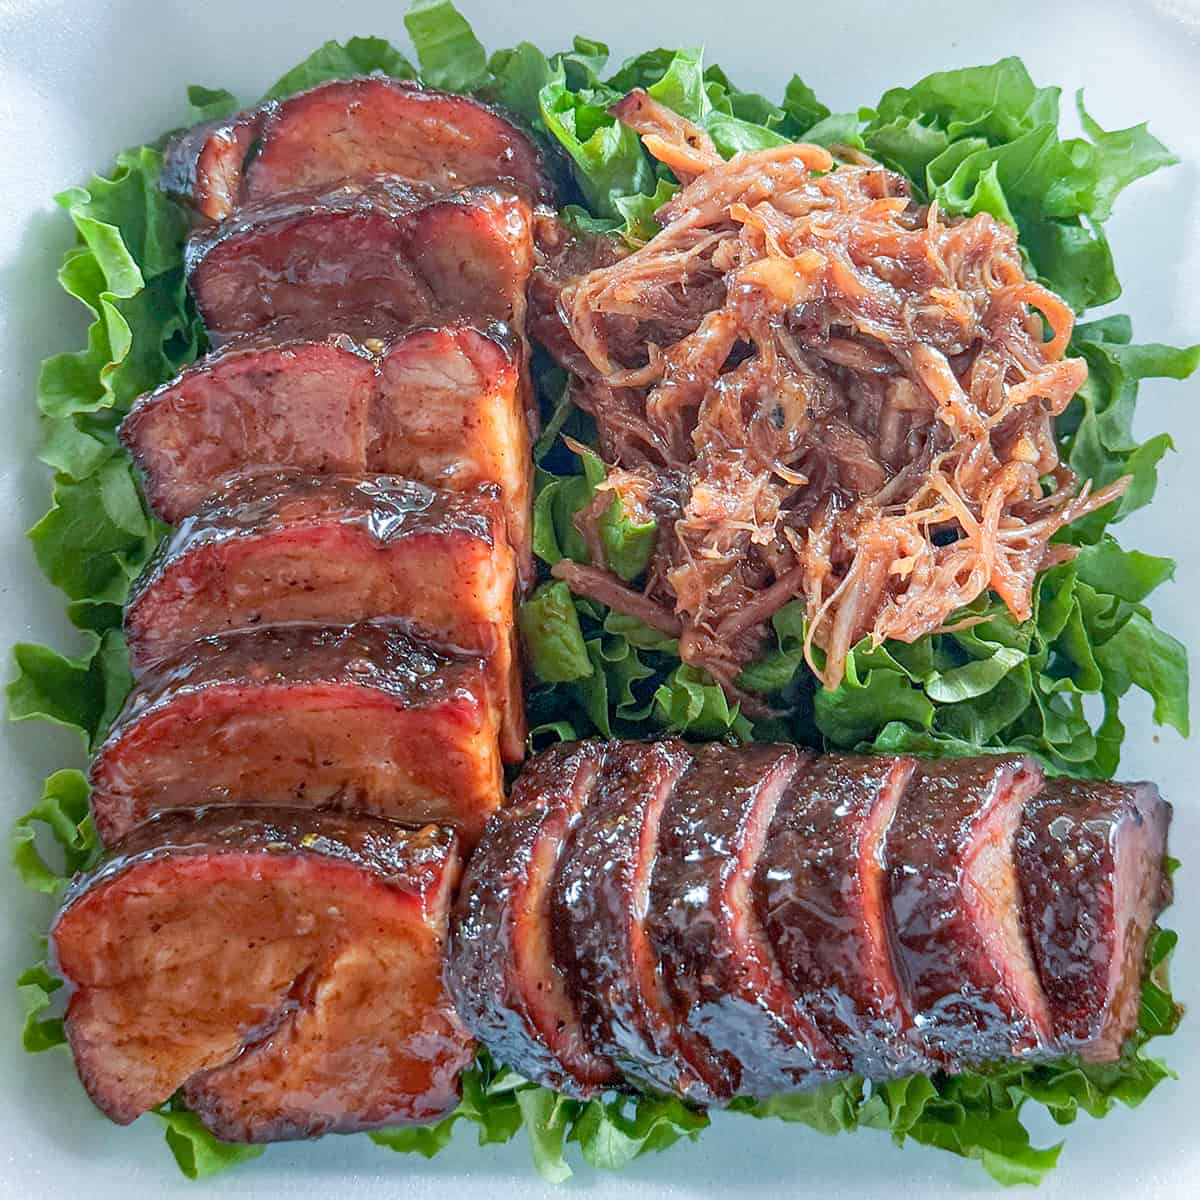
So what I’m left with is the fat cap bottom with the bacon on top, a thin layer that’s maybe an inch and a half, two inches, and then a big kind of scoop of the money muscle on the side.
That’s method number one. That’s worked really well for me in the past.
The method I’m currently using
What I’ve been doing lately, though, is because there’s no 4-pound rule anymore. I just chop that money muscle right off, I slice it off, and then I sculpt it, and then I make it exactly the size and shape that I want so I can control those elements right up front.
Then again, I get rid of the bone and the whole top portion of that pork butt. And what I leave myself with is just the slab of bacon. That’s kind of a square or rectangular shape.
That’s about one and a half to two inches thick. So now what I have is an individual money muscle and a slab of that pork fat bacon.
The rest of it gets frozen and I just smoke those pieces. So I end up with 3 to 4 money muscles and 3 to 4 slabs of bacon.
Injecting competition pork butt
I inject on Friday night when I get to a competition. My injection includes a mix of some of those dry powdered injections that you can find. I usually add a little bit of maple syrup and a little bit of apple juice. Sometimes a little bit of water.
To inject my pork butt I use an aluminum half pan and I place my money muscles all in one. I place my bacon in others, and I take my injection needle and I inject the heck out of that money muscle.
I basically inject that money muscle until it can absorb no more liquid.
Once you inject it from the top, the sides, the bottom, you’ll know when you go to inject it some more where it’s just starts coming out, you’re like, okay, it’s done. It’s got as much injection as it can take.
Same thing on the bacon. I’ll inject from the bottom, from the top, and then you’ll see that thin layer of meat I go ahead and inject in there as well, so that I can get all that flavor into the meat that I’m actually going to use from the bacon slab.
If those pans collect any extra injection juice, I go ahead and pour those out so that what I’m left with in the pan is the fully injected meat. It doesn’t have to be dry, but you just don’t want it sitting in a pool of injection.
Seasoning pork butt
Then I take my seasonings and I sprinkle them all over. I cover my pork, but pretty liberally.
I add enough seasoning to where you can almost not see the grain of the meat anymore. I use a variety of seasonings. I add a little bit of MSG for that pop of flavor. I use my pork rub and just a couple other things that have a nice sweet, savory and fruity mix.
Once it’s injected and seasoned, then I go ahead and put it in my Cambro, which has some ice and it to keep it cold overnight.
If you are going to put it in a refrigerator instead, I would go ahead and cover it with plastic wrap because the refrigerator has a circulating fan, and that’s going to affect things on the pork itself.
But if you have it in a Cambro or in a cooler, that’s nice and cold, you don’t need the plastic wrap because there’s no fan or no air circulating.
Smoking competition pork butt
All right, it’s Saturday morning. Time to smoke up the pork. We fire up the Hunsaker Smokers with Cowboy lump charcoal and charcoal briquettes. I add some pecan, some hickory, and some cherry wood in there to just add a little bit of extra fruity flavor.
And we set that dial to 300 F degrees.
Now, I usually light my pits about an hour before I put the meat on. If I am at a high altitude location, though, I will light them about an hour and a half before because it seems to take longer to get the clean smoke. I think it’s just because of the thin air takes longer for everything to get steady.
So when I’m at sea level, it’s usually 45 minutes to an hour before. When I’m at higher elevations, I usually go for 90 minutes.
The way my Hunsaker Drum is set up is that I have a multi rack level. So on the bottom rack is where I place a half pan full of warm water. And then I put the upper rack on top of that.
Then I add my pork to the smoker and it’s getting that moist, warm, watery, steamy air that’s going to help keep my pork tender.
The way the Hunsaker works is there is a vortex kind of deflector plate in the bottom, which means that the outer circle is a little bit more hot than the interior.
I put my money muscles towards the interior because they’re more delicate than the bacon. And then I put my bacon slabs on the exterior.
That way if they get a little bit more of that hotter, intense heat on the bacon, it’s okay. I don’t want that to happen though on my money muscles. So those are going to stay in the middle.
Cooking stage 1
Once all my pork is on the smoker, I set my timer for an hour and 15 minutes. Then every 20 to 30 minutes or so, I go back on the smoker and I check them and I spritz them.
Even though we’ve got the water pan, you always just want to add a little bit more moisture.
You can spray them with butter, with apple juice, with apple cider vinegar, with water, whatever your flavor profile preference is.
You just want to add a little bit of that moisture so that it just really helps moisturize that meat and keep it tender.
Cooking stage 2
After an hour and 15 minutes, I go out and check on it, and then I actually flip everything over. Because I’m cooking on a drum smoker, that heat comes up from the bottom. I want to get a little bit more even color.
So I turn things over and I cook them for about another 30 minutes.
What I’m looking for at this point is for the money muscles to have a nice, even beautiful mahogany bark for there also to be some bark on that bacon. And I also want the internal temperature to be about 165 to 175.
Then I take everything off the smoker and bring it inside. And this is where it’s time to wrap.
Cooking stage 3: the wrap
When I wrap my pork, it’s actually really similar to how I wrap my pork ribs. I add butter, sugar, maple syrup. Some glazes like maybe a Tennessee Red from Blues Hog, or maybe like a cherry habanero Kosmos Q rib glaze.
You want to add sweetness, fruitiness, savoriness add a little bit more rub in there so you do get that extra saltiness to kind of balance out all that sweetness and wrap everything up tight.
One thing that I should mention is when I did the first style trimming that I described, where the bacon was attached to the money muscle. Still, this is the point where when I take it off the grill, I would actually separate my money muscle. I would cut it off and I would wrap my money muscle separate from the bacon itself.
But now that I actually cook them separately, that’s been already done for me, which is kind of a time saver and a little bit easier and cleaner.
Whichever trimming method you use, you just want to make sure that you wrap your money and wrap your bacon separately.
One thing that is important when you’re wrapping your bacon piece is that you want the fat cap to be up. We’ve already hit that fat cap with so much heat and so much intensity that it has cooked the bacon meat perfectly, but I don’t really want that much more intense heat going up to that bacon, so I’m going to flip it over.
The fat cap is now on top, and that will help protect the bacon meat even more. Then you wrap it up tightly, head back out to the grill.
This is where temperature really matters. The grill is still set at 300 degrees, and I’m going to place my money muscles in the center again, and the bacon pieces around the edges where the heat’s just a little bit more intense for me.
The temperature to pull the money muscle
I have found that cooking my money muscle to an internal temperature of 211 to 214 F is usually perfect. Tenderness is on point.
The temperature will vary depending on your altitude, your humidity and some other factors like weather. So you also want to just pay attention to the feel.
Don’t always go by the number. Place your probe in the meat it needs to glide in smoothly like a soft ripe peach, as opposed to like a peach that’s not quite fully fresh yet. That’s got a little bite to it. You want that like soft, kind of gentle, almost, almost buttery feel to it.
But for me, again, most of the time that temperature’s like 211 to 214.
I have found if I go below that in temperature, like 207 to 209, that my money muscle is perfectly tender when it’s on my counter. But when I go and taste at 15 minutes after I turn it in, that’s when it tends to seize up.
That’s where I think my tenderness scores in the past were suffering, which is why I go a little bit higher. It gives that forgiveness time so that when it does start to seize up, it’s gotten moist enough that it can kind of correct itself and then be at the perfect temperature.
Adjust based on your altitude and climate
Now, I know I’m telling you a temperature number, but really, you have to trust your instincts. And here’s why.
When I cook in Nevada, Arizona or Utah, that 211 to 214 is usually perfect because I’m cooking in an arid environment. All three of those locations are pretty dry.
But when I cook in California, there’s a lot more humidity. It’s closer to the ocean.
When I cooked in Perris California, recently, I tried to get my pork money muscle to 211, and I kept it on there and it just stalled at 210 and it would not go past that.
I kept cooking it, kept cooking it. And then finally I said, quit thinking about the number, Christie, and I just probed it and realized it was definitely done.
So focus on the feel of your probe more than the number. Once you have that feel down pat and you know that it’s going to be soft, then you can pull it.
So 211 to 214 is my guide, especially in arid climates. But you might want to go above or below that depending on where you’re cooking.
For the bacon meat, I’m actually aiming more for like a 200 to 205. It doesn’t have to be quite as soft, quite as tender, because it’s not going to seize up like the money muscle does once it gets a little bit cooled down.
The holding stage
So once both of my meats reach their ideal temperature or their ideal feel, I take them off of the grill.
I keep them wrapped in their foil, and I place them in the Cambro with the door closed, and I just wait until it’s time to prep my pork box.
How to finish competition pork butt
Once it is time to prepare my box, I usually do this right after ribs are turned in. I take the money muscle out first, and I place them each in a 2-pound loaf pan.
I pour some of that jus in the loaf pan and I brush them with sauce. Then I put them back out in the smoker for just like 3 to 5 minutes. It’s not too long. It’s just enough to set the sauce.
While all that’s happening, I take my bacon out of the foil, and you’re going to want to remove that top layer of fat. You don’t want that at all. What you’re going to be left with is this really kind of stringy pork.
Those are the pieces that I’m looking for. I pull out all of those pieces and I kind of test them and feel them. Are they too soft? Are they too hard? Is there too much bark on it? Maybe the meat got exposed and it got a little bit too barky.
I’m really looking for and feeling for those exact pieces that I want, and I set that aside in a pile and I add some more jus on there, some more sauce and some seasoning and taste it.
Kind of give it that mouthfeel test and see if it’s something that’s going to work to put it in the box.
Different methods for pulled pork
Now you will see that people turn in their bacon in different ways. Sometimes people will take that strip of bacon and they will make it as perfectly symmetrical, beautifully scraped piece of almost like pork spaghetti. And they will layer it in their box in these beautiful symmetrical patterns. And that’s great. I personally don’t do that, but those boxes are beautiful.
Sometimes what they’ll also do is with that they’ll mix in some tube meat. So you’ll find the tube meat more on top, which I personally trim off. But if you left your tubes, they’ll take that. And that’s the same type of pork that is stringy, almost like string cheese. And they’ll mix that in there. And the reason they’ll do that is because I’ll get a little bit different texture.
Sometimes that bacon meat can have a little bit more firm texture, whereas the tubes can be a little bit more soft or vice versa depending on how you’re cooking it. And so it gives it a nice textural variety in the box.
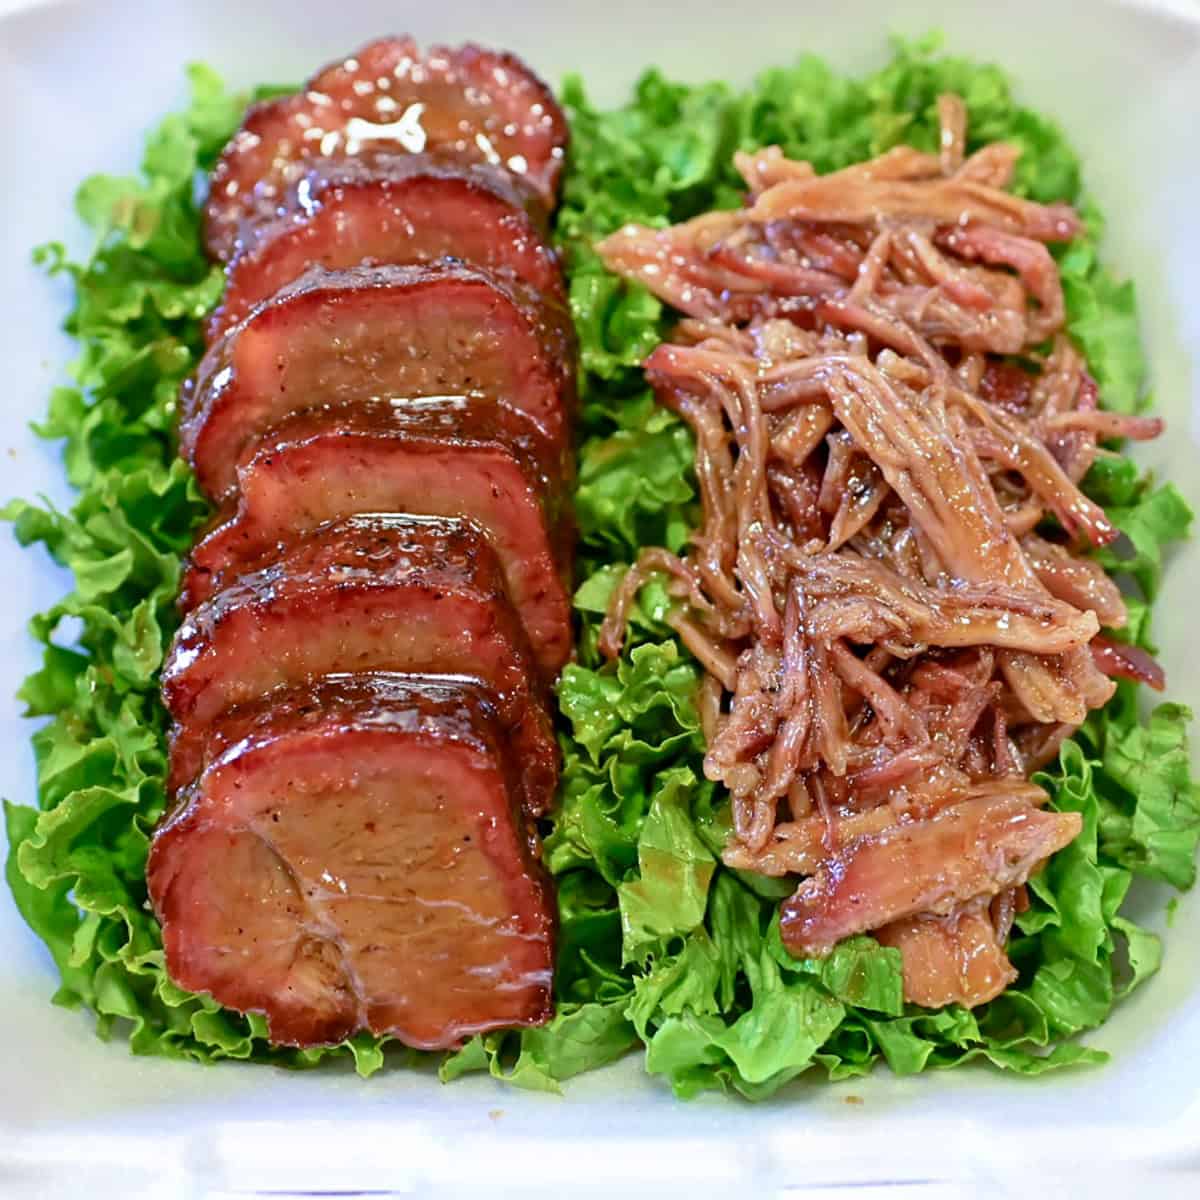
For me, I just like the bacon itself. I don’t make it all symmetrical and pretty. I just put it in the box like you’re going to get a nice barbecue platter of meat, but I do mix in a little bit of that bark, so I give it some textural variance.
Finishing the money muscle
Once I take the money muscle off the smoker, I place each one on my cutting board and I slice off an end cap and I taste that.
Usually I know right away when I’m cutting with my serrated knife. If it’s too soft, it’s going to kind of start to shred when I slice it, and if it’s firm, there’ll be a little bit of resistance, but I still go ahead and taste it just to see which one has the best tenderness.
From there, I decide how thick or thin my slices are. If your pork money muscle is overcooked, you’re going to want to go with thicker slices. That way it gives a little bit more resistance in the bite. If you make them too thin, they’re just going to mush and just be kind of soft and yucky.
If, however, your money muscle is too tight, it didn’t get as tender as you wanted, make those slices just a little bit thinner and that will give it a better mouthfeel.
Honestly, the biggest thing I struggle with with money muscle is shape and size and getting six good pieces. I like to do the thicker pieces, but it’s hard to get six symmetrical pieces out of one money muscle if they’re too thick, because the money muscles only so big.
So if you in advance when you’re trimming, try to shape at least two money muscles to be as close to the same size as possible.
Then you can pull 3 or 4 slices out of one money muscle and 3 or 4 slices out of another money muscle, similar to like we do with ribs.
Just keep in mind that they’re not the same meats. So if one judge gives you a nine in tenderness for one slice of money muscle, and another judge gives you a 7 or 8, remember, it’s maybe because they didn’t get a slice from the exact same piece of meat.
You are always welcome to do more than six slices of money in the box. Sometimes I’ve done that. Sometimes I’ll do a couple rows of 4 or 5, maybe some pulled in the middle.
Creating pork chunks
What a lot of teams do is they’ll take their money muscle and they’ll cut it into chunks, which means that they’ll kind of cut it vertically and then cut it some more.
So it’s just a little bit different shape than a regular money muscle. It exposes more bark to each piece instead of the round slice. It’s going to be more like maybe a triangular slice.
That gives a little variety as well for the appearance of your box, and it allows you to fill up your box a lot more.
One last trick that I learned with my money muscle. And this I’ve got to give credit to Travis Clark. When I slice my money muscle, in addition to adding sauce and more of that jus, those pan drippings, I sprinkle it with my rub. And I actually kind of massage that rub and that sauce and that jus into the meat itself.
That really adds more flavor to the meat. But what it’s also doing is helping to break up that muscle just a little bit more, to add a little bit more tenderness. Now, if you’ve already gone a little bit over in your tenderness, don’t massage it too hard because then you’re just going to make it mushier than it already is.
I mainly do this if it still has a little bit of firmness to it, to really break down those fibers.
Check your temperature
At this point, you should have all of your meat on your counter. You have your slices of your money muscle. Maybe you decided to make some chunks out of that. You have your pulled bacon.
Now you decide what am I going to put in the box and how am I going to make it look?
Also, this is important. What’s the temperature of your meat? You’ve been manipulating it for a while. Has it cooled down? If it has, what I usually do is I find my best slices of money muscle. I put them back in a pan with that jus Maybe I’ll add a little bit more sauce on it.
I take my pulled bacon. I put that in a 2-pound loaf pan with a little bit more jus and sauce, and maybe if I’m doing chunks, I’ll put that in another loaf pan.
Then I take all three of those back out to the smoker, and I let them go for two, maybe three minutes.
The main purpose of this is to just incorporate a little bit more heat to it, because that’s going to have two effects.
One, it’s going to be really enjoyable for the taste and the tenderness when they bite into a hotter piece of meat.
But two, it’s also going to help it in case it started to seize up and get cold and get tight. That’s just going to kind of re amplify it so that it gets that heat again. So it kind of maintains its integrity when it goes into the judges tent.
After that 2 to 3 minutes, I take them out of the smoker and I have my box of greens all ready. And I go ahead and I put everything in the box.
Arranging a competition pork box
There are so many different arrangements that you can do with your pork box. It’s completely up to you.
Some people will just do a beautiful diagonal of money muscle and that’s fine. You don’t have to have a full box of pork. Put your best meat in the box. If your money’s not good, don’t put it in. If you pulled is not good, don’t put it in. Just make sure you have six pieces of fantastic meat in the box.
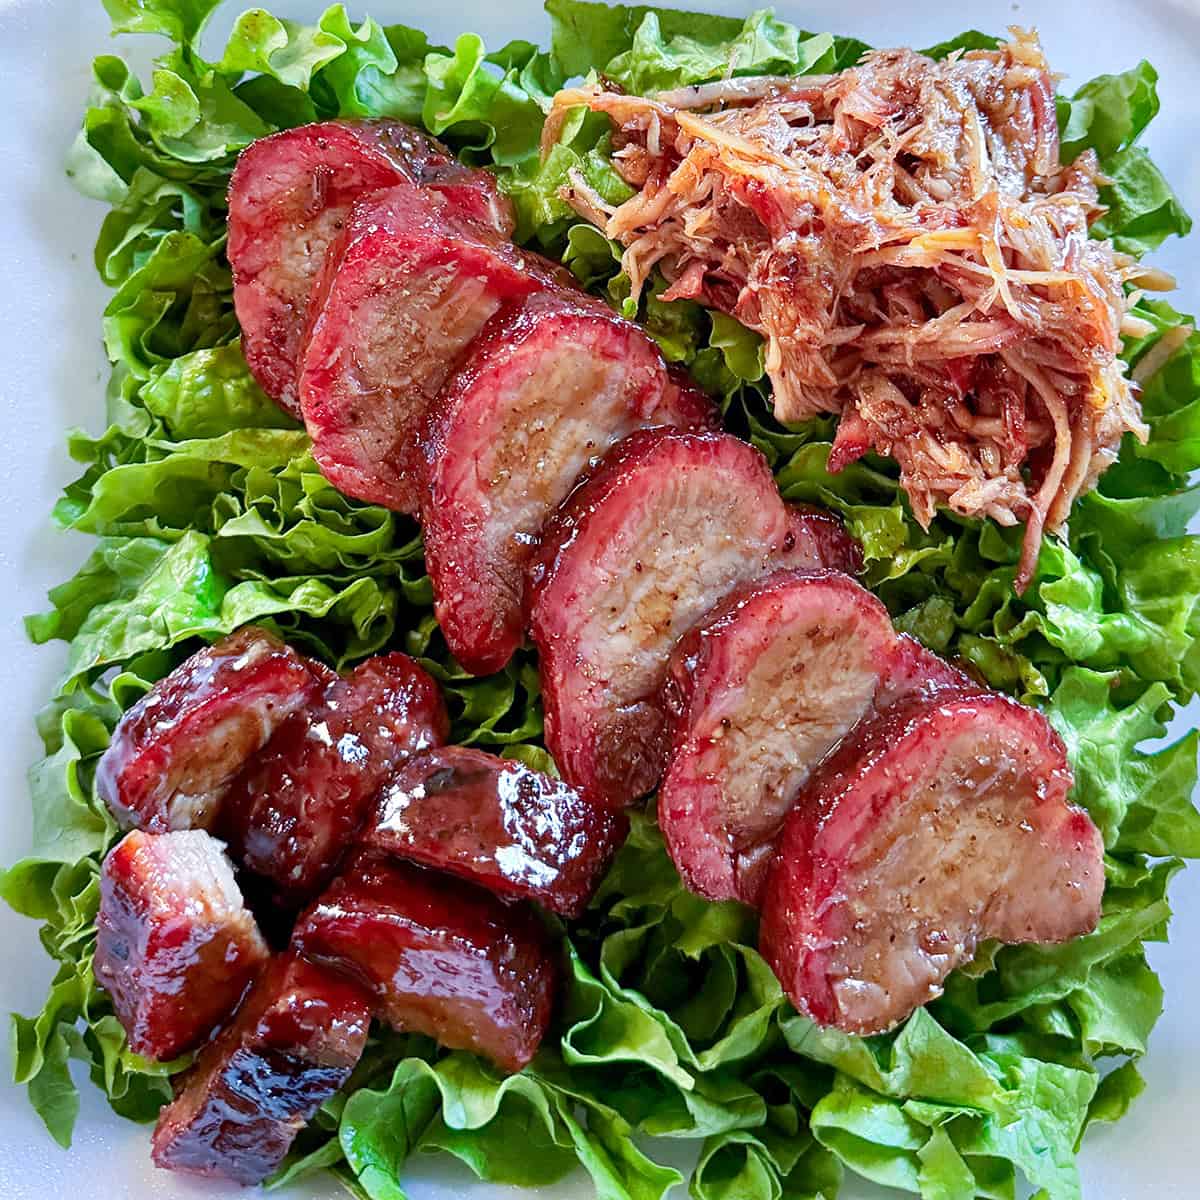
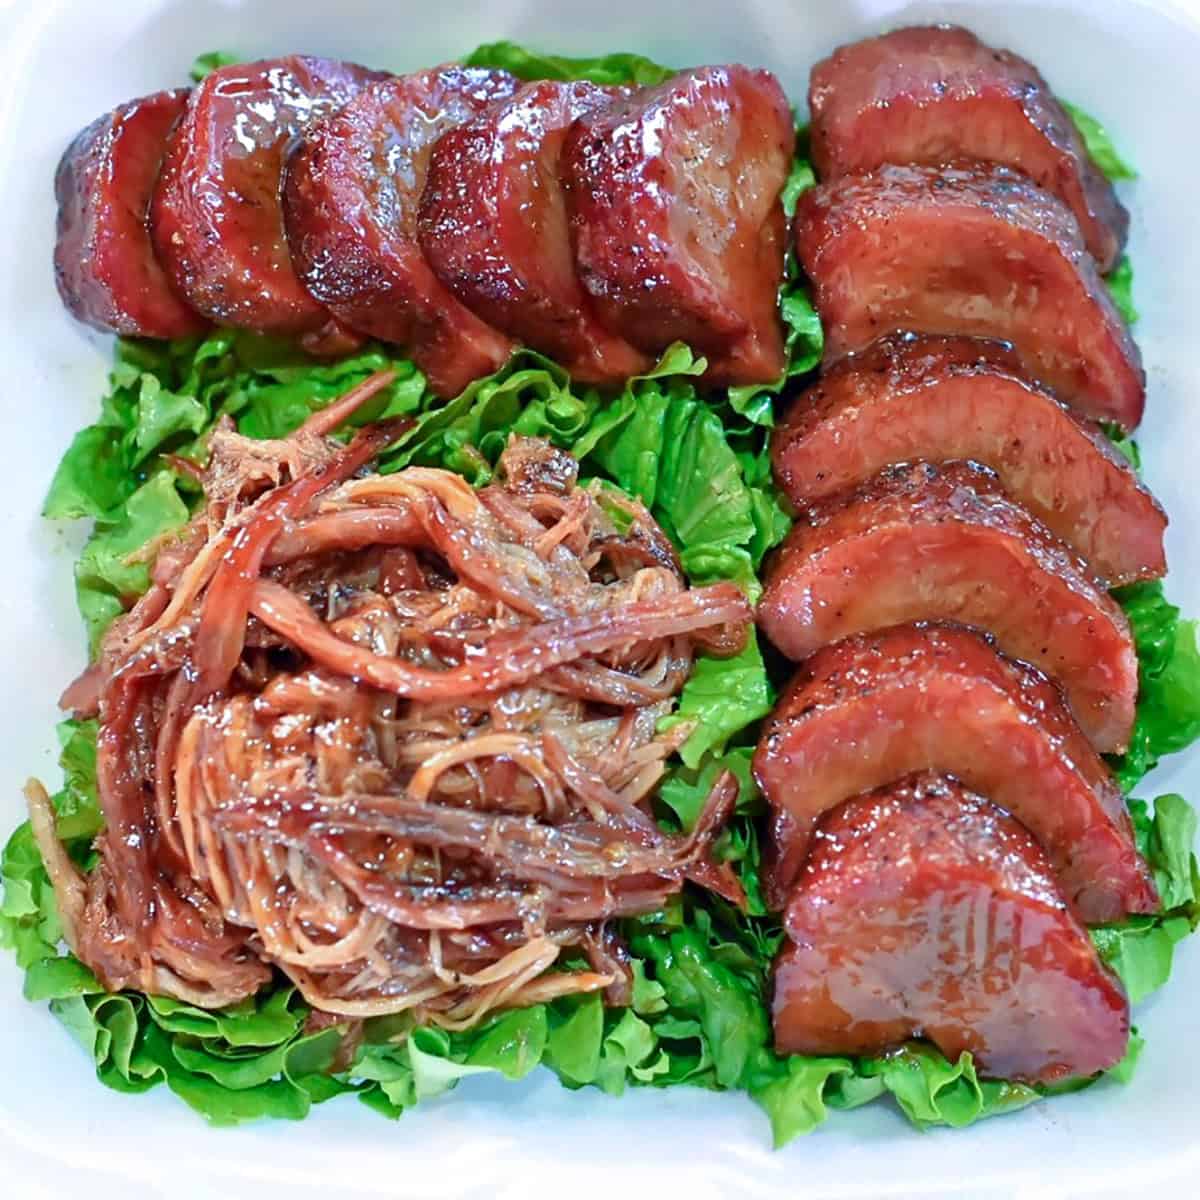
I usually will do maybe a diagonal of slices, with maybe a corner of chunks and a corner of pulled.
Sometimes I’ll do two rows of money muscles with some pulled in the middle, or maybe chunks in the middle, and then pulled on the side. I really kind of mix things up.
There’s even an L pattern you can do with like 3 or 4 slices of money going down the box, and then 3 to 4 in the front of the box.
That’s a really good tip, if your money muscle is not symmetrical because it doesn’t have to look like a beautiful straight line of six pieces. And then just do something in the middle, maybe chunks are pulled or even more money muscle pieces, if you’d like.
You can do the arrangement however you want. You’re not judged on creativity of placement, but what you are judged on is appearance. And does that meat look fantastic? So put it in there.
Showcase your best pieces, give it a little bit of glaze at the end, but again, not too much sauce because like we talked about in the beginning, you want to be able to see the meat.
The judges want to judge the meat. They don’t want to judge the sauce itself and then use a wet paper towel or Q-Tip to clean up your box. Give it one more look.
Take that photo so you can share it on Instagram and close your box up and get it into the judges.
Taste your meat again and judge it yourself
Make sure you do wait at least 15 minutes to try some of your pork. That way you give time for the pork to cool down, so it’s similar to what the judges tasted. And then go ahead and score yourself.

Use one of those KCBS comment cards. Look at the comment options on there. I touched on those in one of my earlier podcasts. Ask yourself, is it too mushy? Is it too tight? Is it just right?
Could it have use a little bit more salt or a little bit more sweetness? Think about those things.
If I’m at a comp with you, feel free to let me try your meat. I will warn you though, I am 100% honest. I’m a certified barbecue judge. I’ll let you know if I think it needs a pop of sugar or a pop of salt, or if it’s absolutely perfect. I’ll let you know if I think it’s a little on the mushy side or a little on the tight side.
Either way, I want to give you my honest feedback because that’s only going to help you become better if I just tell everybody, great job, that’s wonderful, then it’s not going to help you improve. So look for those people in your life who are going to give you the honest feedback.
I hope these competition barbecue tips have been helpful for you guys. If you have questions, leave a comment below.
If you guys enjoyed this podcast, it would mean the world to me. If you would subscribe, hit like, leave a comment. Let me know what you want to hear about in future podcasts. If you guys are competing this weekend, best of luck to you.
I hope you get those pork calls. And until next time, happy grilling!
Tune into more of my BBQ Tips podcasts or scroll around the website for even more helpful BBQ Tips.