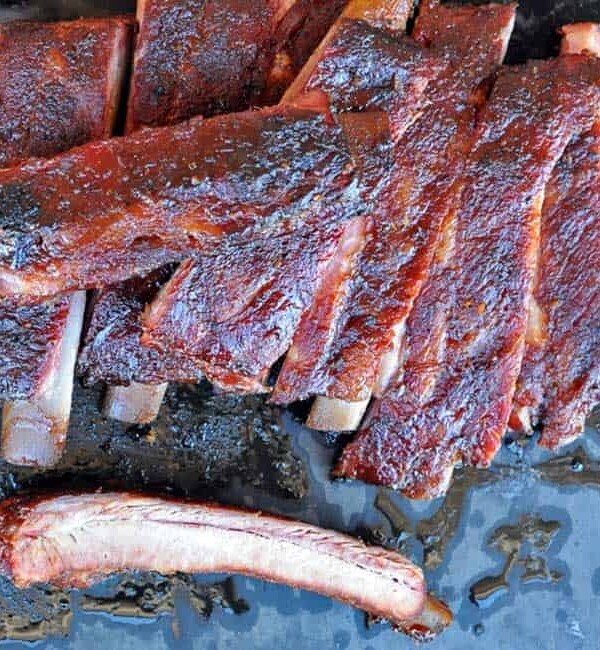
Tenderness seems to trip people up in the KCBS rib category. In this week’s BBQ Tips Podcast, Christie shares her competition ribs process.
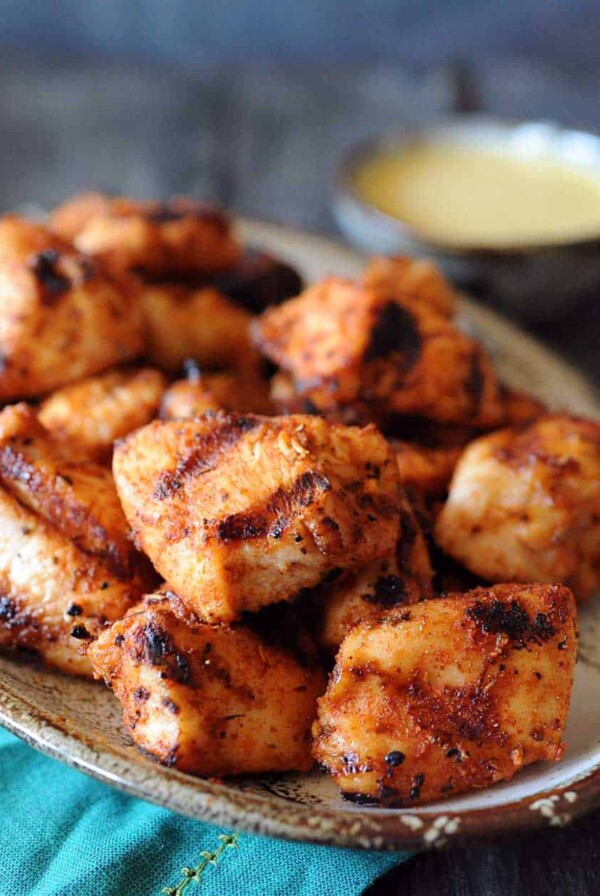
If you tuned into last week’s episode, you know that we touched on competition chicken. Well, this week we’re going to move on to the second meat category in a KCBS competition, which is pork ribs.
Listen to the BBQ Tips Podcast on
Table of Contents
KCBS Pork Ribs Rules
There are a few rules that you need to know before you actually even get started cooking with your pork ribs.
Rule number one is that the ribs have to have bones in them. You can cook baby back ribs or spare ribs or Saint Louis ribs, but you cannot cook those boneless country style ribs.
You are also required to have six portions in the box. That means that every rib has to actually be cut individually. You can’t put a rack of six in the box. You have to have at least six individual bones in a box.
But you can season and sauce your ribs however you’d like. I’m going to talk a little bit about my procedures as we get later into this podcast.
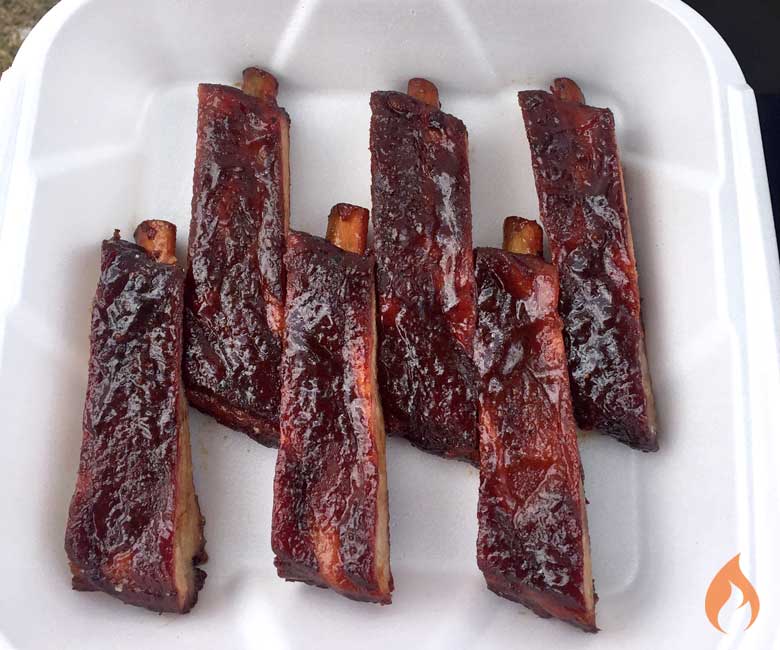
Then once your ribs are smoked up and sliced and ready to be turned into the judges, you put them in your styrofoam turn-in box and you can put them in any arrangement that you like.
Save this BBQ Tip
Enter your email, and I’ll send this link directly to your inbox. Plus, you’ll get new BBQ recipes and tips weekly.
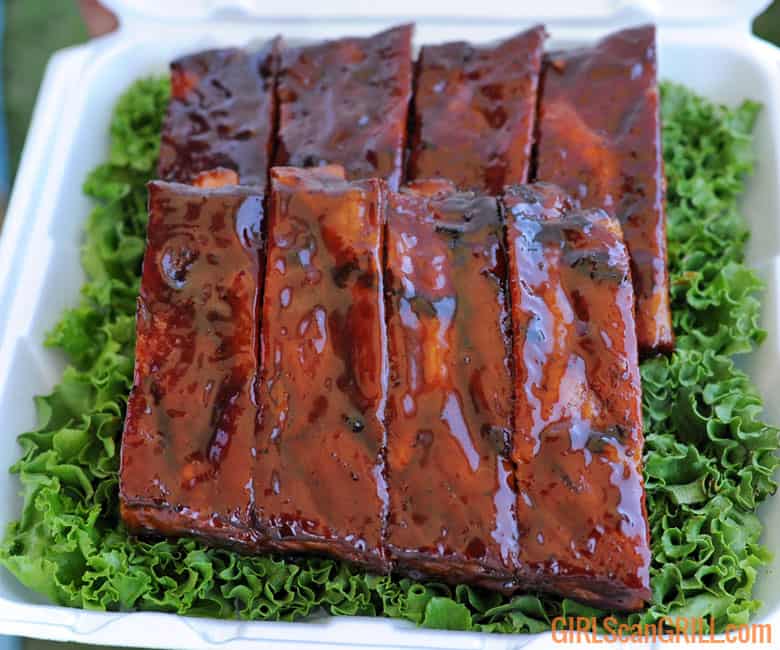
A lot of teams will do at least three bones on the bottom, and then they’ll put three bones resting on top of that.
You do need to be a little bit careful if you do three on three, because as you walk, it’s possible that they could flip over depending on how you put your greens on the bottom.
This is why some teams will do four bones or even five bones on top of five bones. So that way it really, really fills the box.
But be mindful, you want to turn in your best bones. If you only have six really good rib bones, limit it to six. Don’t feel pressured to turn in eight or 10 just to fill your box. It’s all about the best product that you can deliver to the judges.
The Judging Process
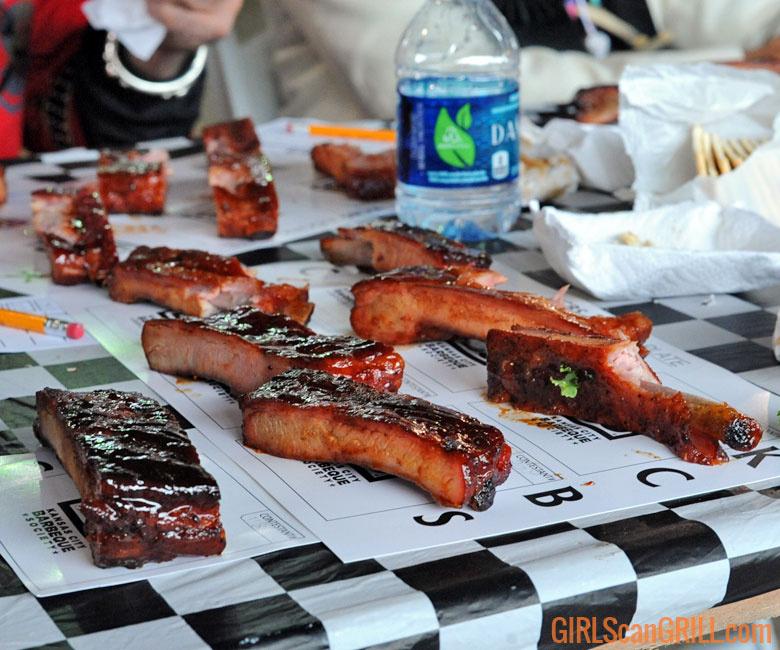
When you turn your box into the judges’ tent, it’s going to be carried to the judges’ table. The table will have six judges plus a table captain along with your box are going to be five boxes from five other teams that are competing, as well.
Appearance
The judges will be shown the box and it’ll be judged on appearance. And they’ll do that for each box.
Then they will take one rib out of each box and place it on their placemat. Then they’ll judge each one individually for taste and tenderness.
Make sure that you listen to my last podcast about competition chicken. I go in really great detail about the different comments and what they’re looking for, specifically when it comes to taste and tenderness, but I will be a little bit specific when it comes to ribs.
When judging ribs on appearance, they’re basically looking for the same thing that they are with all other meat categories. Does this meat look appetizing? Does it look appealing? Is it something that I’m excited to take a bite of?
In my experience in the judges tent, the judges don’t just look at the top of the box and at the ribs themselves. They will turn their head to the side and look at the side of the meat where the slice is. They want to see. Does it look juicy? Am I excited to take a bite of that? So keep that in mind when you turn your ribs in.
Taste
When it comes to taste they’re looking for overall, how well does this pork rib taste? Do the seasoning and sauce complement the pork ribs so that the pork really stands out. Or are they overpowering. Is it too sweet? Is it too salty, too spicy, etc.?
Tenderness
Tenderness seems to be what gets everybody tripped up in the rib category, myself included.
With ribs, they are supposed to be a little bit different in competitions than you would expect them to be at a restaurant, or even in your backyard.
We always hear the phrase fall-off-the-bone ribs. That’s when you take a bite, and it’s so tender that the meat just falls off the bone. Sometimes you pick it up and the bone doesn’t even stay connected.
That is not good in a competition.
In a competition that’s considered overdone. The meat can actually end up being a little bit mushy. So you can get scored down for that.
Instead, the rib should have a slight tug. When the judge takes a bite, they are instructed to bite the meatiest side of the rib itself. They’ll take a bite, and it should have a slight tug as it pulls away.
It should actually leave an indention into the side of the rib where they took that bite. If they take a bite and all of the meat falls off the bone, then it’s over. Then they’re likely to give you an eight or a seven in tenderness.
If, however, they took a bite and it’s meaty and juicy and really palatable in their mouth, but the rest of the meat stayed on the bone, that’s when you’re going to get a nine.
The challenge is finding the balance where it’s not too overdone that it falls off the bone, or too underdone to where they go to take that bite, and they actually have to tug at it harder or it dries out or it seizes up.
We’re going to talk about what I do to work through that process.
Selecting Ribs
All right, let’s get into the cook. The first thing we need to do is pick out our ribs. I always cook Saint Louis style ribs. If I can’t find good Saint Louis style ribs, I’ll go ahead and buy spare ribs.
And then I will slice off those extra bones to trim them down to Saint Louis style ribs.
Marbling
When I’m at the grocery store, what I’m looking for in my ribs is a lot of marbling on the top side where the meat is, the meatiest part of that rib. You want there to be white flecks in there, because that fat is going to equal flavor.
When it comes to fat, though, I want to make sure that there’s not big pockets of fat all over the top because that’s going to be hard to render, and that might give an uncomfortable mouthfeel to the judges.
I just want it to be really beautiful meat with marbling, not big pockets of fat.
Thickness
I also look at the thickness of the ribs themselves. Do they look meaty? I mean, usually you’re going to maybe find a half inch to an inch if you’re lucky, on the thickness of ribs, but stay away from those ones that are mostly bone with very little meat on top, because that’s just not going to be a good bite.
Bones
Lastly, I turn them over and I look at the back side and I see if the bones are straight. Sometimes the bones will be really crooked, which means when it comes time to slice my ribs after they’re cooked, they may be a little cattywampus.
So I try to look for straight bones, but not at the risk of losing the marbling.
If I find a beautifully marbled rack of ribs, but the bones are a little bit crooked, I will pick those over the straight bones any day because it really comes down to the bite.
The other part with appearance, if they’re a little bit crooked, the judges shouldn’t judge you down for that. So really focus on taste first.
I will say, when you go to like the big box stores like Sam’s Club or Costco, it may be a little bit hard to pick out your ribs because they often come in multi-packs. So you might get two to four ribs that are packaged together. So it’s hard to know if you’re going to get a good set of ribs in that full pack.
Look for the outer ones. If they look really good, then hopefully the interior ribs that are kind of stacked on top of each other are also good.
But you do run the risk of once you get at home, that maybe one of those racks is not as desirable. If that’s the case, just refreeze it, set it aside and cook it for your backyard cook.
Brands
When it comes to brands, I’ve cooked a lot of different brands. I used to cook Smithfield when those were regularly available. Lately I’ve been cooking a lot of Hormel, which turn out really well.
I just tried the Sam’s Club ones last week and those performed well. Compart always does really good for me, and I’ve also tried Prairie Fresh, so just look around at the ones that work best for you.
Give them a cook at home, give them a taste. Again, look for that marbling, look for that meatiness. And really, the brand shouldn’t matter.
Trimming Ribs
A couple days before the competition, it’s time to trim my meat. Be sure to go back to listen to one of my earlier podcasts. I talk about my entire competition prep process. So you can see how my timeline works, if you listen to that podcast.
But for now, we’re back at home. We’ve got the ribs, they’re thawed, they’re in the refrigerator. Time to trim them.
You’re going to want to have a lot of paper towels handy, because when you cut open that cryovac, there’s going to be a lot of liquid that comes out. You want to pat them dry and then put them on your cutting board.
I use a cutting board that has a one inch grid pattern on it. I get those from Mudville BBQ.
When you look at a rack of ribs, there is the bone side and there is the meat side. So the bone side is going to be the part that’s really thin, that has the silver skin where there’s not really any meatiness to it.
The meat side is the top side of the ribs that has all of that beautiful meat.
Then when you look at the sides of the ribs, there’s the side that’s really bone. Like it’s really going to be hard to cut that.
And then there’s the opposite side that has the cartilage where it was connected to the other part of the spare ribs. That’s the part we’re going to cut.
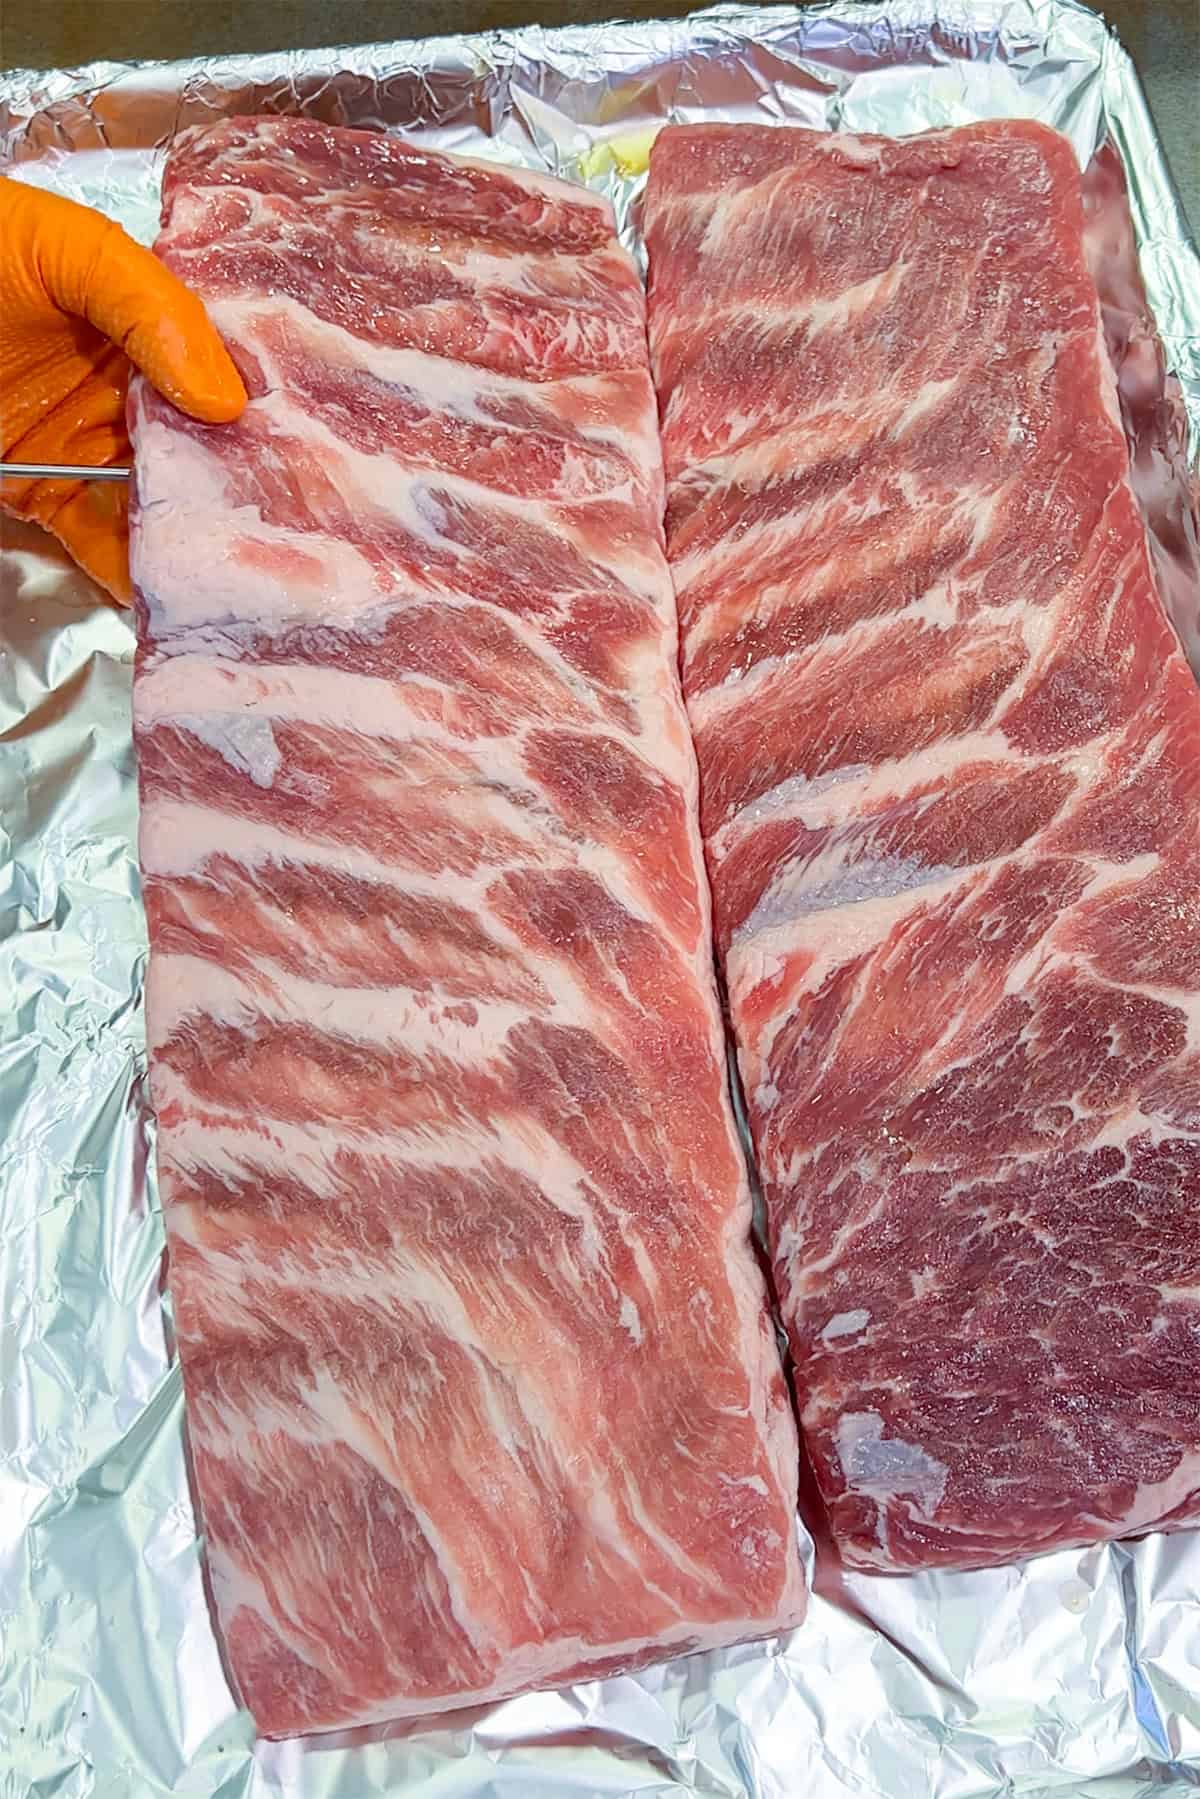
So I place them on my cutting board with the hard bones aligned along the line, and I have them bone side up. Then I take a very sharp knife, I use a butcher’s knife, and I trim those bones on the cartilage side until they are five inches.
So I basically use those squares and I count five inches, and then I cut a straight line so that my ribs have a really nice evenness to them.
I do this with all four racks of the ribs that I’m cooking.
After that, it’s time to even them up on the other side. So I cut off the first two bones on the thicker part of the rib, and then I count usually eight or nine. Most of the time I do nine bones, count down nine bones, and then trim off the other end, where it’s a little bit more of the thin meat and the smaller bones.
Trim those off. So now you should have a beautifully, perfectly rectangular slab of ribs.
The next thing I do is on the underside with the bones up, there’s going to be a flap of meat that rests over the bones. I just take my fillet knife and I just slice that piece right off.
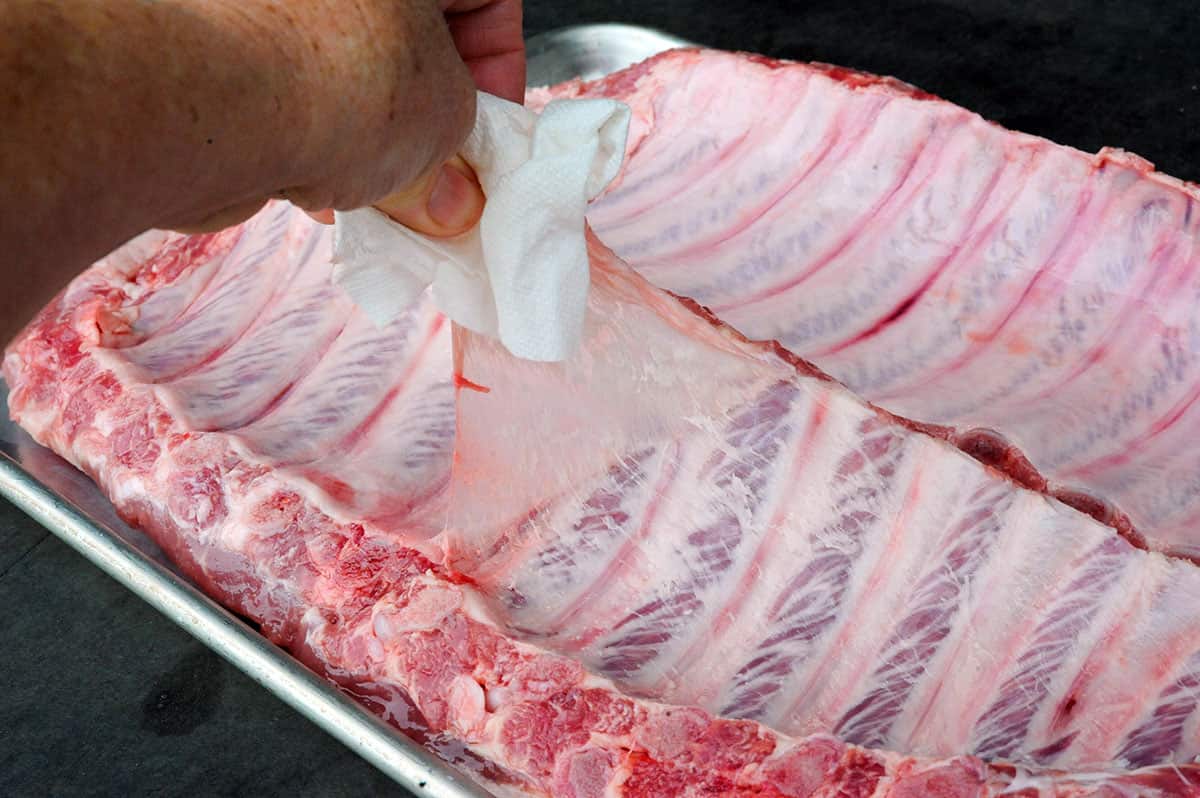
Then, using a paper towel, I grab the silver skin, usually from the middle, and I just pull at that until I can pull off the entire silver skin.
Next, I flip the ribs over so the meat is on top. Now I’m looking if there’s any fat pockets that are on top that are really noticeable, I’ll take my fillet knife and I’ll just gently shave some of that away.
You don’t want to go too deep because then you’re going to create a gouge. That’s why you want to look for ribs that don’t have big fat pockets in the first place. But if you have some you can shave off just a little bit of that.
The final step is I take a pair of scissors and I trim along the full outer edge on the top side. This just kind of smooths it out, makes it round, and it’ll prevent splintering when it comes time to slicing the ribs after they’ve been smoked.
After each rack of ribs has been trimmed to perfection, I go ahead and double wrap them in plastic wrap and put them in the refrigerator.
You’re welcome to put them in a bag and vacuum seal them if you’d like. But in the next step I’m going to explain why I go with the plastic wrap.
Injecting Ribs
All right, it’s Friday. I’m at the competition either Friday afternoon or Friday evening, I’ll go ahead and inject my ribs. When it comes to injection, use your favorite mix.
There’s a lot of pork injections out there. Sometimes people add apple juice or maple syrup. Just go with flavors that you really like that are pleasing, that you think the judges are going to go for.
When it’s time to inject, I go ahead and I place one rack of ribs on a sheet pan. I unfold the plastic wrap and I actually leave the rib still on top of the plastic wrap, and I have the meat side up.
Then, I pull the injection into my injector and I take the needle, and I put it between each bone, starting between bones one and two.
I insert it all the way in, and as I’m injecting the injection into that meat, I’m slowly pulling it out back towards me. And that’s allowing the injection to get fully into the meat.
I do that in between each and every one of the bones.
Then I actually finish by doing a little bit more on top. So instead of going in through the side, I take my injection needle and I kind of work it at a 45-degree angle at the top of the rib, doing the same thing, kind of pushing it all the way in and then pulling it out slowly.
I really want that meat in between the bones to start to plump up. That’s where you’re going to get all that juiciness.
If you did it properly, you shouldn’t end up with too much liquid on your plastic wrap. It should all be within the meat, which is great.
Seasoning Ribs
Then you can take a very, very light dusting of seasoning. Don’t do too much, just a very light coating of your favorite rub. It can be something that has a little bit of salt, pepper, garlic.
It could be something on the sweeter side. You could even just do some turbinado sugar if you want on top, but keep it light. If you season your ribs too early, they can get hammy and they can have kind of an odd consistency. So be very light on that first seasoning.
Then I just wrap it back up in that plastic wrap, and I put it in the refrigerator or the Cambro and finish with the next three ribs.
All right, Saturday morning, time to pull the ribs out of the Cambro and season them for real. This time I’m going to take them out of the plastic wrap, and I’m actually going to get rid of the plastic wrap at this point.
And I lay my four ribs bone side up on either a sheet pan or a piece of foil, or just something to protect the counter.
Then I take a layer of flavors of different rubs, and I sprinkle those all along the back side. Depending on how many rubs you use is whether you want to go light or medium or heavy in your application.
In the end, I want most of the meat to be covered and I use several different rubs, so most of them just get a really light dusting.
There’s a couple that I really like the flavor profile of that I’ll actually add a little bit more too, because I want that to really shine and stand out. But go ahead and sprinkle the backside of your ribs with whatever seasonings you’d like.
And then and then let them rest on your counter for 15 to 30 minutes. What’s going to happen during this time is that seasoning is really going to start interacting with the meat, and you’re going to start to see a little bit of a sheen or a glisten.
That’s what you want. So the seasoning actually sticks to the meat.
If you were to just season it and flip it, a lot of that seasoning is just going to come off and fall into your pan. So let it rest again for that good 15-30 minutes. Then give it a flip and repeat with the top side. You can use the same rubs.
You can use different rubs. It’s completely up to you. Again, this is all about you creating your favorite flavor profile that you’re trying to do to impress the judges.
Let your ribs again set for 15 to 30 minutes before you put them on the grill.
Smoking Competition Ribs
As you guys probably know by now, for competitions, I cook on Hunsaker drums. For ribs, I set it to 300 F degrees. I fill my charcoal basket with Cowboy lump charcoal and Cowboy charcoal briquettes. And then for wood chunks, I usually use hickory, cherry and sometimes pecan.
With a drum smoker, you have two options. You can start by laying your ribs flat on the grill grate or you can hang them.
I like to hang ribs because I find that that gives more even cooking. If I lay them flat on the grill grate, I find that I need to maybe rotate them or flip them over a little bit so they get nice and even cooking.
But when I hang them, they get really nice and beautiful color on both sides.

When I hang my ribs, I use metal rib hooks and I take that rib hook and I just stick it under the first bone on the skinnier side of the ribs. Kind of the thinnest part, not the big meaty ones. Right on that skinny side. Tuck it right into the first bone, and then you should be able to hang it just fine.
I have a rib hanger in my Hunsaker, and I place four bones right on top of that rib hanger and just let them drop in there and then keep the temperature at 300 F degrees.
I cook my ribs for about an hour and a half at this temperature. In the hanging process, and I spritz them every 20-30 minutes or so, just whenever it looks like they need moisture.
When it comes to spritz, you can use like a Parkay spray butter, you can use water, you can use apple juice, vinegar. Again, this is all about what flavor profiles you want to add to your ribs. The main thing is you just want to introduce that moisture.
What I’m looking for during that first 90 minutes is color. I really want there to be a mahogany bark formed on these ribs, and I want to start to see the fat sizzle a little bit so that I know that it’s really cooking through and rendering down.
Wrapping Ribs
After the 90 minutes, it’s time to wrap your ribs. During this phase is when we’re going to add way more flavor, way more moisture, and really get those ribs tender.
So I lay foil all over my counter right before that 90 minutes is up. I do double sheets of foil per rack of ribs. So I’ve got four double sheets of foil laid out on my counter.
You want to fold up the edges of your foil just a bit to create kind of a boat, because we’re going to add a lot of liquid inside. And you don’t want that to flow all over your counter.
What you add to your rib wrap is completely up to you. Again, that comes down to you as a barbecue pitmaster. What is your signature flavor?
I do recommend adding some butter that’s going to add flavor and moisture. There are a lot of rib glazes out there that are also fantastic. There’s like cherry habanero, peach jalapeno, apple habanero, I think. Lots of different mixes of fruitiness and spiciness.
nd I find that judges, at least on the West Coast, really do like those fruitier flavors on ribs. So I usually use one of those.
Blues Hog Tennessee Red is another really popular ingredient that people put in their rib wraps. Also, in their pork wraps. It’s more vinegar based, but it’s got a sweetness to it. It goes really great in your wrap.
When it comes to adding sweetness, people use all sorts of things. You can use turbinado sugar, brownulated sugar, regular brown sugar. You could use honey, hot honey if you want a little bit of spice and even maple syrup or apple juice.
I start by putting my bones down on some butter, and then I add all of those flavors and all of those syrups and sauces and sugars and everything else inside. I also hit it with a little bit more seasoning, so it’s not overly sweet, and I still get a pop of that savoriness.
And then I fold that foil carefully over the ribs, making sure that none of that juice is falling out, and I seal them up tightly. Once all four are sealed up tightly, I head back out to the grill.
At this point, I’ve taken the rib hanger rack out of the grill and replaced it with just a traditional rack. And then I place my four ribs on the grill and continue to cook them at 300 F degrees for about 30 minutes.
After that 30 minutes, I go ahead and open the foil and flip them so this time the bones are up and the meat is down in all that liquid. Then, wrap them up tight.
During this phase, it’s really important to make sure that you still have a lot of liquid in your wrap. If you don’t, it’s possible that you char or overcook the tops of your ribs, the meat side of your ribs, that’s happened to me before.
And what you end up with is kind of a thick bark that’s really hard to chew through. This is particularly common in higher altitudes, where your liquid is going to evaporate a lot faster.
So once you do that flip, just make sure there’s enough liquid in your foil. If there’s not, you can always add a little bit more.
Trusted Tenderness Tests
I let the ribs cook for another 30 minutes or so. And then I go and check on them. At this point I’m opening up the foil and I’m flipping the ribs over again, so the meat is on top.
Then you’re going to want to do a couple of different tests to see if your ribs are ready. And this is really the key point in getting that tenderness perfect.
Bounce Test
The first thing you’re going to want to do is the bounce test. This is something that I learned from Tim Scheer and Brad Leighninger during one of their classes.
You pick up your ribs holding it on the bone side, and you just let them arch over your hand. If they bend easily and start to crack and almost fall apart, then they’re perfect.
If they still have a little tug to them, they don’t have a lot of bounce and they’re not cracking, then you need to let them cook for a few more minutes.
Flip them back over. Wrap them back up in that foil again, meat side down. Check on them again in ten minutes and repeat that process.
If, however, you pick them up and they actually fall apart, unfortunately you’ve overcooked them and there’s no turning back.
Temperature Test
Another way to check your ribs is by temperature. So I will take my Thermapen probe and insert it in between two bones in the side of the meat.
I’m looking for a temperature of 208-214F, depending on what elevation I’m cooking at. I’m also feeling it.
I want it to glide in smoothly, but if I hit those marks of 208-214 F usually actually 212 F, then I know I’m in a pretty good place and I know that my ribs are most likely ready, but I still do that bend test just to make sure.
During this whole phase, don’t second guess yourself. What may happen during this point is the bones on the end on that thicker side, they may actually start to pop out and like completely loosen from the ribs – especially if you hung your ribs.
And that might be a little scary because you’re afraid, oh my gosh, these ribs are going to be overcooked. I have found that sometimes those two bones will pop out and that’s okay.
The rest of the ribs are maybe not quite ready, or maybe they need a little bit more time. So again, if you focus on that bend and crack and the probing and don’t worry about what you’re necessarily seeing with those two end bones, you should be okay.
Holding Ribs
Once your ribs pass those two tenderness tests, you can pull them off the grill. I like to keep them on the counter, meat side down, fully wrapped.
I don’t like to put them in the Cambro, because then they can tend to get overcooked and become mushy.
If you have reached a point where your ribs are maybe a little bit overcooked, you can vent the foil a little bit and that’ll kind of stop the cooking, so the heat’s not still inside.
But I’m usually at a point where I like the tenderness, so I keep them wrapped up tight and keep them on the counter.
Final Stages of Competition Ribs
We’re getting down to the final stage. Time to slice sauce and put them in the box. I will open up one rack ribs and I will take it out of the foil. But keep the foil there.
Slicing competition ribs
Take it out of the foil and place it on my cutting board, and go ahead and slice between each bone.
I like to slice them with the bones up. That way I have fewer splinters and they seem to cut more evenly. And I know exactly where the bones are, so I can make as even cuts as possible.
Try to make as straight of cuts as possible to get straight bones. You want to try to get even meat on both sides of the bone, because you never know what side the bone the judge is going to bite from.
After you make your slices, go ahead and taste one of the ends, one of the ribs that you know you’re not going to turn into the judges and see how you like it.
Then put all of those sliced ribs back in the foil meat side down in that braising liquid, and repeat with the next three racks of ribs.
With each of those, you want to keep in mind which one was the best, which one had the best tenderness. You can adjust the flavor, but the flavor will probably be similar in all of them.
You’re going to want to rank your rack of ribs so you know which one is the most tender and then the second most tender and so on.
Saucing ribs
While I’m slicing my ribs, I’m usually heating the sauce on my smoker.
Then once I’m done with the slicing, I take the sauce off the smoker and it’s time to get them sauced. I’ve tried a few different techniques.
This is the one that works best for me, but you probably see other techniques out there. So give them all a shot until something hits for you.
I keep my ribs meat side down in the braising liquid in the foil, and I take that warm sauce and just brush it along the back side. Then I hit it with just a little bit of finishing rub.
Finishing rub is usually pretty fine. It’s something that’s going to have a little extra pop of flavor, whether it’s salt or MSG or fruitiness or sweetness, depending on what your rib needs.
After I brushed them all and hit them with that rub, I seal them back up tight in the foil and I put them back on the smoker. This is still again with the meat side down. I only brush the back sides of the bones right now.
What’s happening at this point is you’re reheating your ribs in case they’ve lost some temperature, and you’re just getting that braising liquid going again.
In the past, I used to slice my ribs and sauce them, then put them on a rack and put them on the smoker. But I have found that that tends to dry out my ribs, so I like this process better.
I sauce the back side, put them in the foil with the braising liquid, put them on the smoker and that heats them up and really keeps them moist. Then after about 5-10 minutes, I bring them back to the counter.
You’ve got to keep track of what were your best two racks though. Make sure of that before you take them out to the grill.
Then, keeping the ribs in the foil, I open the foil pouch. I flip the ribs over so now they’re bone side down, and I take my warm sauce and I brush it along the tops add a little bit more finishing rub.
Sometimes I’ll dip my brush into that jus and kind of brush it on there again just to add moisture, add flavor and keep them really nice and tender.
Boxing ribs
Now it’s time to box them.
When you’re deciding how many ribs to put in the box, it’s really going to depend on how many racks of good ribs do you have.
If only one of your racks of ribs is amazing, then you may want to limit it to six bones. Take six bones from that one rack and put them in your box, either three in the back and three on top, or arrange them all flat in the box, whatever you prefer.
If you have two racks of ribs that are really good, then you can go ahead and put eight or even 10 bones in a box.
Again, you can layer in four on four or five on five. That’s completely up to you.
Once you figure that out, go ahead and place them in the box. Remember to look at the side of the meat. If it looks a little bit dry, take your brush, dip it in the jus in that foil pouch, and kind of brush the sides to make sure it’s nice and glistening and nice and meaty and juicy looking.
Clean up your box with a wet paper towel or a Q-Tip. Make sure that your greens look nice if you’re using those, and then go ahead and take a picture so you can remember what you turned in for next time.
And then go ahead and close the box and get it delivered.
Tips to Analyze Judges’ Scores
What I like to do after I turn my ribs in are leave a couple of bones from the best racks on the counter. Then I wait 10-15 minutes and I take a bite of them again.
Because think about it, it’s going to be at least 10-15 minutes before the judges taste your ribs.
So you want to experience what the judge is going to experience. You may have turned in the most amazing ribs.
You think, how can the judges be wrong? But if you actually wait that 15 minutes and take a bite, you’ll know what they’re tasting. And it’s possible that your ribs have seized up, that they got a little bit tighter and that’s what the judge is experiencing.
So what you experience when you put them in the box may be a little bit different. So by tasting them yourself, you’ll know what the judge is tasting. And that’ll give you a better reference point for next time.
If they did seize up, maybe you just need to cook them a little bit longer. Make them a little bit more tender next time.
After the competition, when I’m evaluating my scores, I really like to pay attention to the rib category. If you’re turning in eight ribs, let’s say four bones on the bottom and four bones on top, look at your judges’ scores. The first four scores on your judges’ sheet are probably going to be that top rack.
In my experience in the judges’ tent, when a judge takes a bone, they’ll take the first one on top, the next judge will take the second one on top, and so on.
Then once they get to judge number five or judge number six, they’re going for the bottom rack. So if my scores on the last two judges are a little bit lower than the first four judges, it’s likely because that top rack of ribs was better than that bottom rack of ribs.
So if you ever find yourself questioning, why did judge one give me a nine in tenderness and judge six gave me a seven in tenderness, it’s because they didn’t have a bite from the same rack of ribs.
Also, go ahead and evaluate your taste scores. They’re likely going to be nines or eights or sevens. If they were on the seven side, you’re going to have to figure out if they didn’t leave you comment cards.
Was it too sweet? Was it too salty? What was it about it that maybe I could change for next time? And then it’s just all really a matter of experimenting.
If, however, your ribs usually hit with taste and it was just an off day, don’t go changing your formulas just because of one round of judging. Kind of give it a go.
But if all of a sudden you see it start to slip for the next three or four or five competitions, then it may be time to make some adjustments.
I hope these rib tips have been helpful for you. If you implement any of this and you try it out and it works for you, leave me a comment. I would love to hear it.
Thank you, fellow pitmasters
I do need to give a shout out to a few pitmasters who have helped me on my competition journey.
I have attended several competition barbecue classes, and the information that I share is really a compilation of what I have learned from these individuals.
As I mentioned, Tim Scheer and Brad Leighninger. I went to their class several years ago. They have a great Gateway class where if you like to cook on drums, that’s a really good class for you.
In the very beginning, I went to Richard Fergola’s class and Sterling Smith’s class from Loot ‘N’ Booty and Fergolicious BBQ. Also a fantastic class.
I’ve been to Travis Clark’s class. I’ve been to Bushmaster’s class. That’s the most recent one that I went to.
All of these guys have really great techniques. Some of them are similar. Some of them are different, but once you attend the multiple classes, you can kind of make things your own.
So big shout out to them. Thank you to them for sharing all of their knowledge so that I can become a better pitmaster, and now I’m hoping that I can help you guys become a better pitmaster, as well.
Until next time, good luck if you’re competing and happy grilling!
Tune into more of my BBQ Tips podcasts or scroll around the website for even more helpful BBQ Tips.