The term corned beef and pastrami are often used interchangeably. There is no shame in not knowing the difference. I was in that camp not too long ago.
This website is all about teaching you the things I learn, and what I’ve learned is that corned beef is basically pickled or brined beef. While pastrami is when you take that beef and smoke it.
Save this BBQ Tip
Enter your email, and I’ll send this link directly to your inbox. Plus, you’ll get new BBQ recipes and tips weekly.
Table of Contents
Probably, the most famous pastrami in the U.S. comes from Katz’s Delicatessen in New York — If you’ve seen When Harry Met Sally and the “booth scene,” you know Katz’s.
The Jewish deli not only corns (pickles) its beef, they smoke it, boil it and steam it. The process takes weeks.
Choosing the Right Cut
At Katz’s, they use beef navel. This is a cut of beef near the brisket, but closer to the plate ribs. You know…those dinosaur bones I’m always sharing on Instagram. Beef navel is not an easy cut to get at the grocer, and trimming the bones off of dino bones is pretty expensive, so I opted for a different cut.
Recently, I flew to San Antonio, Texas, for Chef Jason Dady’s Titans of the Tailgate. Amazing chefs from around the country come out and show off their one dish and try to woo the crowd. My favorite by far was the pastrami sandwich by Chef Jeff Bekavac.
After one bite, I stalked his tent to try to understand what made this pastrami so different from others I’ve had in the past.
I eventually learned that they corned and smoked a chuck roll. If you haven’t heard of a chuck roll, you’re not alone. It’s not a cut you find in the meat case. The chuck roll is the entire subprimal cut of beef that is broken down into things like chuck steaks, country-style beef ribs and the ever-popular chuck roast.
When I got home from Texas, I called up my butcher and asked for a chuck roll. Mind you, I didn’t really know what that meant, but sure enough I had a nearly 20-pound slab of meat to play with to make cured beef. After watching multiple YouTube videos, I figured out how to break it down.
In the end, I had a lot of cuts and a few 3-pound chuck roasts, which were much more familiar.
Tutorial: The Different Cuts of Beef
Tutorial: Learn to Make Homemade Pastrami Using Any Kind of Meat
Trimming the Chuck Roast
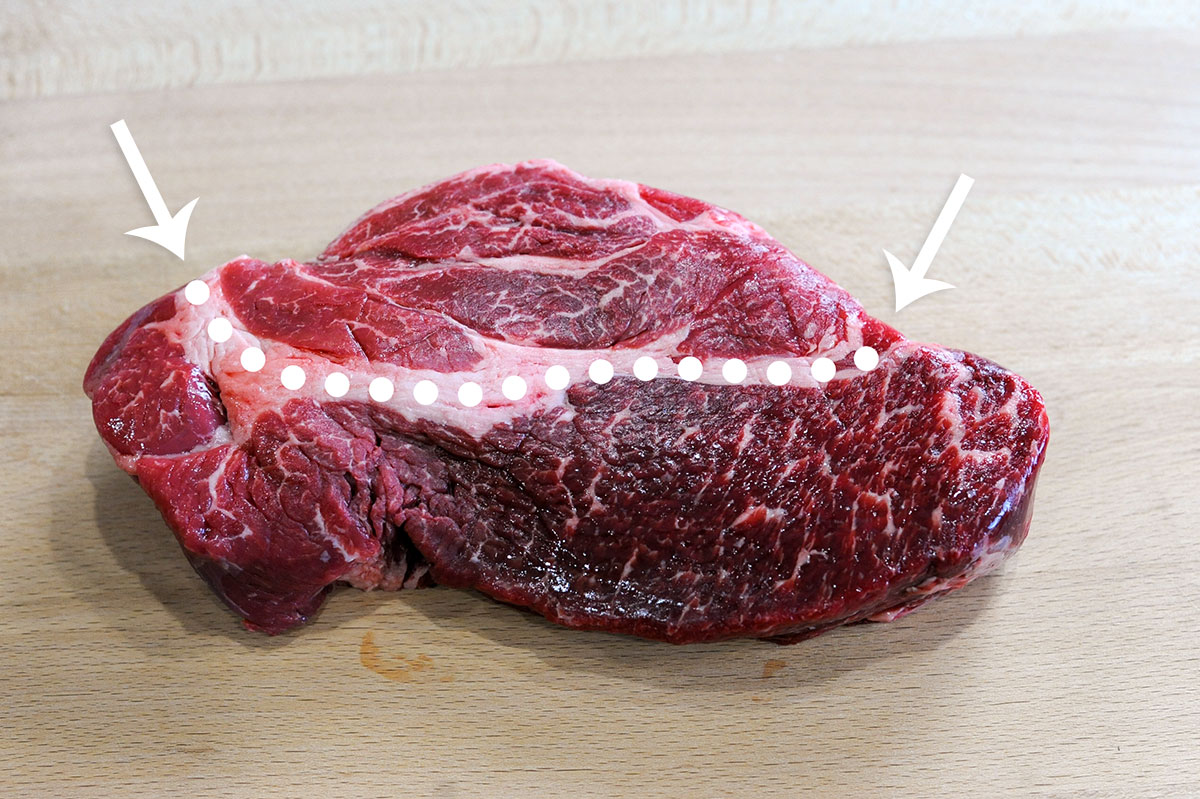
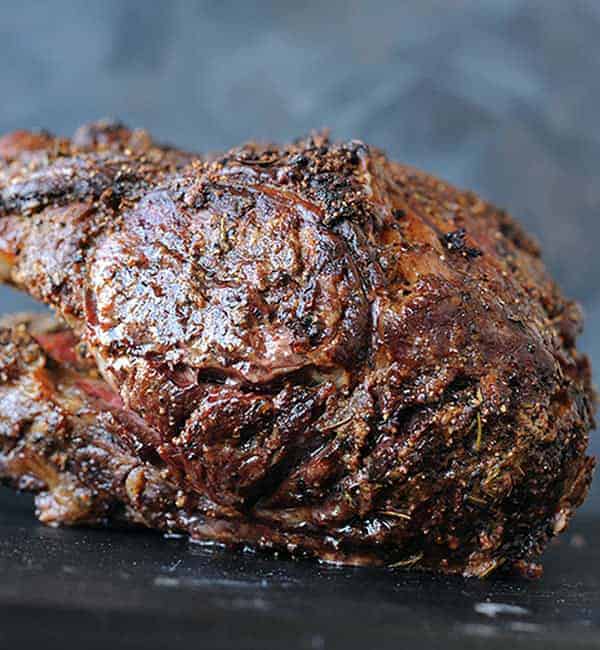
To mimic what Chef Jeff did in Texas, I broke down the chuck roast even further. Meat gives you a road map on how to butcher it. Generally, you just follow the fat lines.
For the chuck roast, I sliced it right down the line – like pictured above – and removed any fat that I knew wouldn’t be tasty after it was cooked.
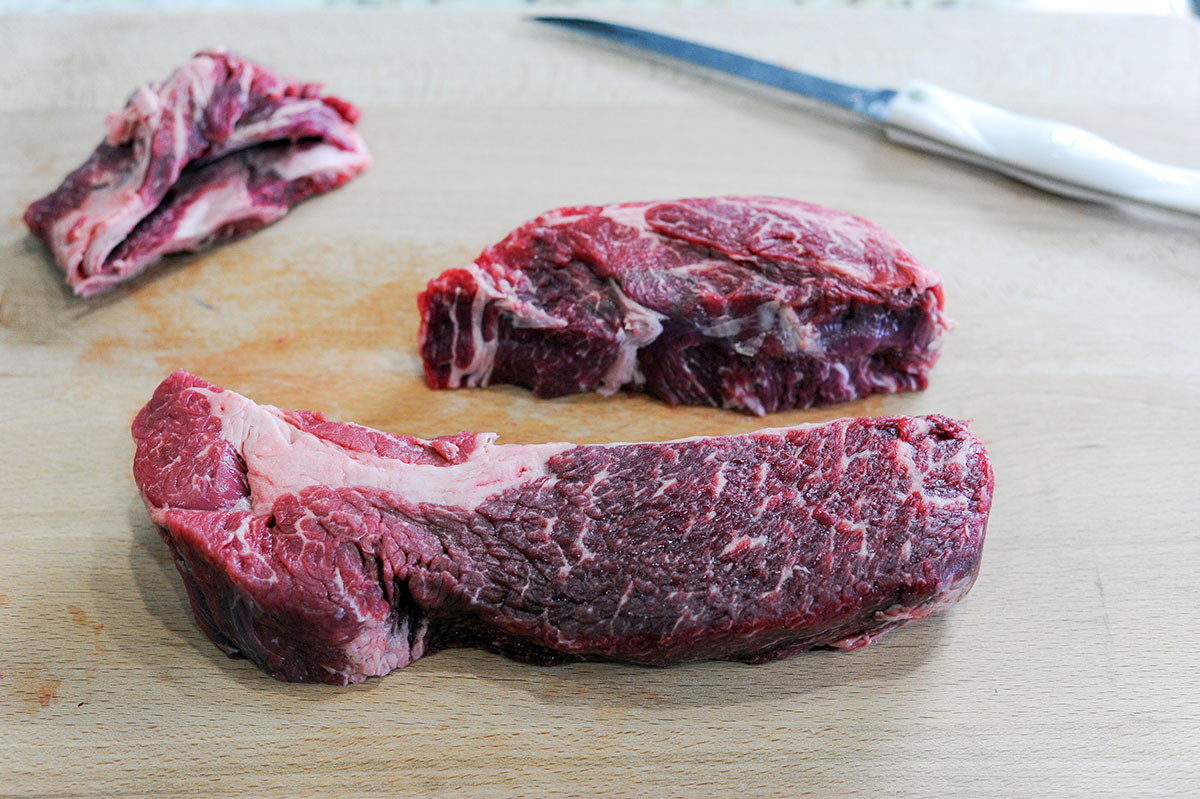
I ended up with two narrow cuts of beef. You should be able to tell from the picture above that the grain of the meat runs in different directions. This is another reason to separate it. In the end, you want to cut the slices against the grain. By separating it, that makes this process much easier.
Separating it also gives you more surface area for maximum bark coverage.
I want you to take another look at the picture above. Do you notice anything else? You should see the marbling. Chuck is what we use for pot roast and hamburgers. It’s a flavorful cut that doesn’t get the credit it deserves.
You can also use this recipe with brisket, but let’s be honest, brisket is a little daunting. You have to commit to more than a few pounds, it requires a lot more trimming, and after all the work, it can still end up dry.
This is why, from here on out, I’ll make my pastrami with chuck roast.
Making Corned Beef
Start with corned beef brine, which is made with water, salt, sugar, pink curing salt and pickling spices.
Pink curing salt or sodium nitrite is the magic ingredient that turns the beef that rosy red color. It’s been used for years to preserve meats. It helps stop the reproduction of bacteria, which is important since this process takes a few days.
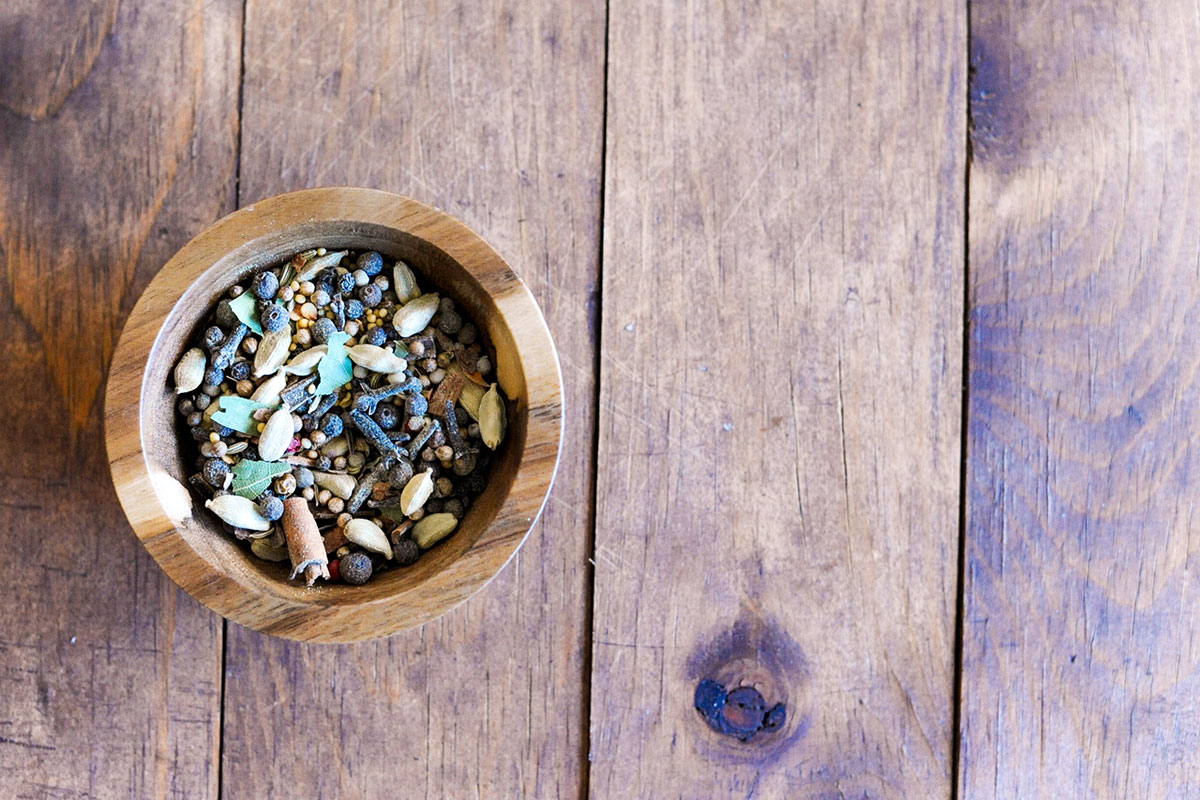
As for the pickling spice, feel free to buy a bottle of the pre-made stuff. I on the other hand like to mix up my own blend. I make a pretty big batch, so when I’m not corning beef, I can use it for homemade pickles and pickled red onions.
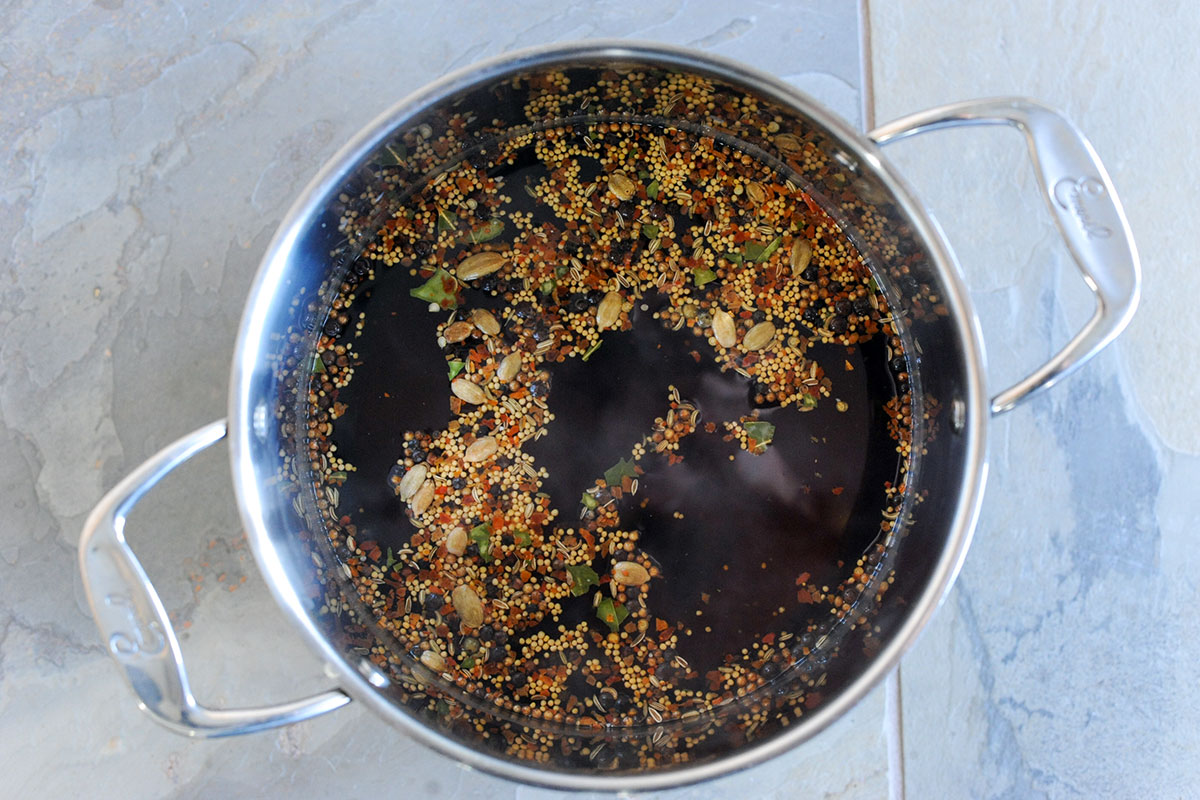
All of the brine ingredients will get cozy in a gallon of water for a while. You want the salt and sugar to dissolve and the spices to steep. Then, let it cool.
Place that beautifully trimmed up beef in a zip-top bag, and pour in the cooled brine.
As an extra precaution, I always put the bag in a large bowl or roasting pan, because inevitably that darn bag is going to leak. You don’t want beef juice and brine all over your fridge.
Let the beef get acquainted in the brine for 5-7 days. Most people tell you to toss the meat around every now and then for even coverage, but if you don’t, it’s not the end of the world.
Pastrami Rub
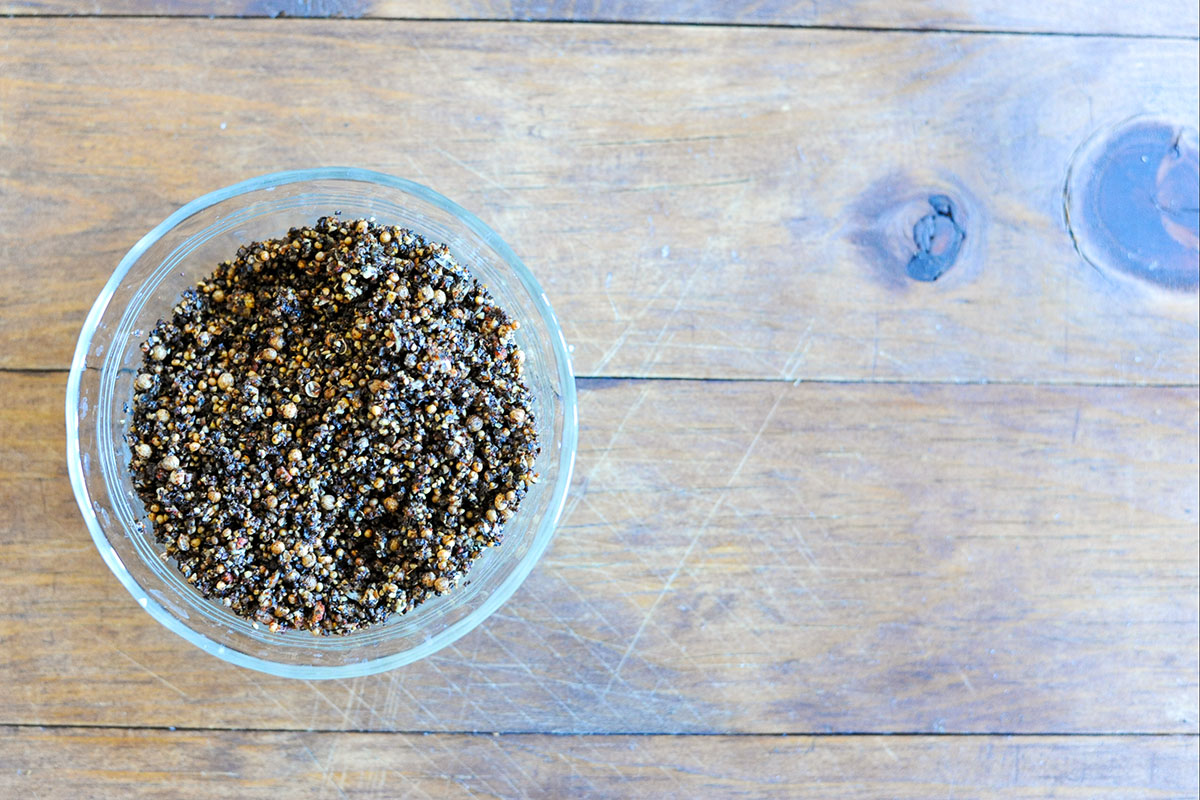
After the week of brining, you’ll rinse the beef off and get it ready for the pastrami rub.
This rub has similar flavors to the brine, but you don’t need to add any more salt. It starts with a base of black pepper, coriander seeds and mustard seeds. I like to toast them in a skillet to release their essential oils.
Then, add some sugar, smoked paprika and fresh garlic, and pulse them in food chopper for a quick grind. For the sugar, I use coconut palm sugar in my rubs because I like the texture and its slower melt factor, but you can also use granulated, brown, raw or turbinado sugar.

Take those spices and rub them all over the corned chuck roast. Place the beef on a baking rack on a sheet pan and let them rest in the refrigerator overnight, uncovered. This is essentially a dry brine.
Turning Corned Beef Into Chuck Roast Pastrami
At this point, you could boil the chuck roast and make corned beef, but instead we’re going for pastrami.
Fire up your smoker to 250F degrees. Place the rubbed beef on the grates and smoke for 2 hours.
If you only have a gas grill, you could use that too, but turning one burner on and setting the meat over the burners that are off. Just make sure the temp stays around 250F degrees and add some wood chips in a foil pouch to add smoke.
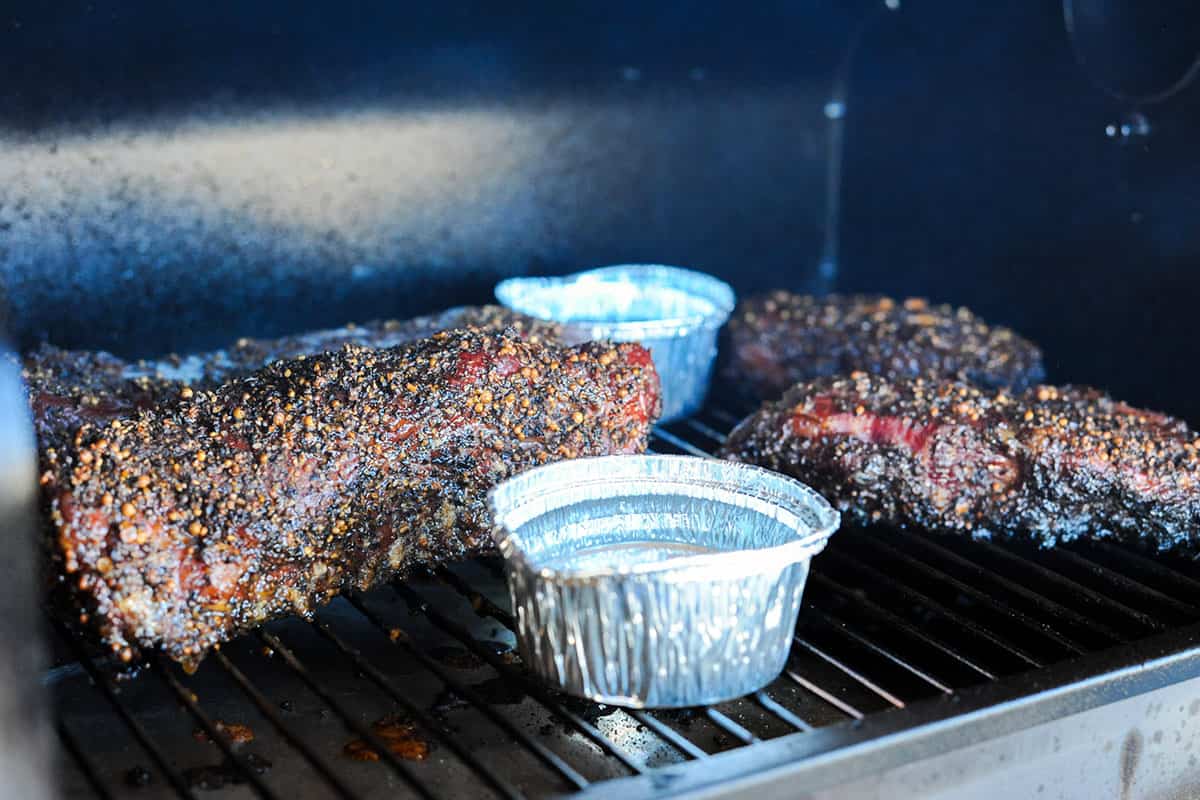
As I mentioned earlier, the pastrami at Katz’s Deli is smoked, boiled and steamed. We’re skipping the boiling, but we will add a bit of steam. After the second hour, add small pans of water to the grill grates. The water will let off steam that will fill the smoker, helping the meat become even more tender and juicy.
I wait until after the second hour for this step, because I want the smoke to be the star at first.
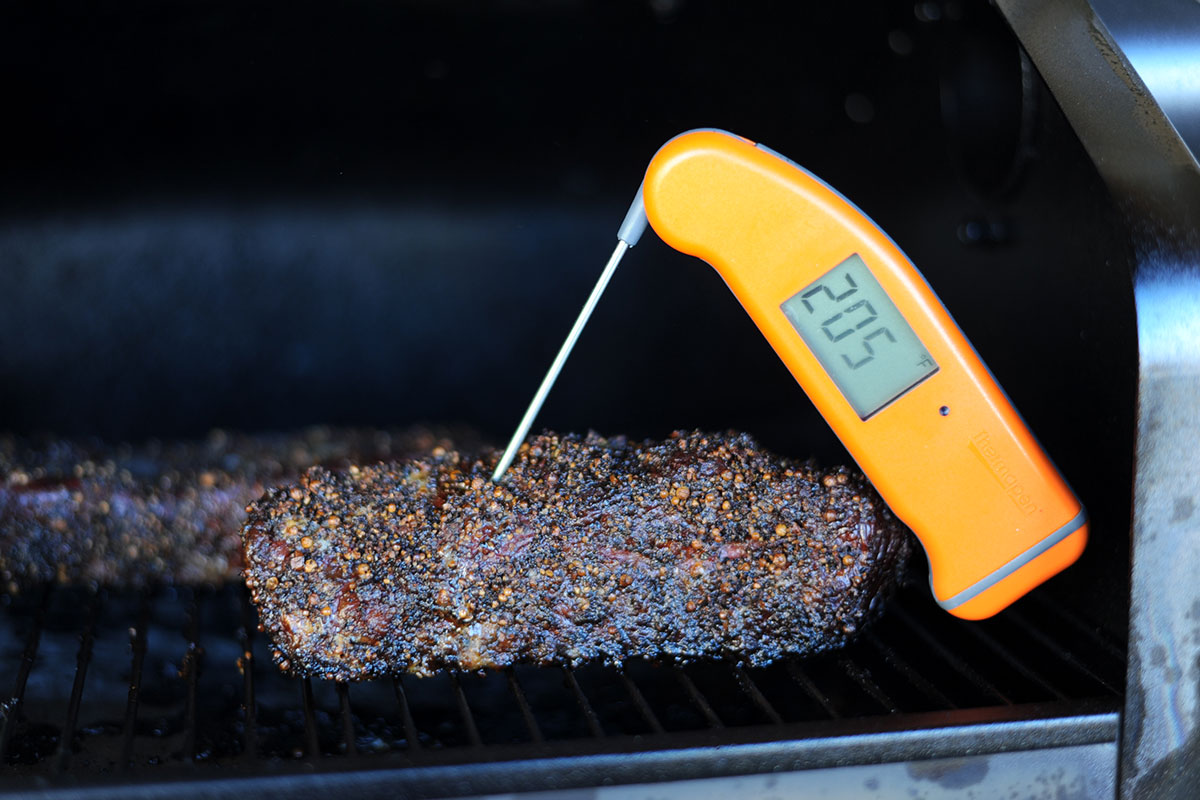
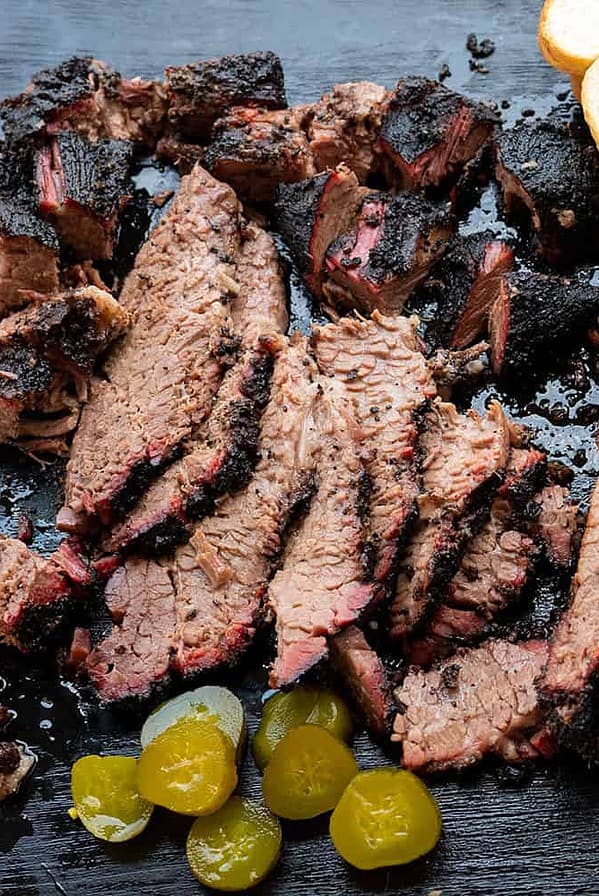
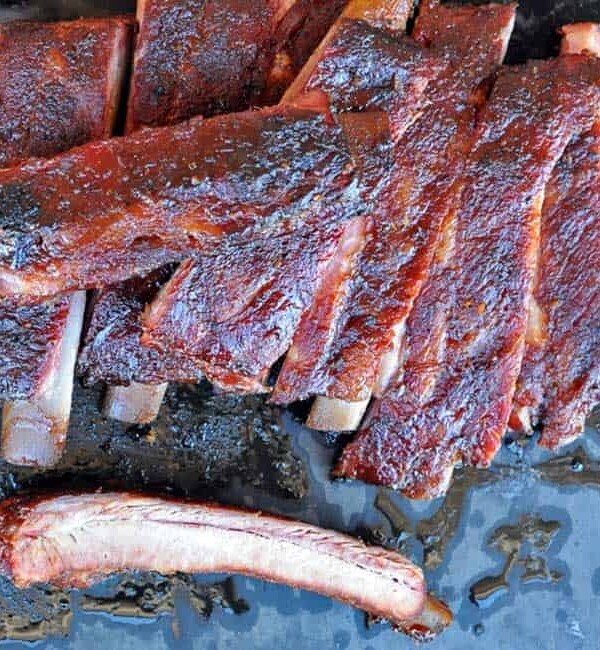
Smoke for another 30 to 90 minutes, until the internal temperature registers between 205-210F degrees using a digital thermometer. The smaller pieces will be done first.
Once they hit the mark, remove them from the smoker, cover them with foil, and let them rest for at least 30 minutes before slicing.
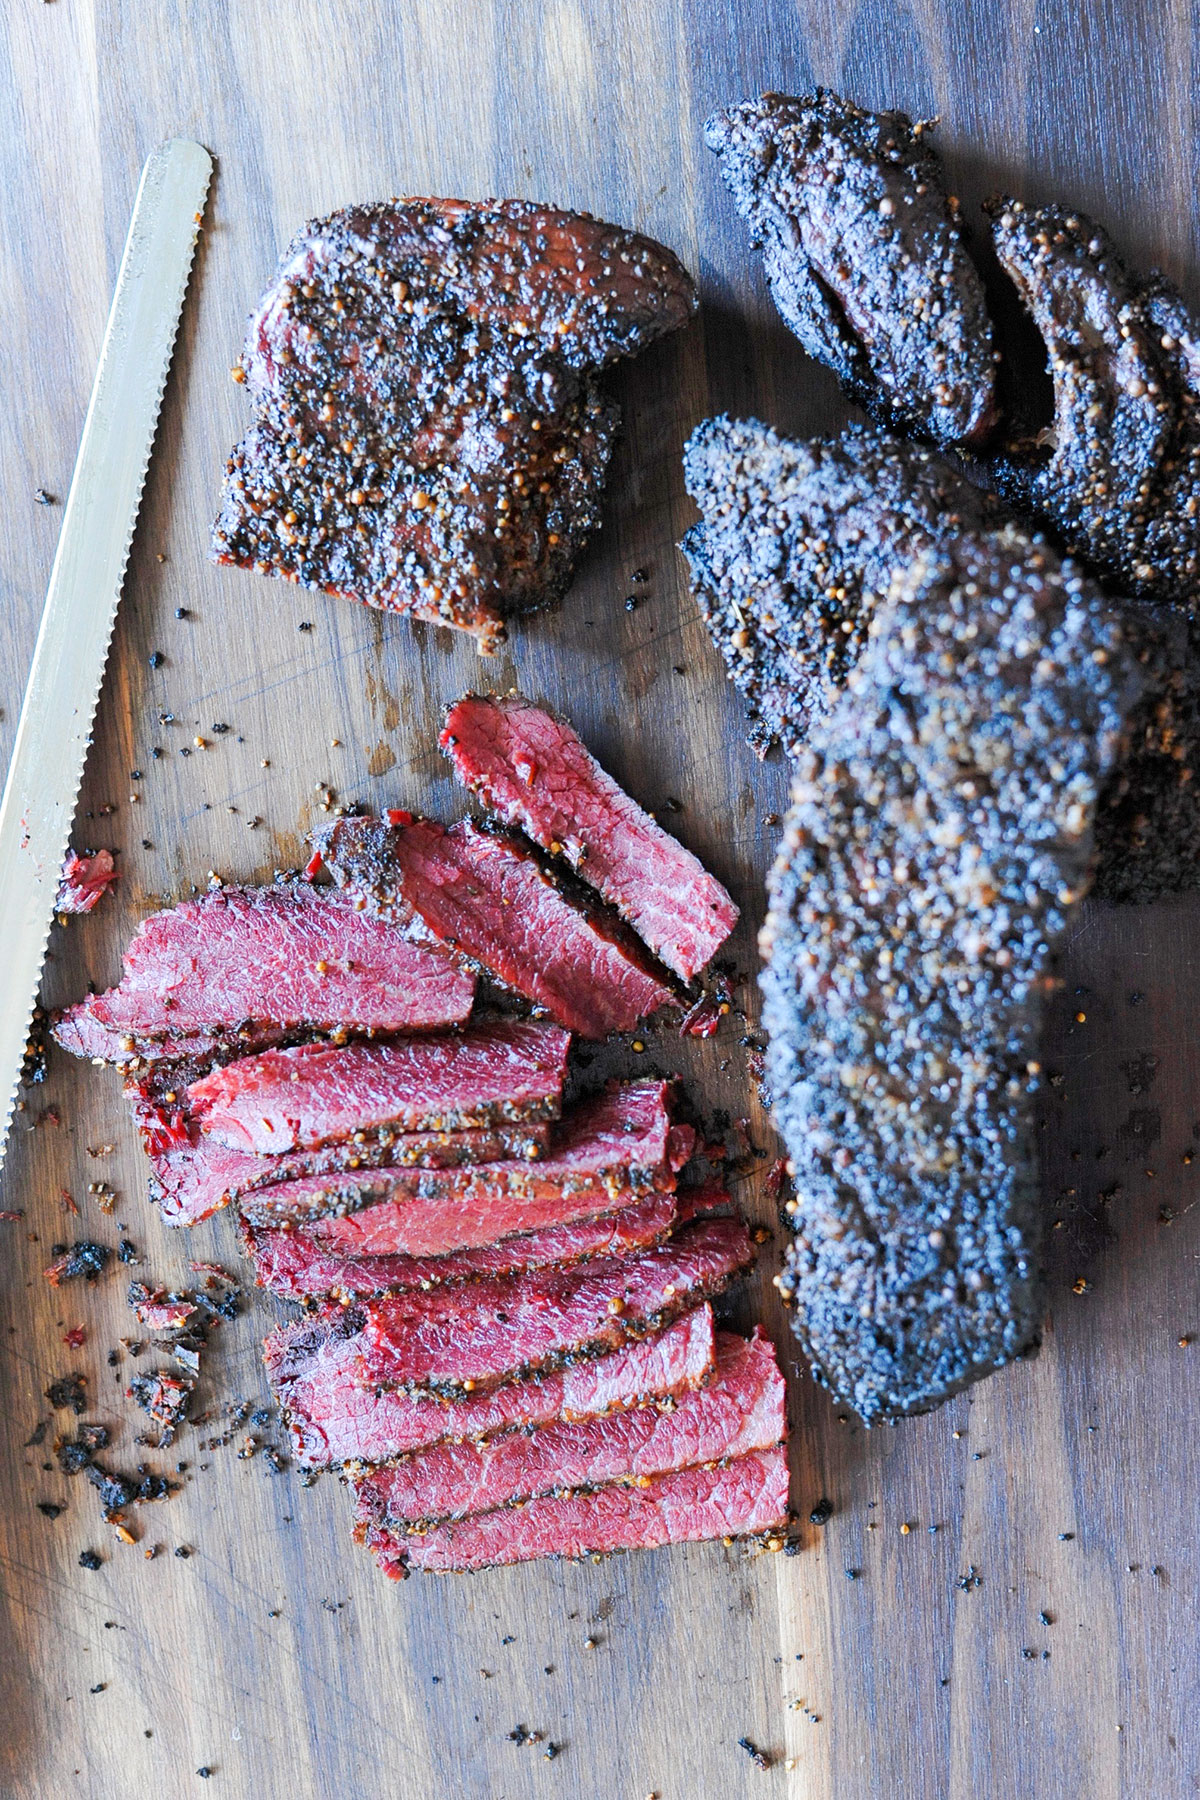
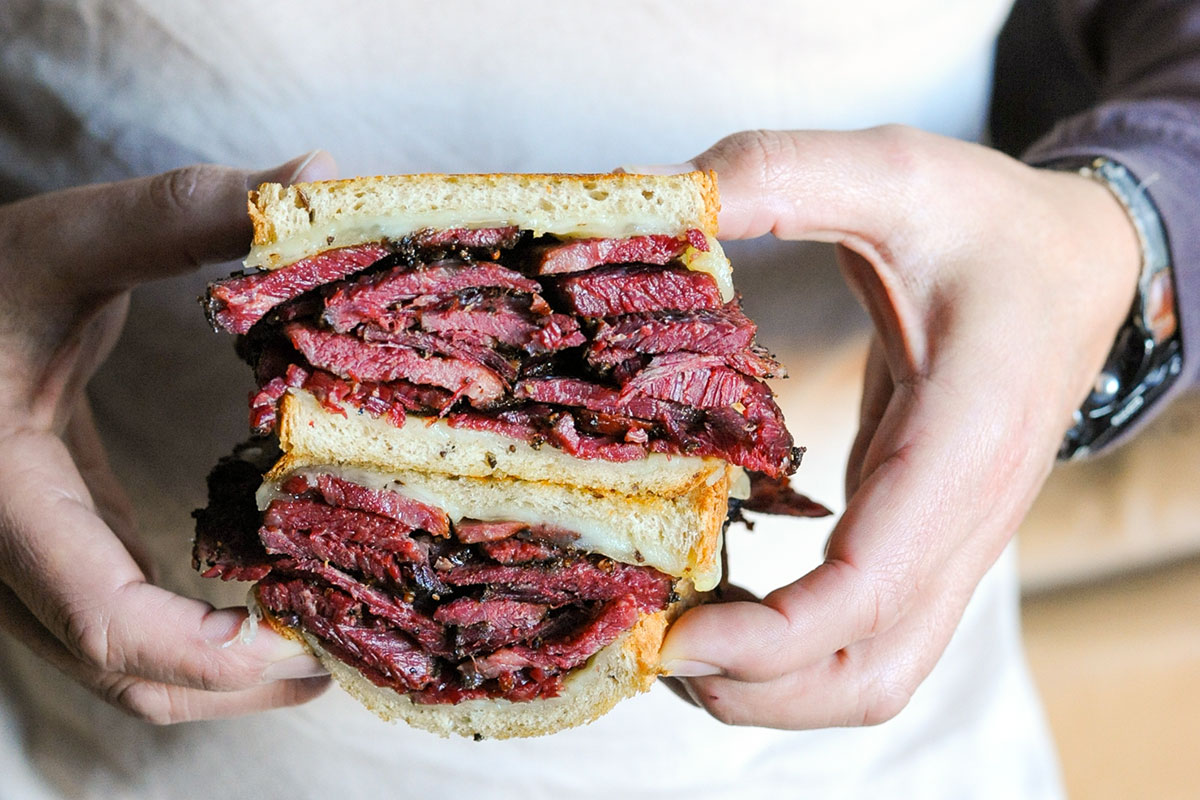
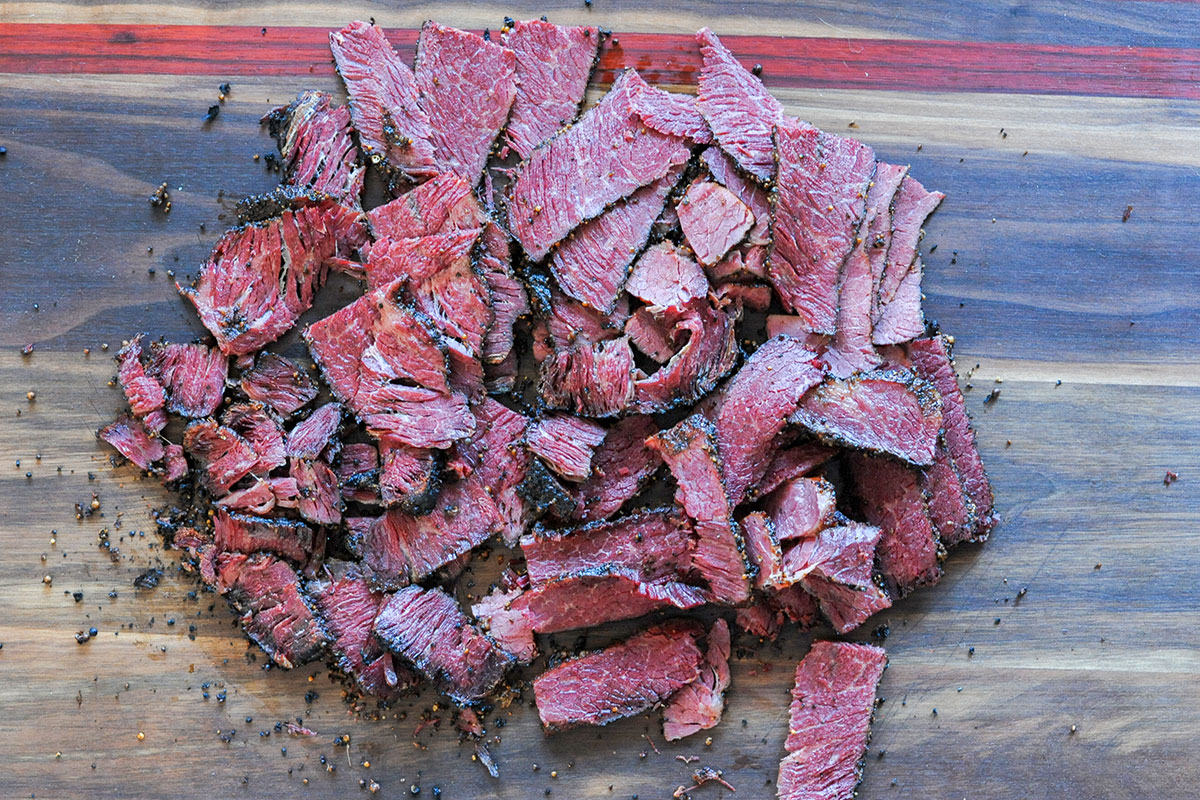
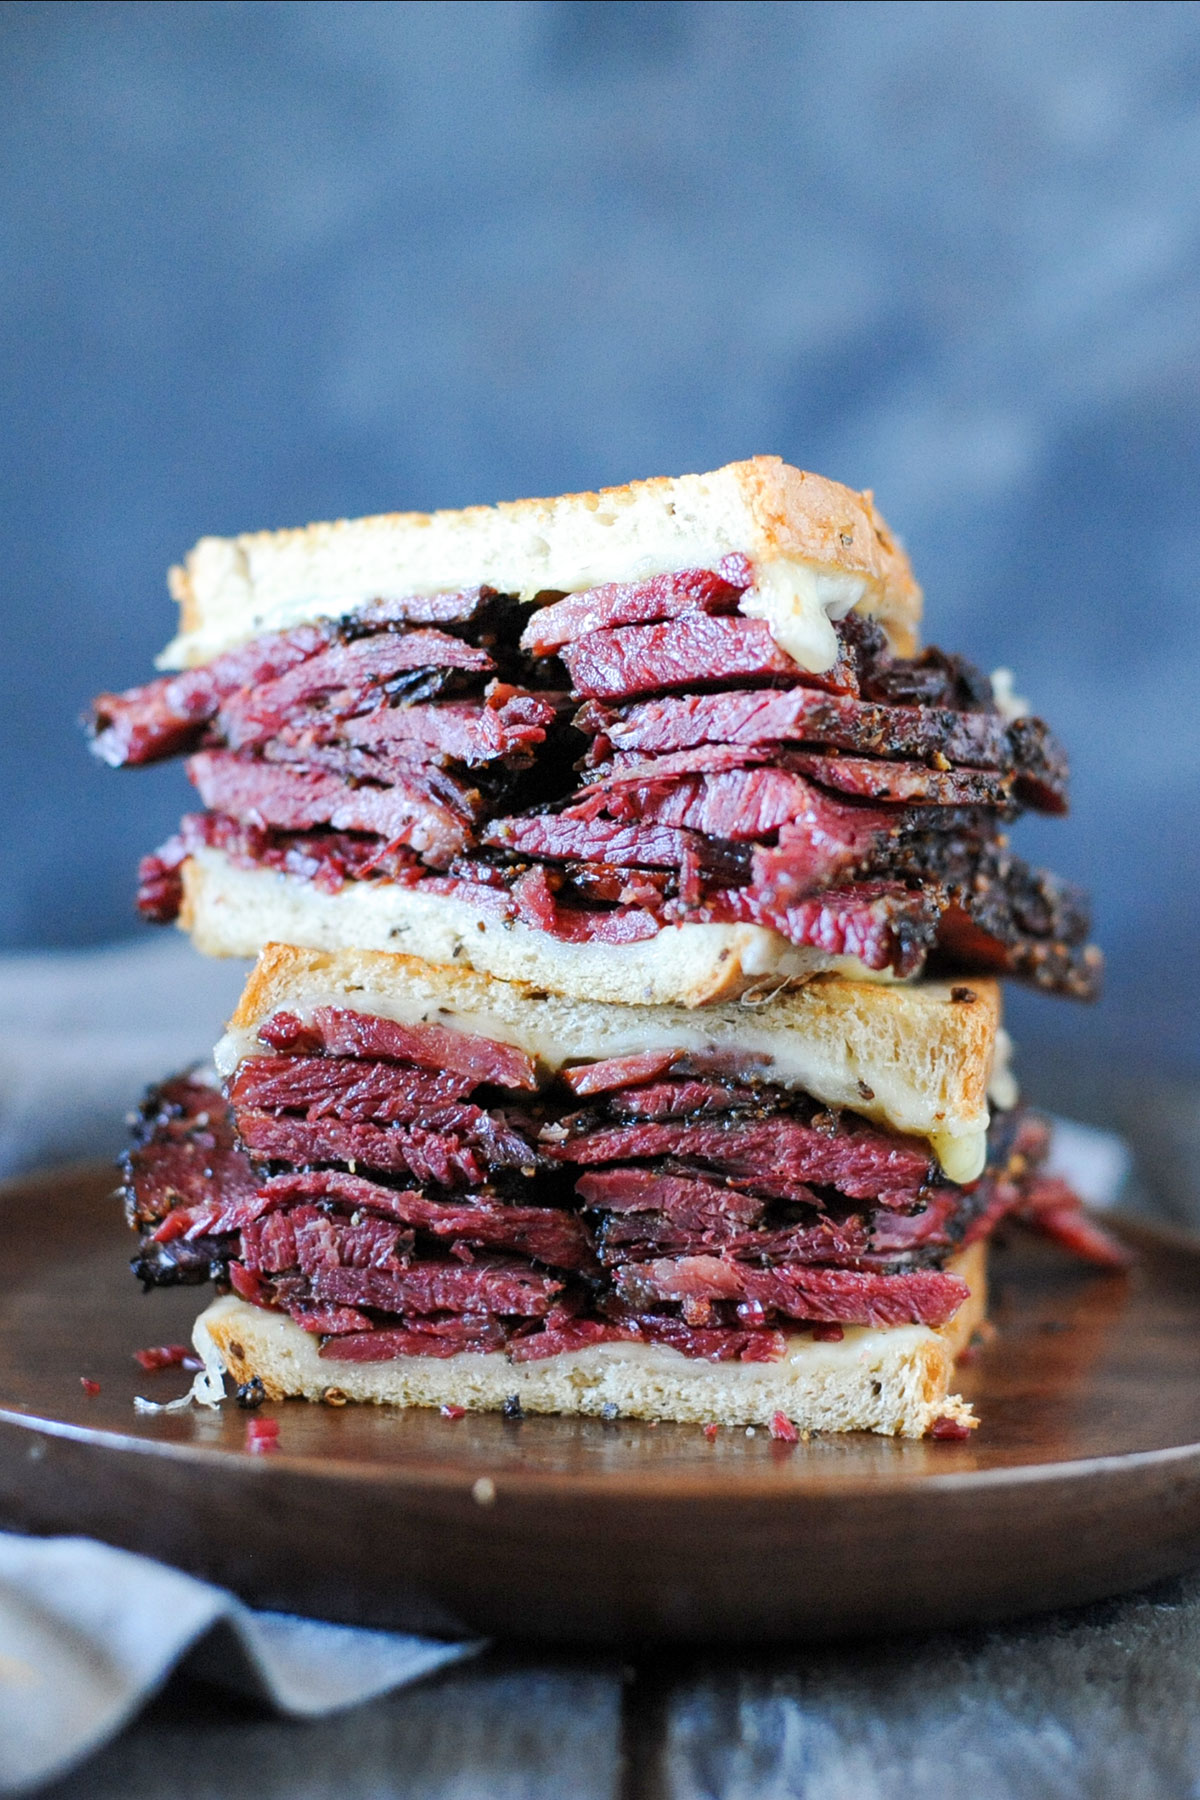
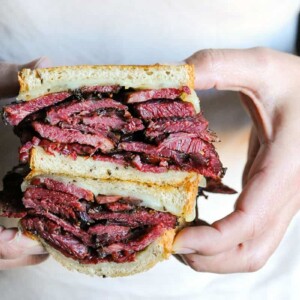
As with all beef cuts, it’s important to slice the beef against the grain. I slice the larger piece in half and then it’s sliced thin lengthwise.
For a true deli slice, try to aim for an 1/8-inch thickness or less.
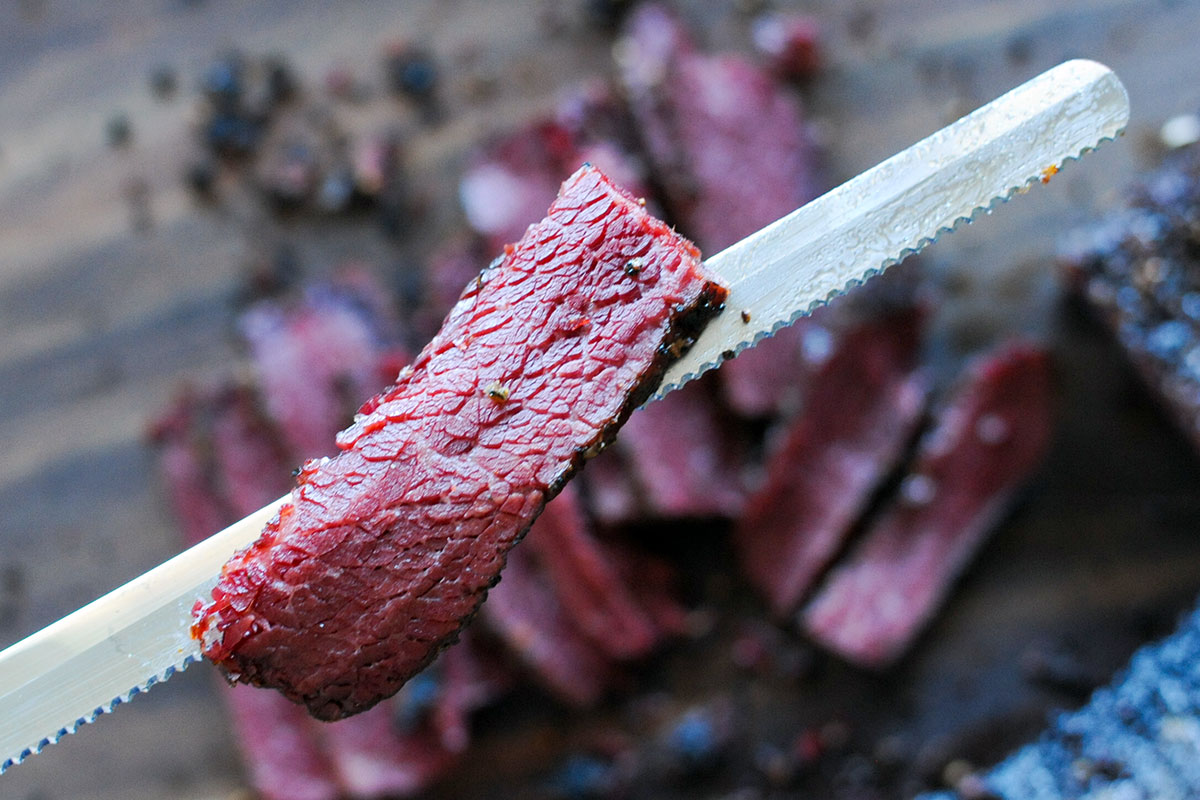
I was so pleasantly surprised by how juicy the chuck roast pastrami was. Usually, I hide my pastrami brisket in mustard, cabbage or Russian dressing, because it can be a little dry, but all this needed was some rye bread and a slice of Swiss cheese.
I honestly doubt I’ll ever make pastrami with brisket again.
Want to know my melty cheese trick for a twist on pastrami on rye?
Go ahead and make a grilled cheese sandwich with rye bread and Swiss cheese (without the meat). Once it's nice and melted, remove it from the griddle. Wait a few seconds, and then separate the slices of bread and pile on the pastrami. It results in perfectly melted cheese and toasted bread every time.
More St. Patrick’s Day Recipes
- Beer-Braised Smoked Corned Beef Burnt Ends
- Corned Beef Brisket Sausage
- Smoked Corned Beef Brisket
- Smoked Bratwursts with Beer-Braised Cabbage and Onions
Want even more great grilling recipes and tips? Subscribe to my newsletter and follow me on Facebook, Instagram and TikTok for my latest grilling adventures. If you make a recipe, please leave a comment and rating below.
Save this BBQ Tip
Enter your email, and I’ll send this link directly to your inbox. Plus, you’ll get new BBQ recipes and tips weekly.
Homemade Chuck Roast Pastrami Recipe
Ingredients
- 2 3-pound chuck roasts
- corned beef brine
- pastrami rub
Corned Beef Brine
- 1 gallon water
- 1 cup kosher salt
- 1/2 cup brown sugar
- 1/4 cup pickling spice
- 1 tbsp pink curing salt
Pickling Spice
- 2 tbsp whole allspice
- 2 tbsp cardamom pods
- 2 tbsp whole cloves
- 2 tbsp coriander seeds
- 2 tbsp whole peppercorns
- 2 tbsp mustard seeds
- 1 tbsp red chili flakes
- 2 tsp fennel seeds
- 2 cinnamon sticks, broken
- 3 bay leaves, crumbled
- 1 tsp ground orange peel
Pastrami Rub
- 1/4 cup coarse ground black pepper
- 2 tbsp coriander seeds
- 1 tbsp mustard seeds
- 1 tbsp coconut palm sugar
- 2 tsp smoked paprika
- 3 cloves garlic
Instructions
- Slice each chuck roast in half along the fat seam. Remove any silverskin.
- Place the chuck roast in a plastic bag. Fill with cooled brine. Close the bag, and place it in a large bowl. Refrigerate for 5-7 days.
- Remove the beef from the brine and rinse under cold water.
- Rub thoroughly with pastrami rub. Place on a baking rack on a sheet pan. Refrigerate uncovered overnight.
- Heat smoker to 250F degrees. Place the brined and seasoned beef on the smoker. Smoke for 2 hours. The beef will develop a mahogany bark.
- Place a disposable pan of water on the smoker. Continue smoking for about 30-90 minutes, until the internal temperature reaches 205-210F degrees. The smaller pieces will likely be ready in 30 minutes, while the larger ones may take 90.
- Let rest 30 minutes. Slice and serve on toasted rye bread.
Corned Beef Brine
- Heat the water in a large pot. Add the remaining ingredients. Cook for 5-10 minutes, until the sugar and salts are dissolved. Cool.
Pickling Spice
- Combine all of the ingredients. Store in a sealed container.
Pastrami Rub
- Place the black pepper, coriander and mustard seeds in a skillet over medium heat. Toast for a few minutes to release the essential oils.
- Place in a food chopper with the remaining ingredients. Pulse to roughly chop the seeds and garlic.
Video
Nutrition
Nutrition information is automatically calculated, so should only be used as an approximation.


You mentioned that the brine could be used for veggies, but I understood that using curing salt (Prague Powder) should not be used for vegetables. I am curious about how safe it is to use this brine with vegetables. Thanks in advance!
I honestly have never heard that before. I have used it on cauliflower, and it was great. It only needed to soak for 12-24 hours.
Amazing! This pastrami turned out so well, way beyond my expectations! I also took your idea about making the grilled cheese then splitting it apart and putting my pastrami on it. Genius. Can’t believe I never thought about doing this??? Anyhow, I am an armature griller/smoker and had no problems making this recipe.
I sure hope you can provide some guidance. I followed this recipe by the book. 2 roasts, about 3lb each. I am 6 hours into my smoke and am at 170 degrees. At this point I’m convinced that this is the most expensive pastrami favored beef jerky. Meat is not tender and is taking easily 3x as long as recipe outlined.
I have a pellet smoker that runs temp very consistently so I simply can not believe that my situation is unique. So sad. $40 in meat, $18, in pellets, $40 in ordered pizza because of this garbage meal. So sad.
I’m sorry to hear you’re having these results. Others have commented that the time of the cook varies, as well. That can depend on temperature outside, altitude, humidity, size of the meat slices, etc. But in the end, the meat should still be juicy. If you live in a dry climate, you may need to add more water to the smoker. I hope in the end by the time it reached 205, you were pleasantly surprised.
you can speed up the cook by wrapping the meat tightly in foil once it stalls in temperature gain its a shortcut for sure but even the pros do it but it will soften the crust thats formed by that point its called the Texas Crutch its still the easiest way to beat a stall
aren’t you concerned about consuming sodium nitrite.I know the the U.S. govt allows it but its been banned in some countrys?
I believe the amount of salt you add and refrigeration is fine until its cooked
Smoked the “pastrami” today, after pickling for 5 days, smoked for 2 hours at 250, hit about 160 degrees, placed pan of water smoked another hour and 30, hit 180, removed from heat, wrapped in foil for about an hour, came out great, grilled rye with mustard and Swiss, will definitely make again
If the chuck roast has to stay in the fridge for essentially one week plus one day (or at least 5 days plus one day), wouldn’t the ‘sell by’ date on the meat be expired? Wouldn’t that be a concern?
The curing salt protects it from going bad.
Like most everyone else mine took a lot longer than a couple hours. My biggest problem was the salt it came out way too salty, so much that I could not even eat it. The flavor and texture were good just way too salty
Mine was salty too. I recommend soaking the meat in water for an hour to get more of the salt out. I’ve done this with buckboard bacon before and forgot to in this recipe.
I cannot wait to make this! I do have a question, would you use the same process for turkey? I was going to substitute a boneless turkey breast for the chuck roast.
That sounds awesome. I’ve never tried it. Let me know how it turns out.
Can I do this in the oven?
Sure. You just won’t get the smokiness.
I have some McCormick pickling seasoning blend already from a vension pastrami I did. Do you know how much I would use of that instead of sourcing all the ingredients for the pickling?
Sugar alternative for those of us living low carb?
I’m really not sure. I don’t eat low carb, so I haven’t experimented with a substitute. But this is just the brine, which gets thrown away after it soaks. You won’t get a lot of that sugar in the end.
Maggie try Swerve brown sugar replacement, it’ll do the trick!
I always kick myself for not reading the comments first. Its at 158 now and is taking about 20 minutes to move up 1 degree. It’s gonna be a while for sure. But it sounds like it will be worth it.
Freezing….
After brine can I add rub and freeze then thaw when I want to smoke? Or should I smoke then freeze. It is really good but I would like to do smaller amounts more often and think I cools just throw one on when doing other things.
I recommend going through the whole process of smoking it. Then freeze slices and pull them out when you want them.
Goooood Gaaaaawd! This was some killer chuck roast! I started with a prime chuck roast from Costco. I think it was a little under 6 pounds. I didn’t cut or trim mine. Cured it for 7 days and there were a few spots that didn’t get cured but, that is fine. Smoked it for 3 hours at about 150 and turned up the heat to 250. I smoke with a trawler. Using a mix of pecan and hickory. Smoked at 250 for 6 hours. Was in the smoker for a total of 9 hours.
Let it rest for about 10 minutes then sliced about 1/8 inch. Griddled some rye with melted Swiss. Kraut, and Russian dressing. Might have been one of the best sandwiches I have ever had. Meat was tender and juicy. Fat had rendered very well. What was left was simply melt in your mouth delicious! The crust on this was dark, full of flavor, and I couldn’t get enough.
You could seriously smell this on the smoker all over my neighborhood. Even had one of my neighbors come over and see what I was coming because he could smell it three houses down. Haha!
Thank you for the recipe Christie!
Meant to say that I smoked this on a Traeger
I love this recipe. I always used brisket point before seeing this post This is a lot easier than separating the point and flat and trimming it up I can also almost always find chuck roast whenever I want it. Not so with brisket. Results are very similar. I see a lot of people are experiencing really long cook times. I always wrap mine when I hit the stall. Pastrami is usually steamed at the top delis. I think wrapping it accomplishes this without having to put a bowl of water in the smoker and also speeds the cook along. I also like to soak for an hour in water after the brine to reduce the salt. You can always salt it when you eat it if you want more.
Thanks, Scott! Appreciate the feedback. Great suggestions.
A buddy gave me some venison loin, and I used your method to make venison pastrami. The only thing I did different was soak it in water for 8 hours after brining it to get a bit of the salt out. After smoking it in applewood, it was utterly amazing. Do you have any recipes for Prociutto?
That’s awesome! I haven’t tried prosciutto yet, but it’s on my bucket list.
Great recipe! However, At 250 degrees I had to cook this for at least 6 hours to get the meattemperature even close to to 200 degree mark. Both roast were just under 3lbs each.
Still a great recipe!…tasty as all get out.
Thanks for the feedback. It seems others are having a similar experience. I’ll make it again in the near future and test out my times again. I’m glad you enjoyed the flavors.
I am six hours into smoking the chuck roast and I wasn’t sure how you were able to get the pieces up to 203 degrees in 3 or even 4 hours at 250 smoker temp. I have cranked my grill up to 300 degrees in hopes of reaching the 203 finish point in the next two hours. Obviously, like brisket, chuck roast will go through the “stall” at 150-160 degrees internal. That is where I am now.. I’ve used chuck roast before to make “Poor Man’s Burnt Ends” and it has always taken 6 or more hours. I love the recipe and I hope the taste is all you said it will be, I’m just disappointed in the fact that your time just doesn’t seem possible to reach in a three hour or slightly more time.
I’m sorry to hear yours is taking longer. I can understand your frustration. Mine definitely only took a few hours. The smaller pieces were actually done sooner. Perhaps your roasts were larger or you’re at a higher elevation. I hope you enjoy it once it’s ready.
I wouldnt worry about how long it takes my 12 pound brisket took me 10 hrs at 225 deg it turn out great
It could very well be due to a larger number of factors – namely the size of the meat (especially if they’re all one piece or different chunks as in the pictures above). I usually end up more than a few hours. Be sure that you are not using your grill temperature gauge but instead, use a meat thermometer placed centimeters above the grate. That’s where you want to measure your grill temp – at grate level. The thermometer on the hood will differ about 20 degrees C.